

Summary
What is TestNG?
Why Use TestNG with Selenium?
Install and Set up TestNG
Introduce some TestNG annotations
Run Testcase with TestNG
Details
What is TestNG?
This blog will provide basic concepts of TestNG.
TestNG is an open-source test automation framework for Java. In TestNG, NG stands for "Next Generation".TestNG is inspired by JUnit and NUnit but it overcomes the constraints and disadvantages of JUnit and introduces some new functionalities that make it more powerful and easier to use.
Why Use TestNG in Selenium?
By using TestNG in Selenium, you can generate a proper format for the test results. These following are some features of TestNG that will answer why TestNG is recommended to use in selenium.
+ TestNG can generate a proper report, and you can quickly know how many test cases are passed, failed, and skipped.
+ In TestNG, annotations are easier to understand.
+ Multiple test cases can be grouped more easily by converting them into a testng.xml file.
+ The same test case can be executed multiple times without loops.
Install and Set up TestNG
■ Install TestNG plugin from update site
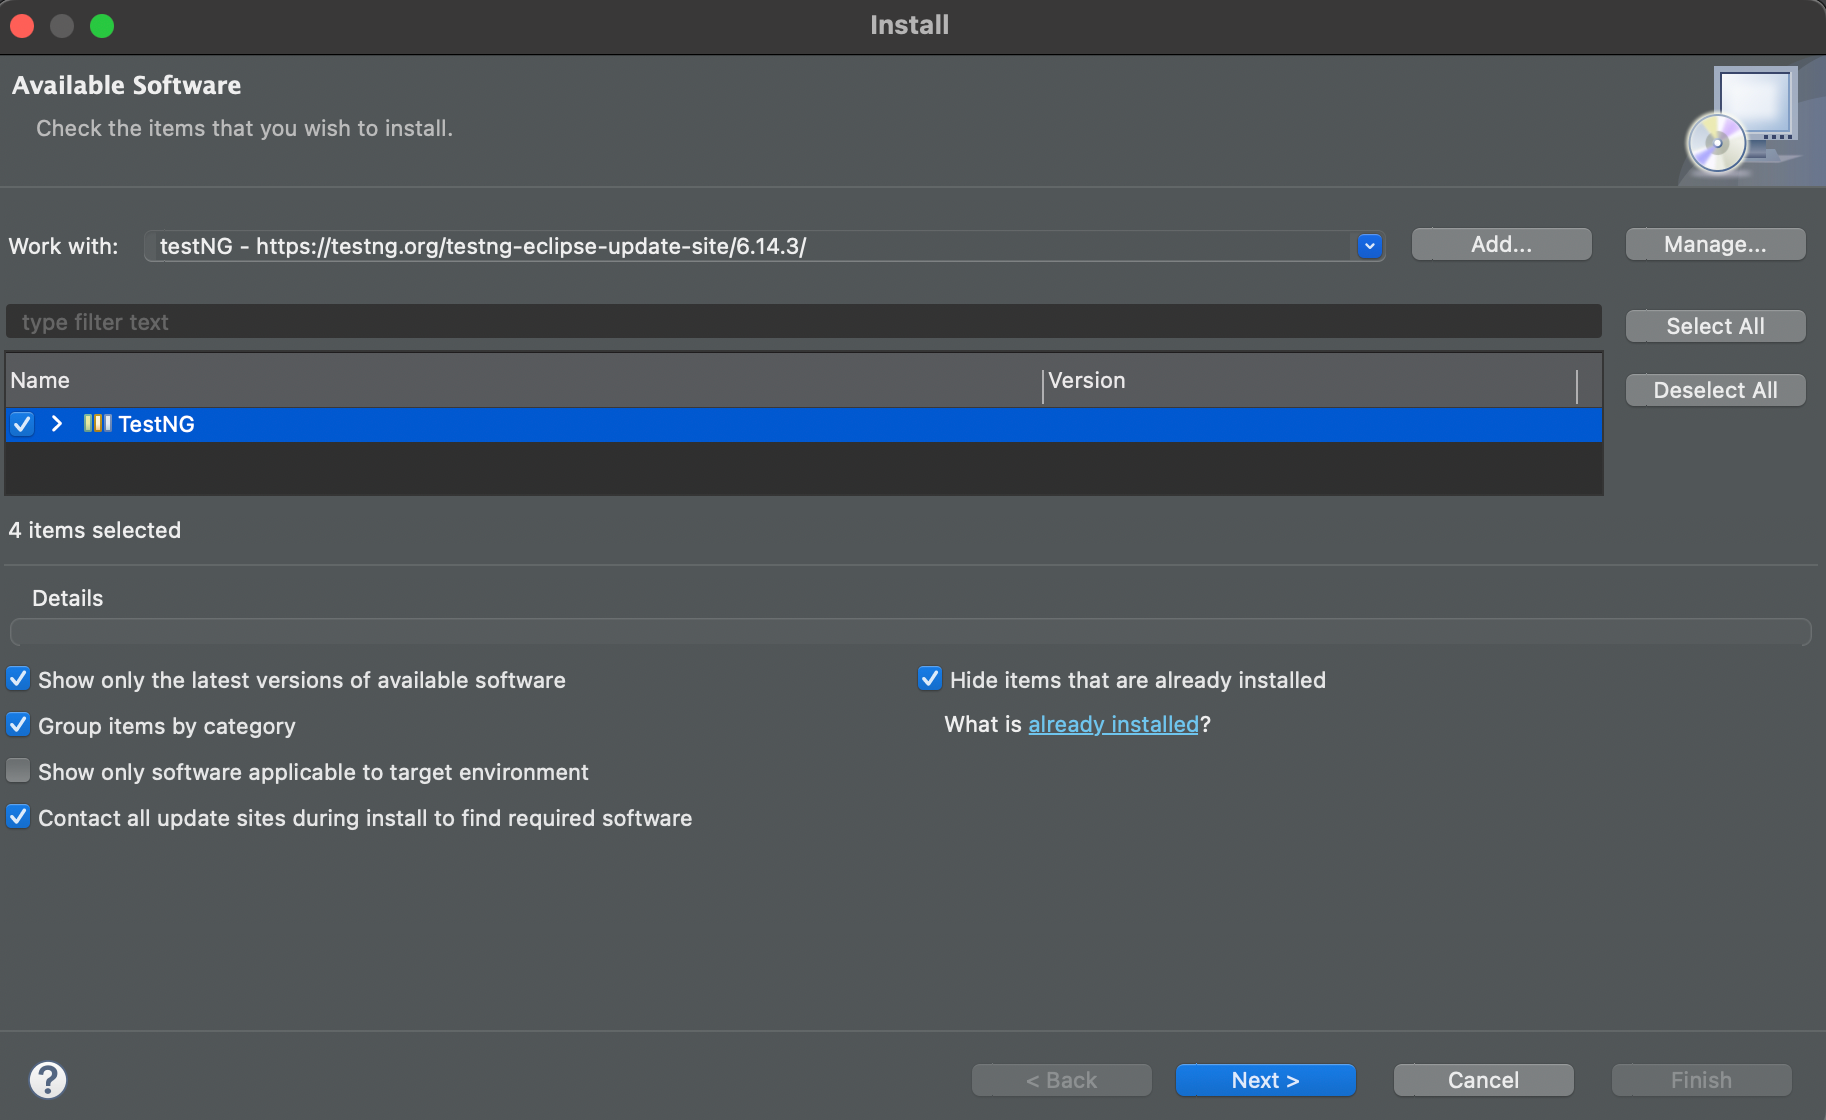
Select Help > Install New Software
Enter the below URL in "Work with:" field.
Link: https://testng.org/testng-eclipse-update-site/6.14.3/
Make sure the TestNG check box is checked and click Next. Eclipse will then guide you through the process.
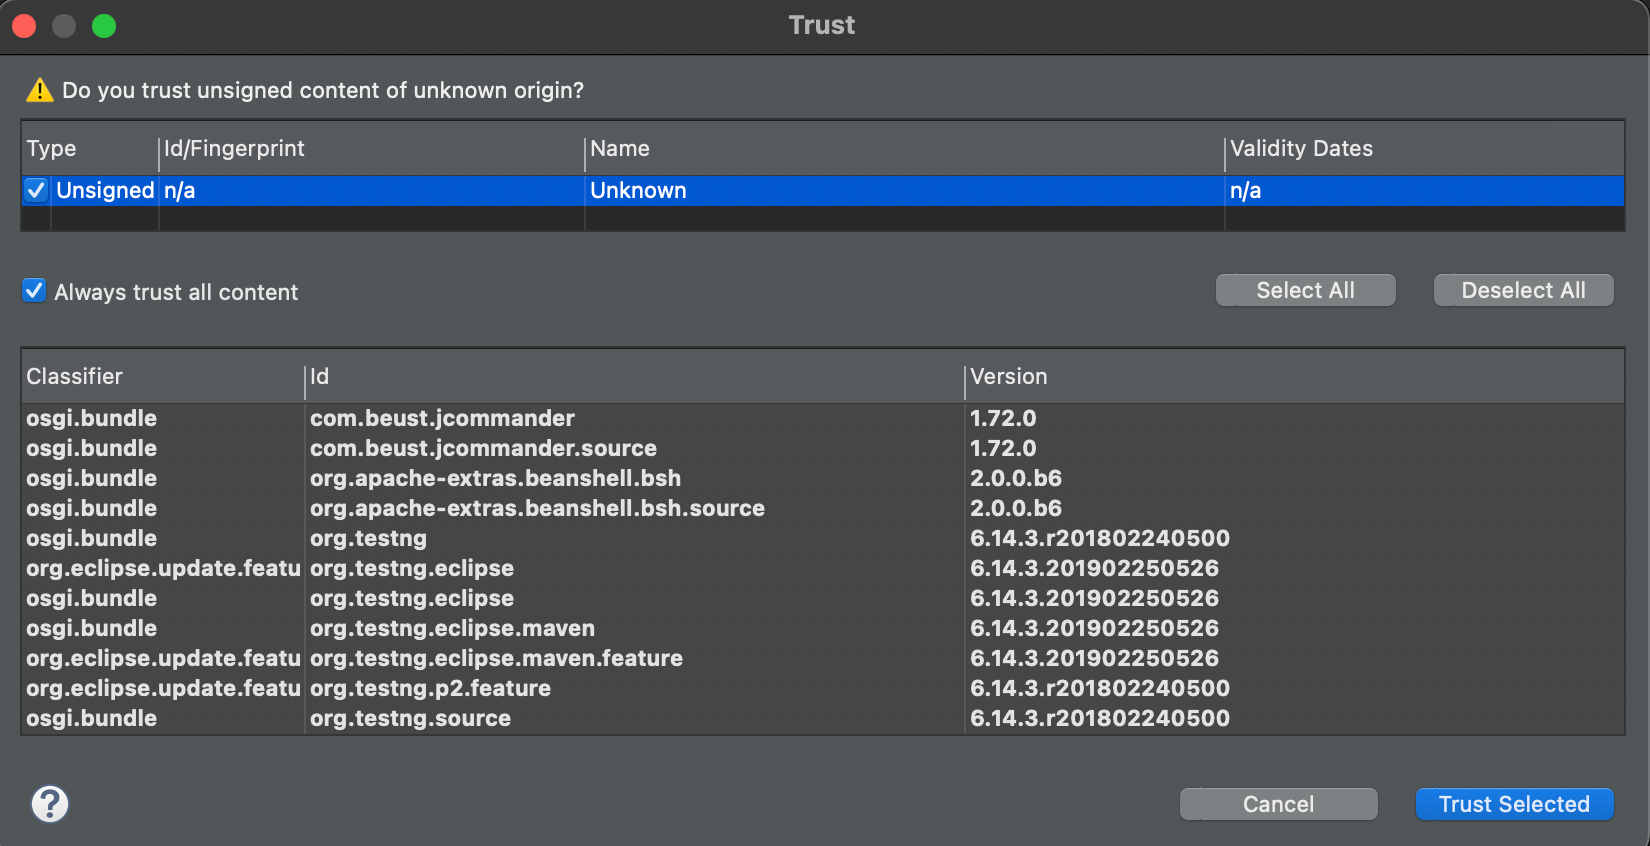
Check “Always trust all content” and click Trust Selected.
Restart Eclipse to finish installing.
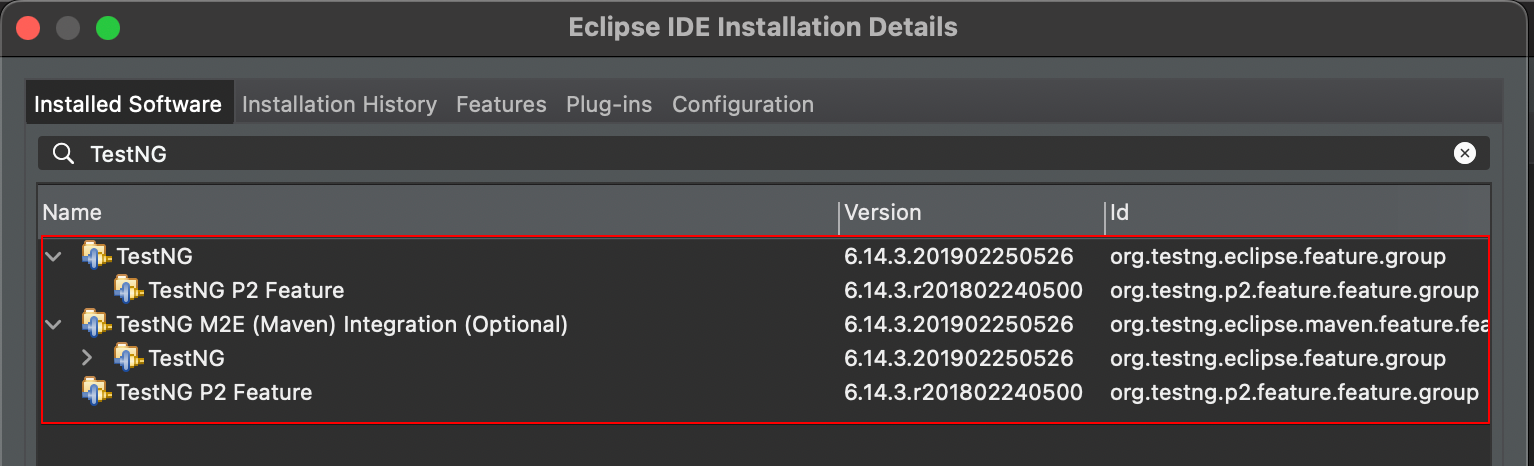
■ Check TestNG plug-in is installed successfully
Select Eclipse > About Eclipse > Installation Details
At the Installed Software tab > Enter “TestNG” in the search textbox and installed TestNG will appear.
■ Download TestNG libraries in the link below
Link: https://mvnrepository.com/artifact/org.testng/testng/6.14.3
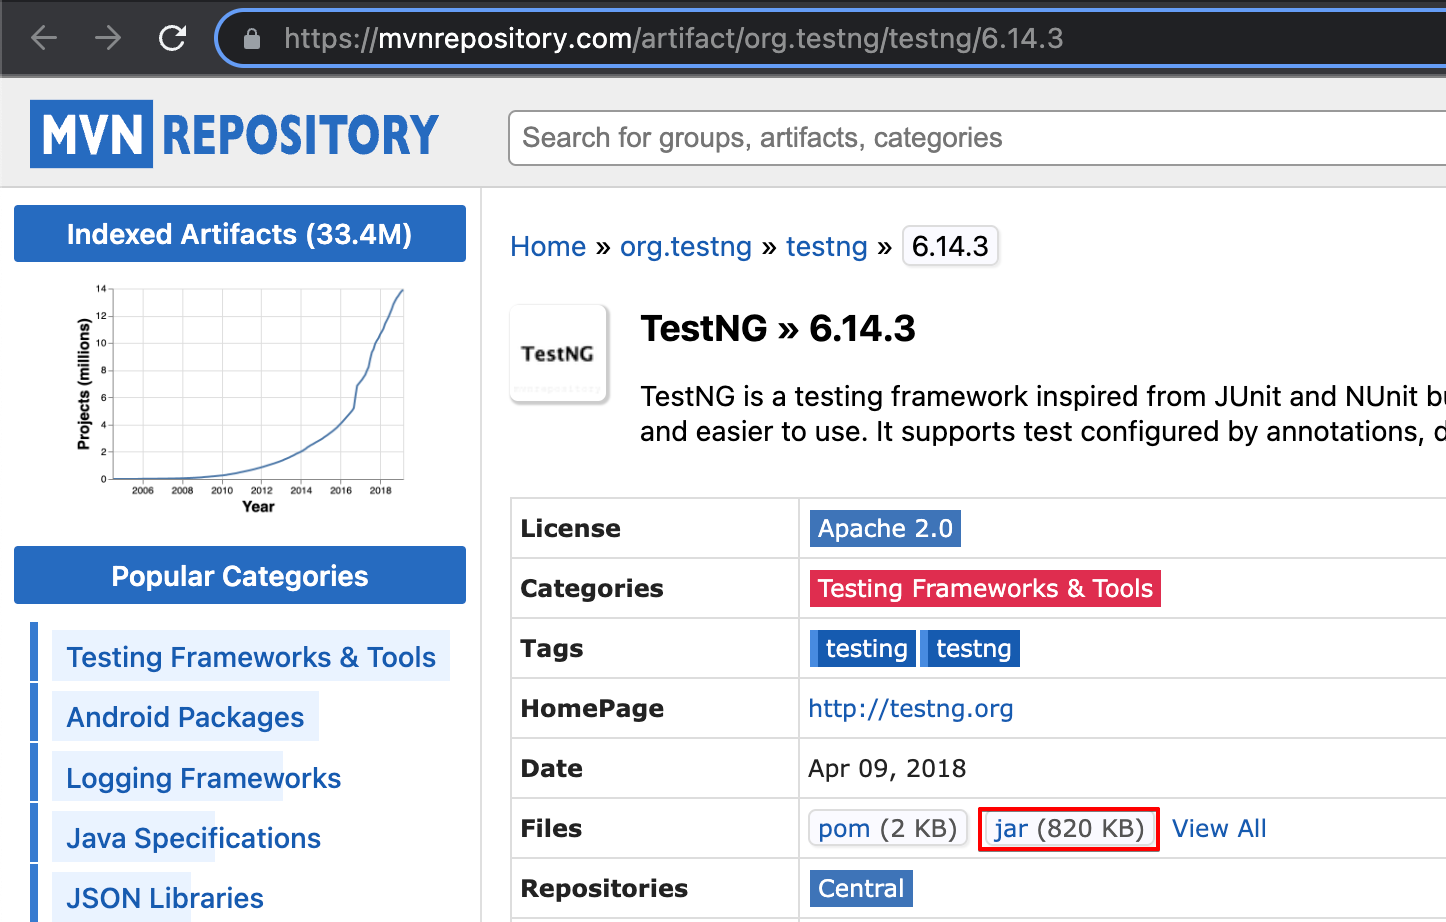
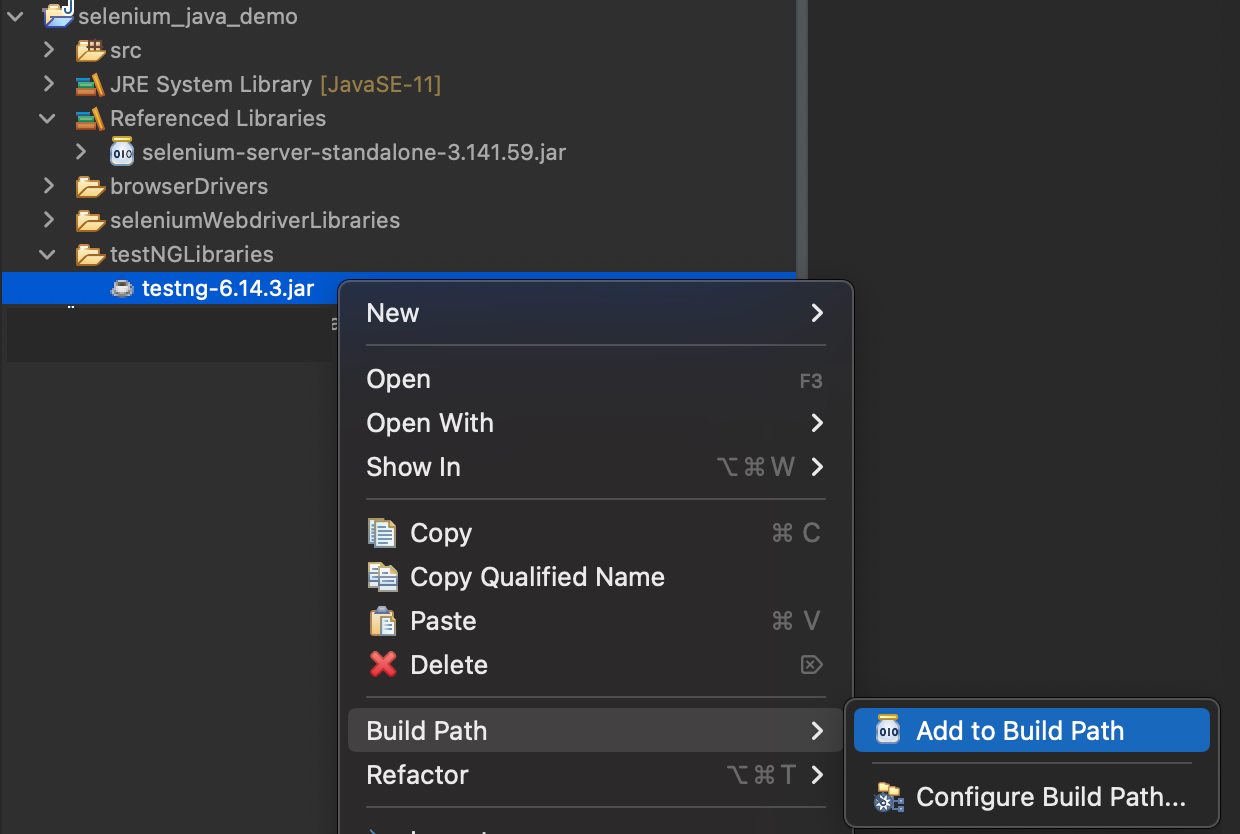
Create folder “testNGLibraries” and copy & paste downloaded TestNG (.jar file) to it.
Right-clicking on TestNG (.jar file) > Build Path > Add to Build Path.
Introduce some TestNG annotations
https://www.javatpoint.com/testng-beforesuite-annotation
https://testng.org/doc/documentation-main.html
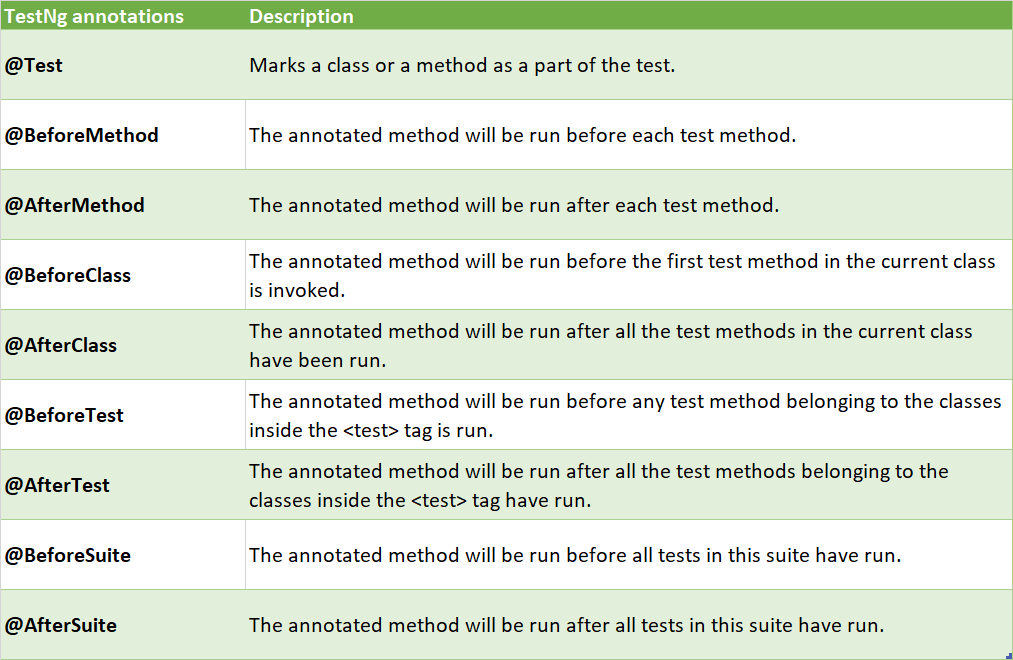
List of TestNG annotations and how these work.
■ Sample code with TestNG annotations
Let's understand through the sample code below:
package selenium.webdriver;
import org.testng.annotations.AfterClass;
import org.testng.annotations.AfterMethod;
import org.testng.annotations.AfterSuite;
import org.testng.annotations.AfterTest;
import org.testng.annotations.BeforeClass;
import org.testng.annotations.BeforeMethod;
import org.testng.annotations.BeforeSuite;
import org.testng.annotations.BeforeTest;
import org.testng.annotations.Test;
public class testNG_Demo {
  @Test
  public void Testcase_01() {
	  System.out.println("    Testcase_01 is executed.");
  }
  @Test
  public void Testcase_02() {
	  System.out.println("    Testcase_02 is executed.");
  }
  @BeforeMethod
  public void beforeMethod() {
	  System.out.println("   BeforeMethod is executed.");
  }
  @AfterMethod
  public void afterMethod() {
	  System.out.println("   AfterMethod is executed.");
  }
  @BeforeClass
  public void beforeClass() {
	  System.out.println("  BeforeClass is executed.");
  }
  @AfterClass
  public void afterClass() {
	  System.out.println("  AfterClass is executed.");
  }
  @BeforeTest
  public void beforeTest() {
	  System.out.println(" BeforeTest is executed.");
  }
  @AfterTest
  public void afterTest() {
	  System.out.println(" AfterTest is executed.");
  }
  @BeforeSuite
  public void beforeSuite() {
	  System.out.println("BeforeSuite is executed.");
  }
  @AfterSuite
  public void afterSuite() {
	  System.out.println("AfterSuite is executed.");
  }
}
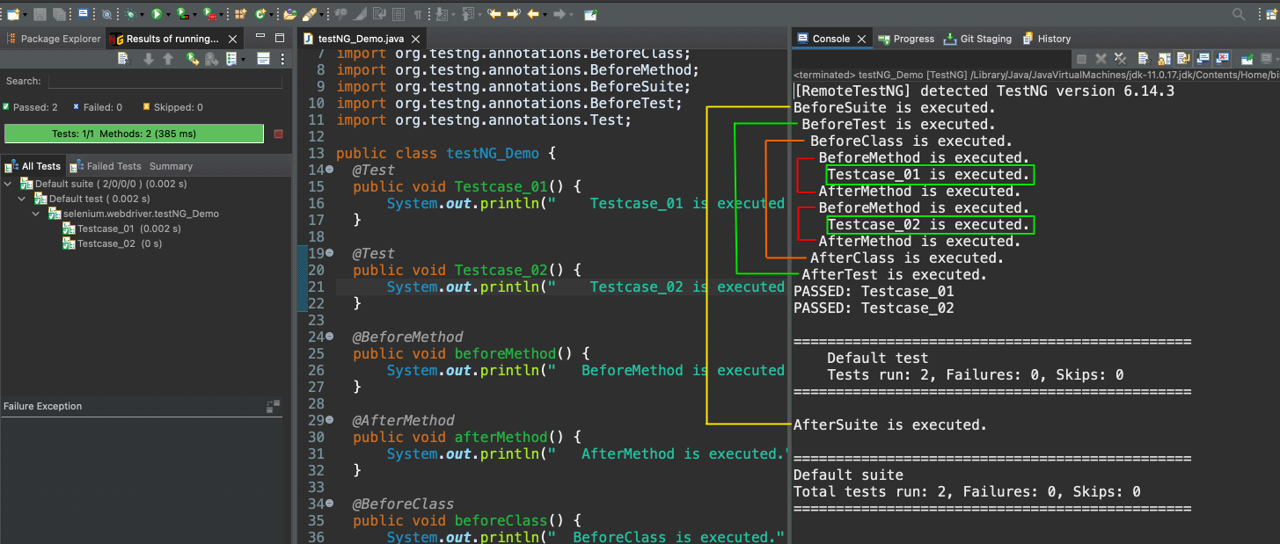
When the above code is executed, the output will appear in the sequence as shown below.
Run Testcase with TestNG
Now we will run the code in the previous blog’s example code with TestNG.
See the previous blog here: #1 - Selenium with Java - Basic settings
Create a new class named “RunTestcaseWithTestNG” and copy the below code.
package selenium.webdriver;
import org.openqa.selenium.By;
import org.openqa.selenium.WebDriver;
import org.openqa.selenium.chrome.ChromeDriver;
import org.testng.annotations.AfterClass;
import org.testng.annotations.BeforeClass;
import org.testng.annotations.Test;
public class RunTestcaseWithTestNG {
	// Declaring driver variable
	WebDriver driver;
	@BeforeClass
	public void beforeClass() {
		// get project path
		String projectPath = System.getProperty("user.dir");
		// setting the driver executable
		System.setProperty("webdriver.chrome.driver", projectPath + "/browserDrivers/chromedriver");
		// Initiating and opening chrome browser
		driver = new ChromeDriver();
	}
	@Test
	public void TestCase_01_Open_Blogs_Page() {
		// open browser with desired URL
		driver.get("https://blog.shiftasia.com/");
	}
	@Test
	public void TestCase_02_Open_Testing_Blogs_Page() {
		// click to "Testing" link in header nav
		driver.findElement(By.xpath("//div[@class='header__right']//a[text()='Testing']")).click();
	}
	@AfterClass
	public void afterClass() {
		// closing the browser
		driver.close();
	}
}
Instead of running test script through main() method, now we use TestNG to run test script directly.
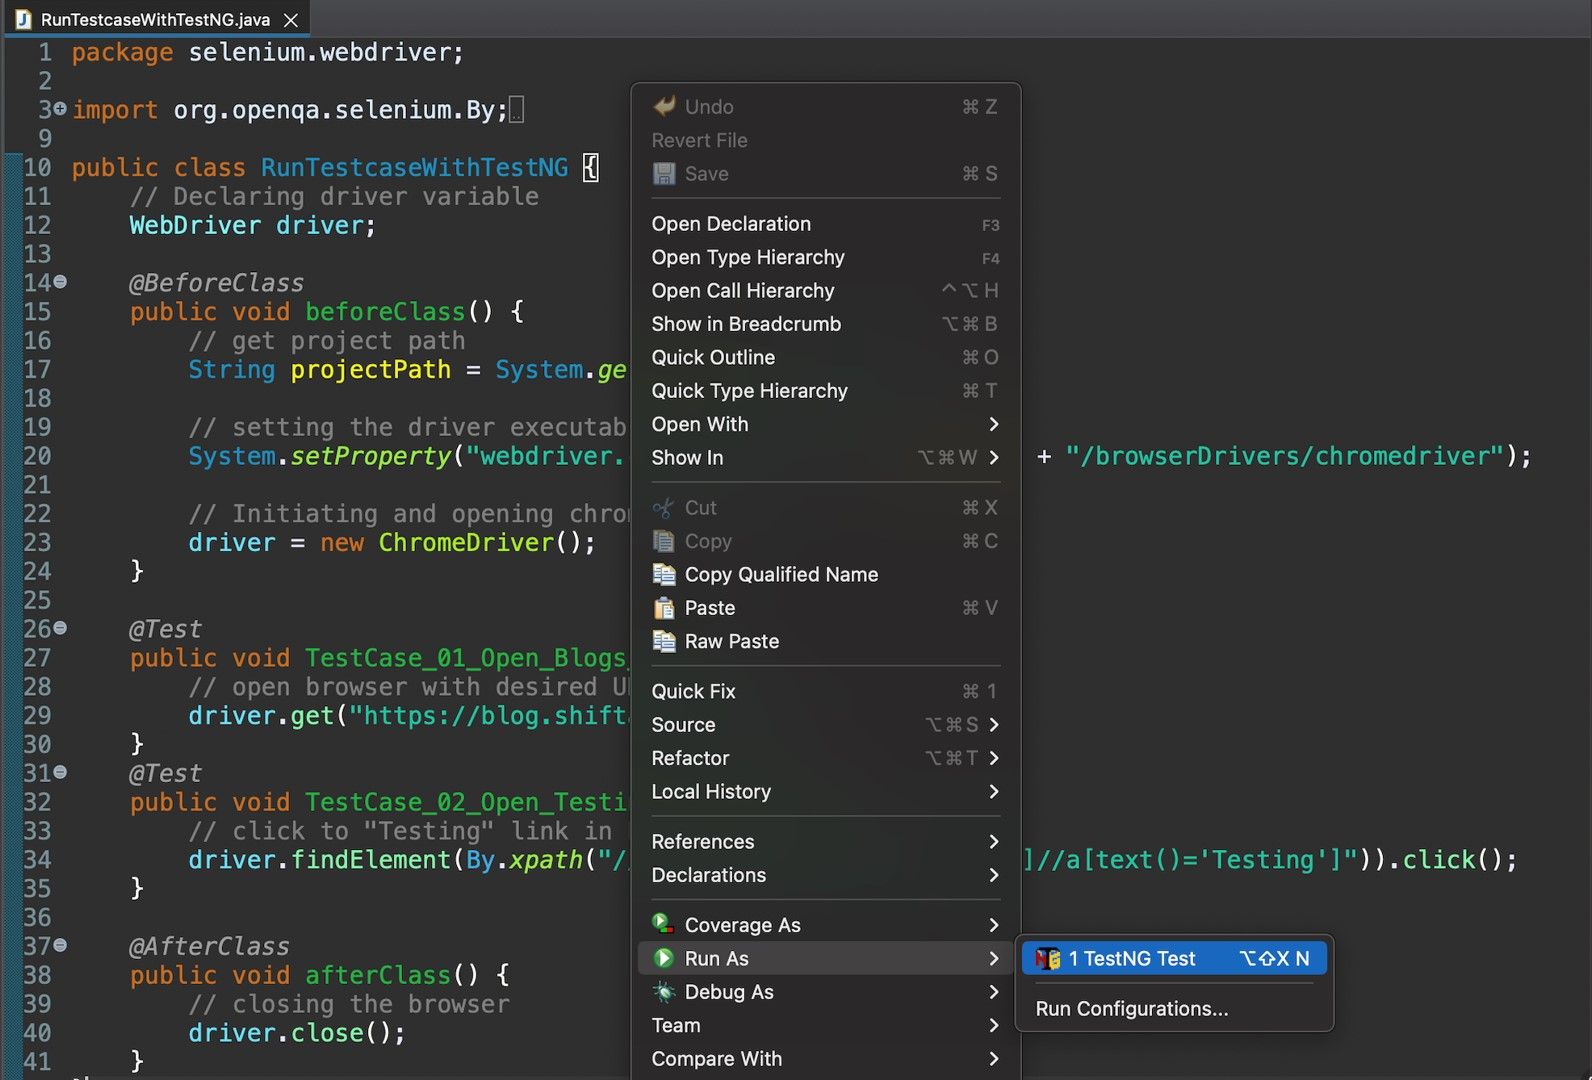
The code will be run in the orders below:
- beforeClass method is run first because it is annotated with @BeforeClass.
After code is run, Chrome browser will be opened. - Next, Below two method is annotated with @Test so these methods are treated as two test cases.
TestCase_01_Open_Blogs_Page
After code is run, the browser navigating to blogs website of SHIFT ASIA
TestCase_02_Open_Testing_Blogs_Page
After code is run, “Testing" link in the header menu is clicked and navigating to testing page. - Finally, after all methods with @Test annotation are run, afterClass is run.
After code is run, Chrome browser will be closed.
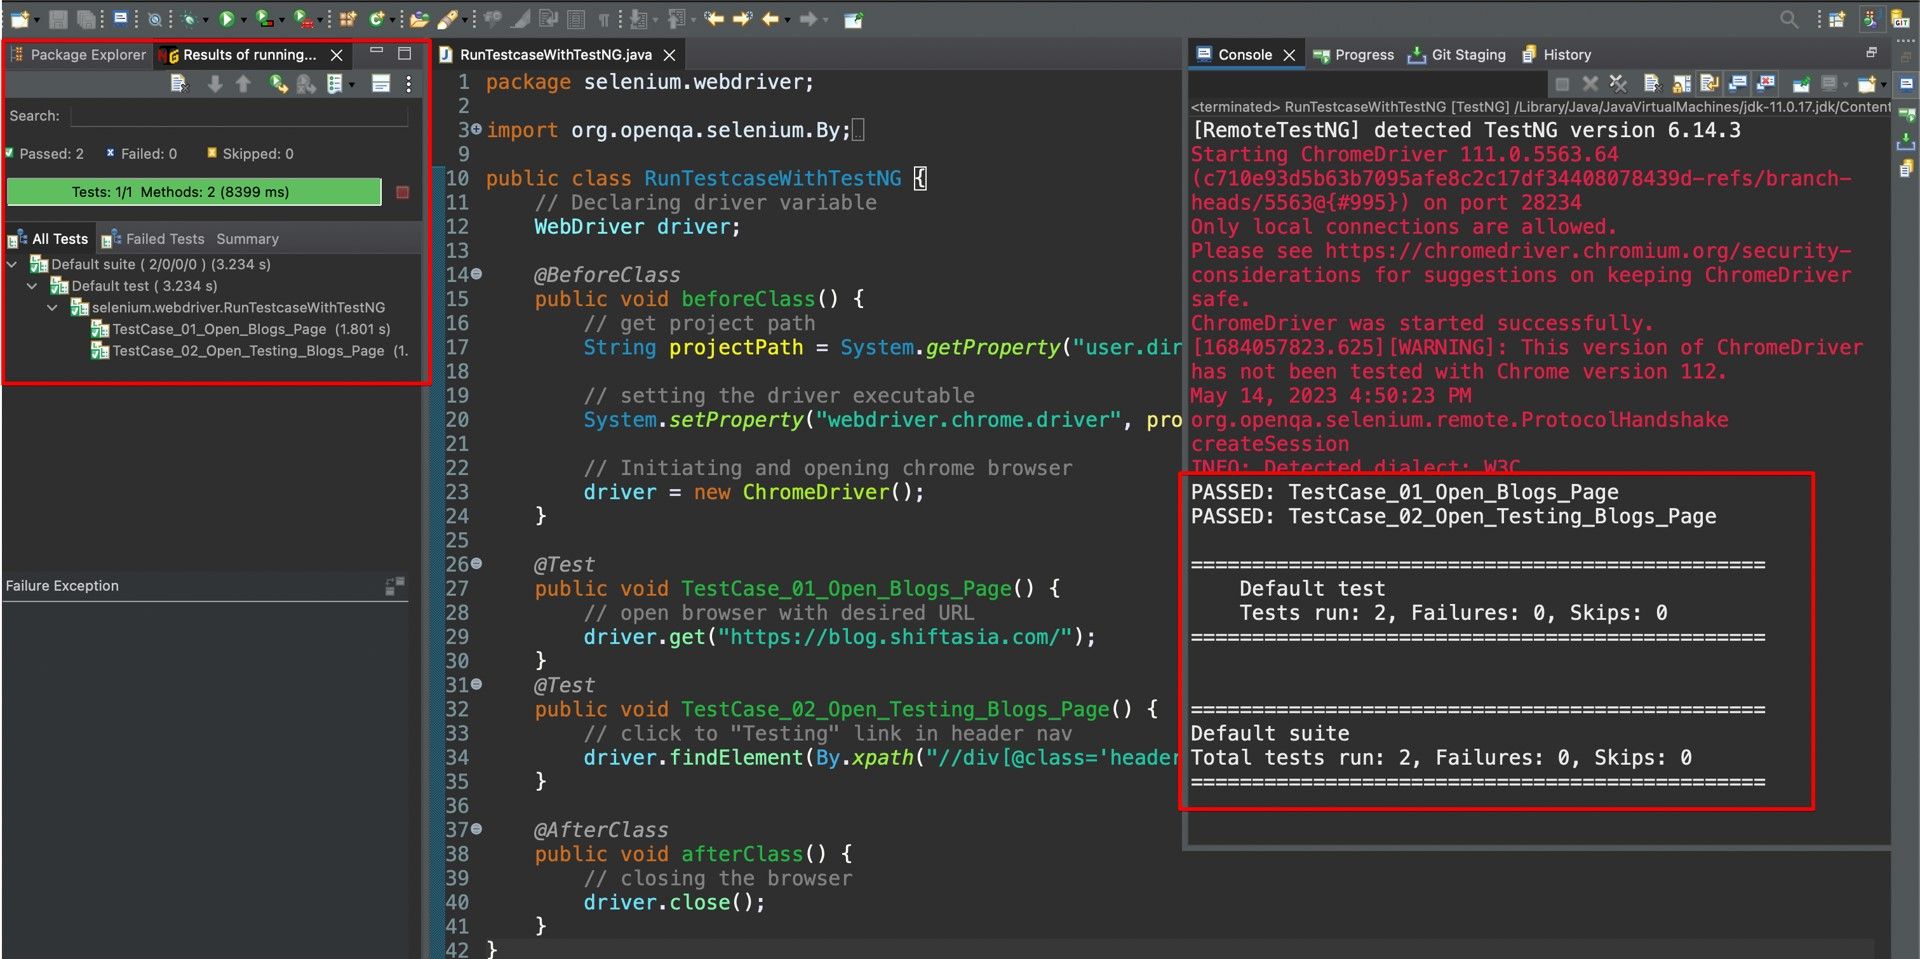
The result is the same when running the code in the previous blog’s example. But when using TestNG we can generate a proper report, and you can quickly know how many test cases are passed, failed, and skipped.
In the below output, we observe that all the test cases run successfully without any failure.
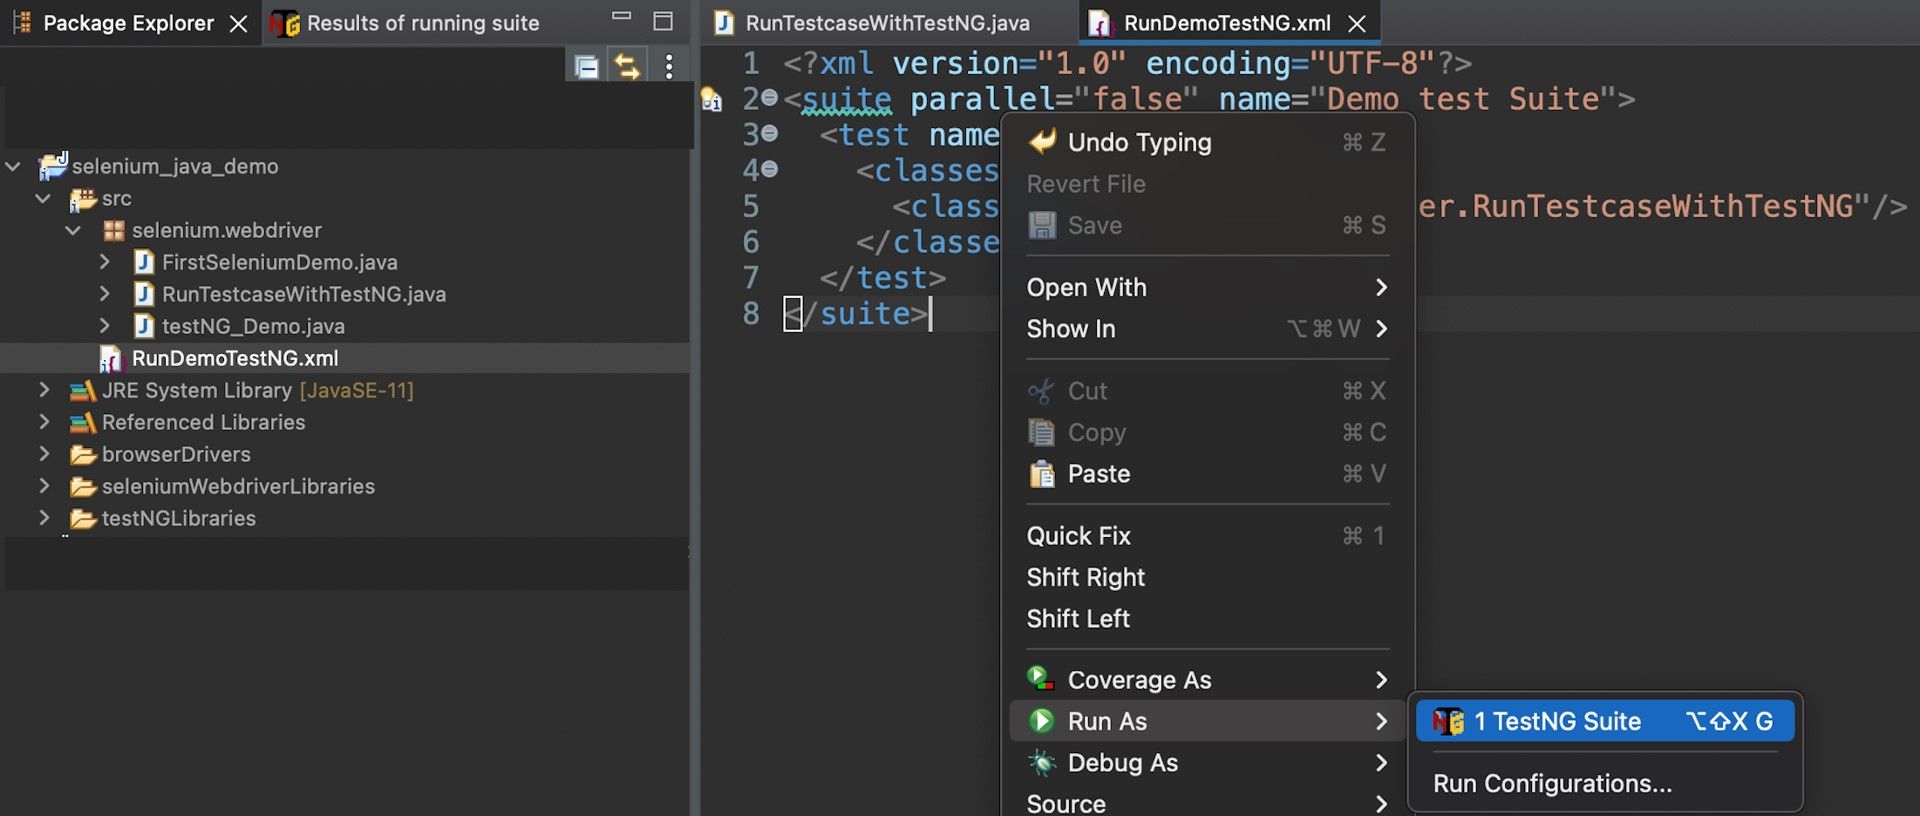
Run test script through a .xml file
Create a new class named “RunDemoTestNG.xml” and copy the below code.
<?xml version="1.0" encoding="UTF-8"?>
<suite parallel="false" name="Demo test Suite">
  <test name="Sample Test">
    <classes>
      <class name="selenium.webdriver.RunTestcaseWithTestNG"/>
    </classes>
  </test>
</suite>
Right-click on code area-> Run As-> TestNG Suite
(or Right click on the “RunDemoTestNG.xml”-> Run As->TestNG Suite)
Output is the same when we run test script directly in class test.

Conclusion
In this blog provides basic concepts of TestNG and know how to install and set up TestNG.
After that, we know how to run test scrip with TestNG directly or run through a .xml file.
Thank you for reading and hoping that helps you guys.
Reference
https://testng.org/doc/documentation-main.html
https://www.browserstack.com/guide/testng-annotations-in-selenium
https://www.toolsqa.com/testng/testng-annotations/


