


Crafting user-friendly and robust forms is an essential skill for any React developer. But juggling form state, validation, and user interactions can quickly become a tangled mess. Enter Formik and Yup, a powerful duo that simplifies form development in React, especially when combined with TypeScript for type safety. Let's dive into their superpowers and how they work together to create exceptional forms!
1. What is formik and yup?
Formik: The Form Management Maestro

Yup: The Validation Superhero

2. Formik and Yup Working Together
That is The Dream Team in Action: Formik and Yup Working Together.

While Formik excels in form state management and user interactions, it doesn't have built-in validation features. This is where Yup steps in as the validation champion. Here's how they work together:
- Define Your Form Schema with Yup: Create a Yup schema that outlines the validation rules for each form field.
- Pass the Schema to Formik: When rendering your Formik form, provide the Yup schema as a prop to the
validationSchemaoption. - Formik Leverages Yup for Validation: Formik automatically validates form data based on the provided Yup schema during user interaction and submission.
- Display Validation Errors: Formik offers ways to display validation errors generated by Yup, providing informative feedback to the user.
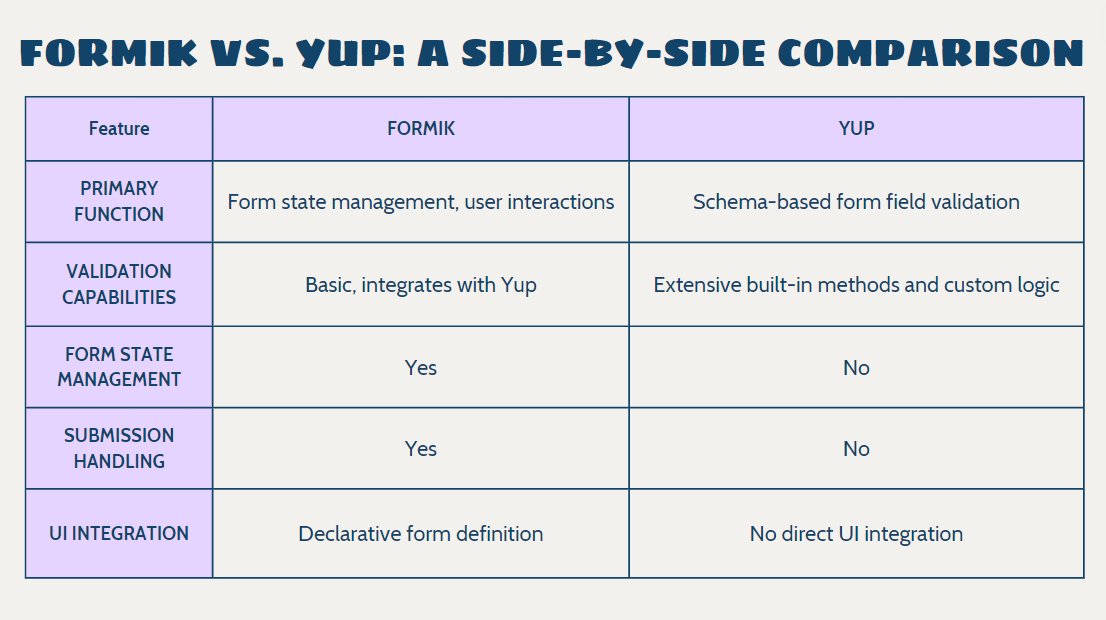
3. Formik vs. Yup: A Side-by-Side Comparison
4. Building a Form with Formik and Yup
First you need to install 2 libraries formik and yup before coding.
With formiknpm install formik or yarn formik
With yupnpm install yup or yarn add yup
Import them into your code.
import React from 'react';
import * as Yup from 'yup';
import { Formik, Form, Field } from 'formik';
Create LoginFormValues:
interface LoginFormValues {
  username: string;
  password: string;
}
Using yup for fields:
const loginSchema = Yup.object().shape<LoginFormValues>({
  username: Yup
  	.string()
    	.required('Username is required'),
  password: Yup
  	.string()
    	.required('Password is required')
    	.min(6, 'Password must be at least 6 characters'),
});
Using Formik into UI:
const MyLoginForm = () => {
  return (
    <Formik
      initialValues={{ username: '', password: '' }}
      validationSchema={loginSchema}
      onSubmit={(values) => {
        console.log('Form submitted:', values);
      }}
    >
      {({ errors, touched }) => (
        <Form>
          <Field type="text" name="username" placeholder="Username" />
              { errors.username && touched.username
              && <span>{errors.username}</span> }
          <Field type="password" name="password" placeholder="Password" />
              { errors.password && touched.password
              && <span>{errors.password}</span> }
          <button type="submit">Login</button>
        </Form>
      )}
    </Formik>
  );
};

export default MyLoginForm;
5. Advanced Yup Features
Formik and Yup, when combined, form a winning team for crafting exceptional forms in your React applications. With Formik handling form state and interactions, and Yup providing robust validation, you can create user-friendly forms that ensure data quality and a smooth user experience. So, embrace the power of this dynamic duo and start building formidable forms in React!