

Use Amazon Elastic Kubernetes Service for development environment is not a good choice if the customer or we have not enough money. The workload for development environment is usually small so we can create 1 or 2 nodes and that's enough. This post will help you to install a single master node and 1 worker and you can absolutely add more nodes later.
We can also choose other choice like minikube or microk8s but in this tutorial i will use kubeadmin to bootstrap a cluster with the required component.
For virtual machine, i chose Amazon Linux 2 (with 2vCPU, 2GB of memory and 15GB of disk) because it is very lightweight distribution.
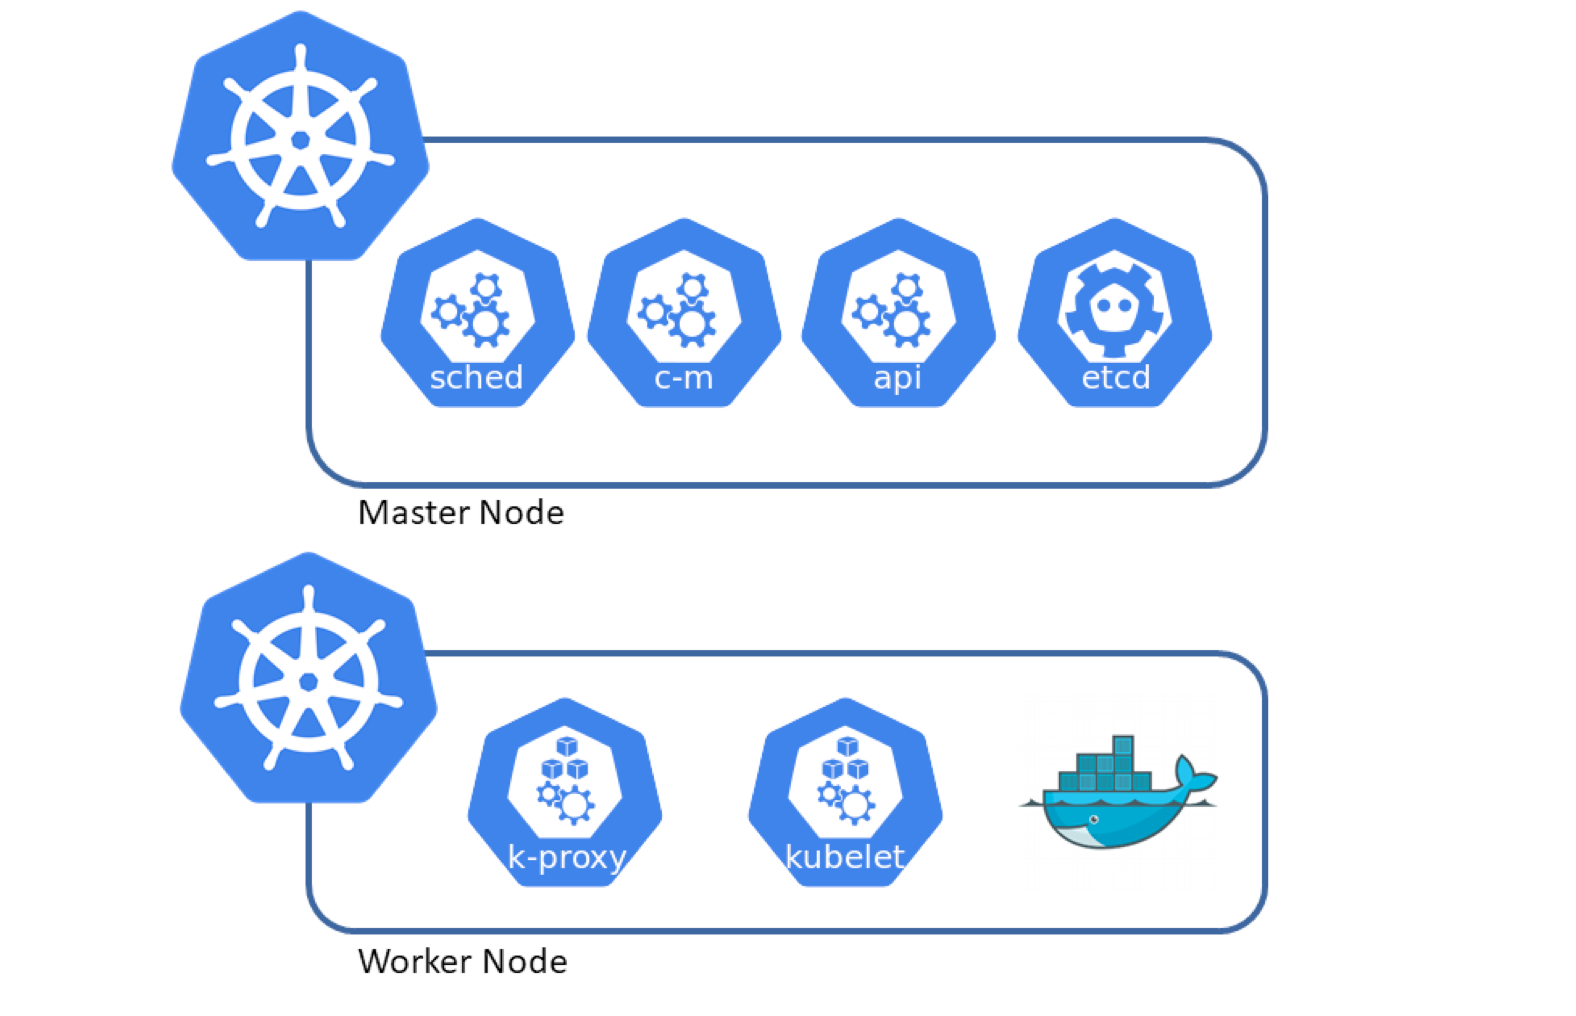
Setup Master Node
We will go through these steps to create a master node.
- config
ipv4 forwardingand lettingiptablessee bridged traffic - install containerd and runc
- install containerd cni plugin
- install crictl
- install
kubeadmin,kubectl,kubeletcli - bootstrap cluster using kubeadmin
- install
flannelpod network
First you need to login to ec2 instance with sudo privilege.
~/code on ☁️  (ap-northeast-1) on ☁️
❯ ssh -i k8s-amz2.pem ec2-user@54.179.77.249
Last login: Mon Nov 28 02:32:26 2022 from 12.23.34.45

       __|  __|_  )
       _|  (     /   Amazon Linux 2 AMI
      ___|\___|___|

https://aws.amazon.com/amazon-linux-2/
[ec2-user@ip-10-10-2-87 ~]$ sudo su
[root@ip-10-10-2-87 ec2-user]# whoami
root
[root@ip-10-10-2-87 ec2-user]#After that we need to config ipv4 forwarding.
Run the bellow command.
cat <<EOF | tee /etc/modules-load.d/k8s.conf
overlay
br_netfilter
EOF

modprobe overlay
modprobe br_netfilter

# sysctl params required by setup, params persist across reboots
cat <<EOF | tee /etc/sysctl.d/k8s.conf
net.bridge.bridge-nf-call-iptables  = 1
net.bridge.bridge-nf-call-ip6tables = 1
net.ipv4.ip_forward                 = 1
EOF

# Apply sysctl params without reboot
sysctl --system
Install containerd and runc

First download containerd and extracting the binary file to PATH.
wget https://github.com/containerd/containerd/releases/download/v1.6.8/containerd-1.6.8-linux-amd64.tar.gz
tar Cxzvf /usr/local containerd-1.6.8-linux-amd64.tar.gz
wget https://raw.githubusercontent.com/containerd/containerd/main/containerd.service
mkdir -p /etc/containerdDownload containerd configuration file. The file is located at /etc/containerd/config.toml
[root@ip-10-10-2-87 ~]# wget https://devops-terraform-assets.s3.ap-southeast-1.amazonaws.com/k8s-amazonlinux2/containerd/config.toml

Saving to: 'config.toml'

100%[==============================================>] 6,627       --.-K/s   in 0s

2022-11-28 13:08:35 (326 MB/s) - 'config.toml' saved [6627/6627]

[root@ip-10-10-2-87 ~]# mv config.toml /etc/containerd/config.toml
This file included runc configuration, you can refer the official guide here.
Next, we need to install runc. Download the binary and install it to the PATH.
wget https://github.com/opencontainers/runc/releases/download/v1.1.4/runc.amd64
install -m 755 runc.amd64 /usr/local/sbin/runcWe already installed runc so far, time to start containerd service.
mv containerd.service /etc/systemd/system/containerd.service
systemctl daemon-reload
systemctl enable containerd
systemctl start containerdVerify that containerd is running.
[root@ip-10-10-2-87 ~]# systemctl status containerd
● containerd.service - containerd container runtime
   Loaded: loaded (/etc/systemd/system/containerd.service; enabled; vendor preset: disabled)
   Active: active (running) since Sun 2022-11-27 16:57:07 UTC; 2min 45s ago
     Docs: https://containerd.io
  Process: 6543 ExecStartPre=/sbin/modprobe overlay (code=exited, status=0/SUCCESS)
 Main PID: 6546 (containerd)
    Tasks: 9
   Memory: 18.7M
   CGroup: /system.slice/containerd.service
           └─6546 /usr/local/bin/containerd

Nov 27 16:57:07 ip-10-10-2-87.ap-southeast-1.compute.internal containerd[6546]: time="2022-11-27T16:57:07.797861346Z" level=info msg=serving... address=/run/containerd/...k.ttrpc
Nov 27 16:57:07 ip-10-10-2-87.ap-southeast-1.compute.internal containerd[6546]: time="2022-11-27T16:57:07.797903099Z" level=info msg=serving... address=/run/containerd/...rd.sock
Nov 27 16:57:07 ip-10-10-2-87.ap-southeast-1.compute.internal containerd[6546]: time="2022-11-27T16:57:07.802187661Z" level=info msg="containerd successfully booted in 0.057233s"
Nov 27 16:57:07 ip-10-10-2-87.ap-southeast-1.compute.internal containerd[6546]: time="2022-11-27T16:57:07.814738006Z" level=info msg="Start streaming server"
Hint: Some lines were ellipsized, use -l to show in full.
[root@ip-10-10-2-87 ~]#
Install Containerd CNI Plugin.
Run the bellow command, it will download the cni plugin and extract to /opt/cni/bin, this is the directory that we used in file config.toml (containerd configuration file).
wget https://github.com/containernetworking/plugins/releases/download/v1.1.1/cni-plugins-linux-amd64-v1.1.1.tgz
mkdir -p /opt/cni/bin
tar Cxzvf /opt/cni/bin cni-plugins-linux-amd64-v1.1.1.tgz Install Crictl
Run the bellow command to download and copy binary file to PATH
wget https://github.com/kubernetes-sigs/cri-tools/releases/download/v1.25.0/crictl-v1.25.0-linux-amd64.tar.gz
tar -xvf crictl-v1.25.0-linux-amd64.tar.gz
mv crictl /usr/bin/crictlTo verify the install process run critil --version and see the version in stdout.
[root@ip-10-10-2-87 ~]# crictl --version
crictl version v1.25.0
[root@ip-10-10-2-87 ~]#Install Kube-X cli
Download the binary file from release page and copy them to PATH. Then start the kubelet service.
RELEASE="$(curl -sSL https://dl.k8s.io/release/stable.txt)"
ARCH="amd64"
curl -L --remote-name-all https://storage.googleapis.com/kubernetes-release/release/${RELEASE}/bin/linux/${ARCH}/{kubeadm,kubelet,kubectl}
chmod +x {kubeadm,kubelet,kubectl}
mv {kubeadm,kubelet,kubectl} /usr/bin
RELEASE_VERSION="v0.4.0"
curl -sSL "https://raw.githubusercontent.com/kubernetes/release/${RELEASE_VERSION}/cmd/kubepkg/templates/latest/deb/kubelet/lib/systemd/system/kubelet.service" | tee /etc/systemd/system/kubelet.service
mkdir -p /etc/systemd/system/kubelet.service.d
curl -sSL "https://raw.githubusercontent.com/kubernetes/release/${RELEASE_VERSION}/cmd/kubepkg/templates/latest/deb/kubeadm/10-kubeadm.conf" | tee /etc/systemd/system/kubelet.service.d/10-kubeadm.conf
systemctl enable kubelet
systemctl start kubeletVerify kubelet agent.
[root@ip-10-10-2-87 ~]# systemctl status kubelet
● kubelet.service - kubelet: The Kubernetes Node Agent
   Loaded: loaded (/etc/systemd/system/kubelet.service; enabled; vendor preset: disabled)
  Drop-In: /etc/systemd/system/kubelet.service.d
           └─10-kubeadm.conf
   Active: active (running) since Sun 2022-11-27 17:10:37 UTC; 2ms ago
     Docs: https://kubernetes.io/docs/home/
 Main PID: 6661 (systemd)
    Tasks: 0
   Memory: 0B
   CGroup: /system.slice/kubelet.service
           └─6661 /usr/lib/systemd/systemd --switched-root --system --deserialize 21

Nov 27 17:10:37 ip-10-10-2-87.ap-southeast-1.compute.internal systemd[1]: Started kubelet: The Kubernetes Node Agent.
[root@ip-10-10-2-87 ~]#We already install all required component so far, now it's time to boostrap cluster using kubeadm. But before that we need to install ebtables socat tc and conntrack because kubeadmin will require that.
[root@ip-10-10-2-87 ~]# yum install -y ebtables socat tc conntrack
Failed to set locale, defaulting to C
Loaded plugins: extras_suggestions, langpacks, priorities, update-motd
amzn2-core                                                                                                                                                 | 3.7 kB  00:00:00
Resolving Dependencies
--> Running transaction check
---> Package ebtables.x86_64 0:2.0.10-16.amzn2.0.1 will be installed
---> Package iproute-tc.x86_64 0:5.10.0-2.amzn2.0.3 will be installed
---> Package socat.x86_64 0:1.7.3.2-2.amzn2.0.1 will be installed
--> Finished Dependency Resolution

Complete!
[root@ip-10-10-2-87 ~]#
Then running kubeadmin to bootstrap cluster
[root@ip-10-10-2-87 ~]# kubeadm init --pod-network-cidr=10.244.0.0/16 --cri-socket=/run/containerd/containerd.sockAfter 2,3 minutes depend on your network speed, you will see a successfully message.
Your Kubernetes control-plane has initialized successfully!

To start using your cluster, you need to run the following as a regular user:

  mkdir -p $HOME/.kube
  sudo cp -i /etc/kubernetes/admin.conf $HOME/.kube/config
  sudo chown $(id -u):$(id -g) $HOME/.kube/config

Alternatively, if you are the root user, you can run:

  export KUBECONFIG=/etc/kubernetes/admin.conf

You should now deploy a pod network to the cluster.
Run "kubectl apply -f [podnetwork].yaml" with one of the options listed at:
  https://kubernetes.io/docs/concepts/cluster-administration/addons/

Then you can join any number of worker nodes by running the following on each as root:

kubeadm join 10.10.2.87:6443 --token uns0xr.vebipp2dubw65fby \
	--discovery-token-ca-cert-hash sha256:9606c9e00e045034c8462c0ed8f64d1994e9b91413cbe1786d88bc74852a3794
To verify our cluster status, we can run kubectl version
[root@ip-10-10-2-87 ~]# export KUBECONFIG=/etc/kubernetes/admin.conf
[root@ip-10-10-2-87 ~]# kubectl version -o yaml
clientVersion:
  buildDate: "2022-11-09T13:36:36Z"
  compiler: gc
  gitCommit: 872a965c6c6526caa949f0c6ac028ef7aff3fb78
  gitTreeState: clean
  gitVersion: v1.25.4
  goVersion: go1.19.3
  major: "1"
  minor: "25"
  platform: linux/amd64
kustomizeVersion: v4.5.7
serverVersion:
  buildDate: "2022-11-09T13:29:58Z"
  compiler: gc
  gitCommit: 872a965c6c6526caa949f0c6ac028ef7aff3fb78
  gitTreeState: clean
  gitVersion: v1.25.4
  goVersion: go1.19.3
  major: "1"
  minor: "25"
  platform: linux/amd64

[root@ip-10-10-2-87 ~]#
kubectl version -o yamlWe can also see that some k8s component that are running by using command crictl ps
[root@ip-10-10-2-87 ec2-user]# crictl ps
CONTAINER           IMAGE               CREATED             STATE               NAME                      ATTEMPT             POD ID              POD
0c665265ebc5d       5185b96f0becf       6 minutes ago       Running             coredns                   1                   7a53c1d8d11ce       coredns-565d847f94-m476x
1ad71787eea7a       5185b96f0becf       6 minutes ago       Running             coredns                   1                   655f09b55d2d1       coredns-565d847f94-24qww
7115b2aa3b81b       d66192101c64f       6 minutes ago       Running             kube-flannel              1                   c96396d645db8       kube-flannel-ds-tr7dj
5af17d42a1c8f       2c2bc18642790       6 minutes ago       Running             kube-proxy                1                   7dac9b6435ce2       kube-proxy-7vsdq
f2d7880727a56       8f59f6dfaed60       6 minutes ago       Running             kube-controller-manager   1                   1ec7a21bc9202       kube-controller-manager-ip-10-10-2-87.ap-southeast-1.compute.internal
356c430fcc97f       e2d17ec744c16       6 minutes ago       Running             kube-scheduler            1                   a080a136aa5ef       kube-scheduler-ip-10-10-2-87.ap-southeast-1.compute.internal
1893db8f94ead       00631e54acba3       6 minutes ago       Running             kube-apiserver            1                   4e99a97d7bd50       kube-apiserver-ip-10-10-2-87.ap-southeast-1.compute.internal
8a729ce4fd29f       4694d02f8e611       6 minutes ago       Running             etcd                      1                   706d70570ef29       etcd-ip-10-10-2-87.ap-southeast-1.compute.internal
[root@ip-10-10-2-87 ec2-user]#
Now, we have a single node k8s cluster, before creating any resource, we also need
Taint the node label
Default, the pod can not run on the master so we need to taint the node label so the pod can also run on master node. You can read more on this post.

[root@ip-10-10-2-87 ~]# kubectl taint nodes --all node-role.kubernetes.io/control-plane-
node/ip-10-10-2-87.ap-southeast-1.compute.internal untainted
[root@ip-10-10-2-87 ~]#
Install flannel pod network

[root@ip-10-10-2-87 ~]# kubectl apply -f https://raw.githubusercontent.com/flannel-io/flannel/master/Documentation/kube-flannel.yml
namespace/kube-flannel created
clusterrole.rbac.authorization.k8s.io/flannel created
clusterrolebinding.rbac.authorization.k8s.io/flannel created
serviceaccount/flannel created
configmap/kube-flannel-cfg created
daemonset.apps/kube-flannel-ds created
[root@ip-10-10-2-87 ~]#
Then let running a nginx pod
[root@ip-10-10-2-87 ~]# kubectl run nginx --image=nginx
pod/nginx created
Get the logs from pod
[root@ip-10-10-2-87 ~]# kubectl logs -f pods/nginx
/docker-entrypoint.sh: /docker-entrypoint.d/ is not empty, will attempt to perform configuration
/docker-entrypoint.sh: Looking for shell scripts in /docker-entrypoint.d/
/docker-entrypoint.sh: Launching /docker-entrypoint.d/10-listen-on-ipv6-by-default.sh
10-listen-on-ipv6-by-default.sh: info: Getting the checksum of /etc/nginx/conf.d/default.conf
10-listen-on-ipv6-by-default.sh: info: Enabled listen on IPv6 in /etc/nginx/conf.d/default.conf
/docker-entrypoint.sh: Launching /docker-entrypoint.d/20-envsubst-on-templates.sh
/docker-entrypoint.sh: Launching /docker-entrypoint.d/30-tune-worker-processes.sh
/docker-entrypoint.sh: Configuration complete; ready for start up
2022/11/27 17:29:34 [notice] 1#1: using the "epoll" event method
2022/11/27 17:29:34 [notice] 1#1: nginx/1.23.2
2022/11/27 17:29:34 [notice] 1#1: built by gcc 10.2.1 20210110 (Debian 10.2.1-6)
2022/11/27 17:29:34 [notice] 1#1: OS: Linux 5.10.149-133.644.amzn2.x86_64
2022/11/27 17:29:34 [notice] 1#1: getrlimit(RLIMIT_NOFILE): 1048576:1048576
2022/11/27 17:29:34 [notice] 1#1: start worker processes
2022/11/27 17:29:34 [notice] 1#1: start worker process 29
2022/11/27 17:29:34 [notice] 1#1: start worker process 30
Then kill it
[root@ip-10-10-2-87 ~]# kubectl delete pods/nginx
pod "nginx" deleted
[root@ip-10-10-2-87 ~]#
To scale our cluster from 1 node to many node, you can install all the necessary component then using kubeadm join to add worker node to the current cluster.
Add worker node.
Before doing that, we also need to install all necessary component same as master node, include ( containerd , runc , crictl, kube-x )
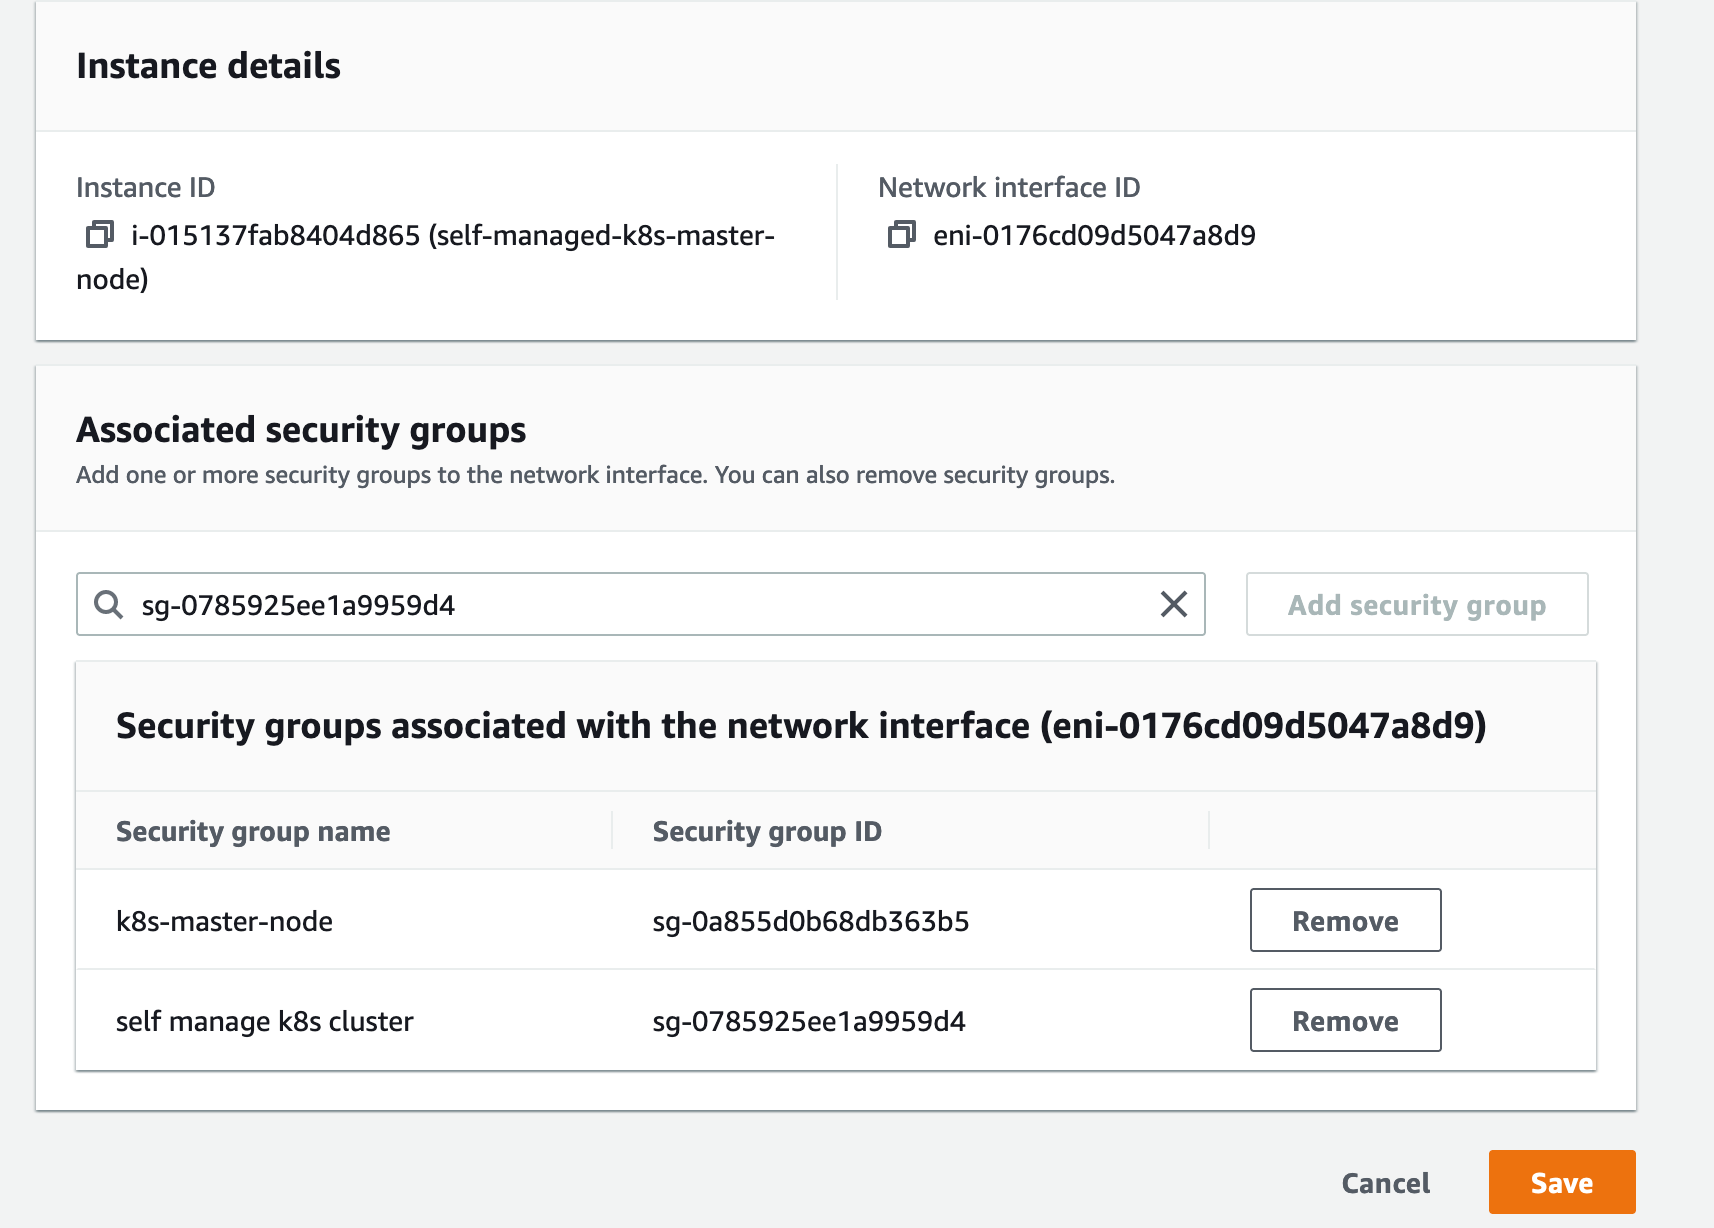
To enable communicate between our node, we need to create a EC2 security group for and use it for all the node.
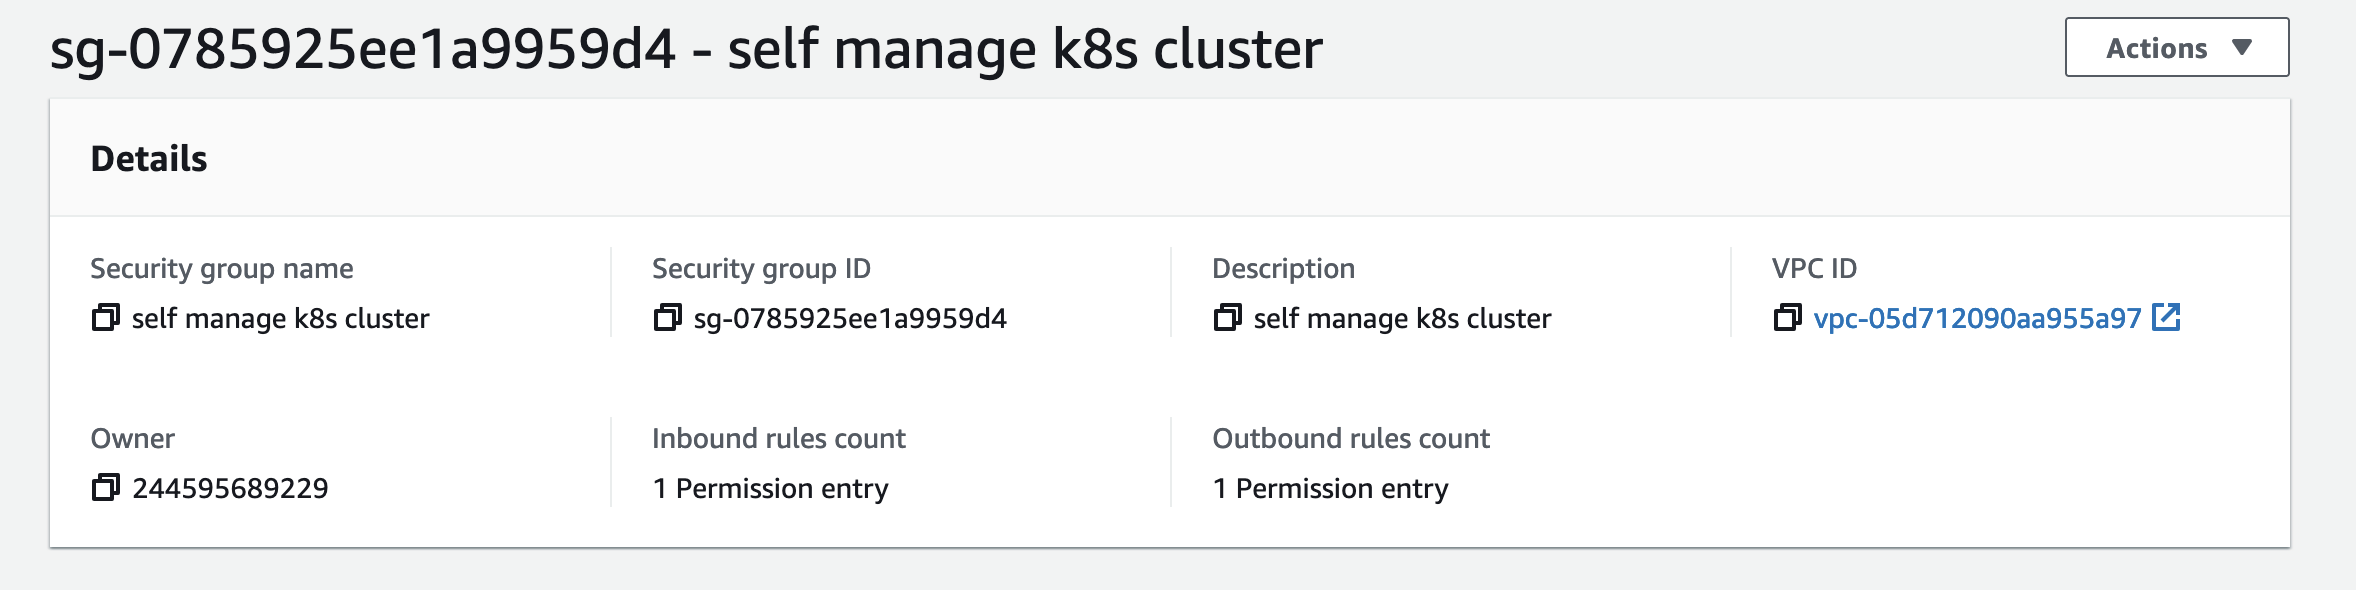
Allow all inboud between EC2 in this group.
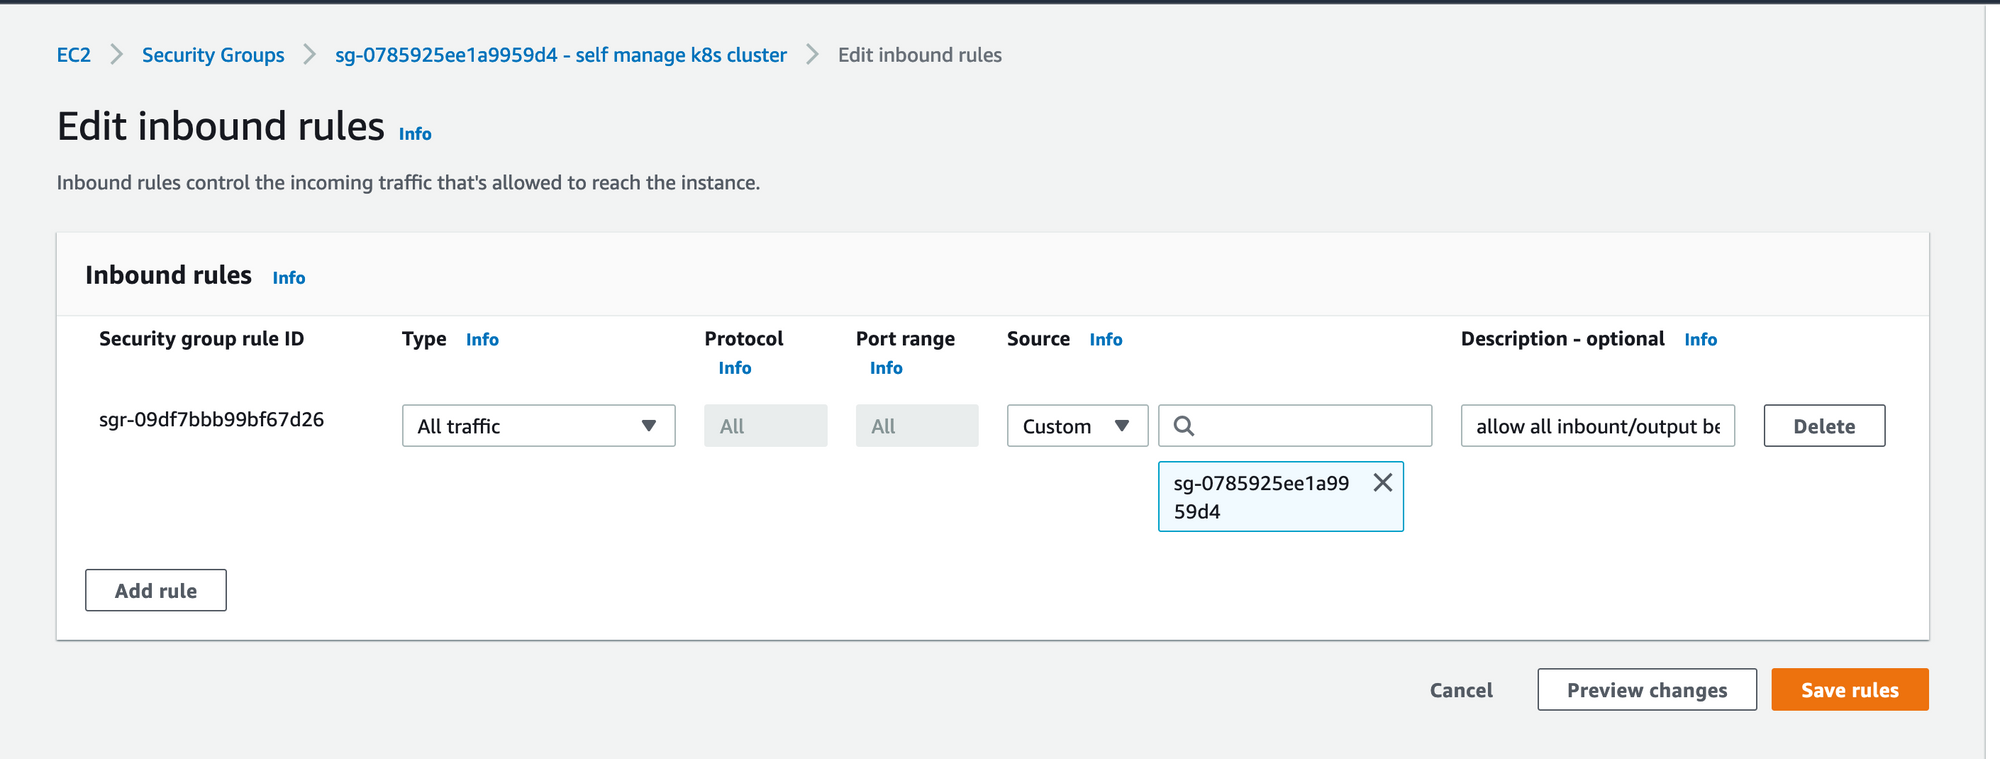
Add this security group to master node
After you install all the necessary component, we need to copy the KUBECONFIG from master node to worker node, you can do it by using scp command or just open then copy/paste file content. Then export the KUBECONFIG variable so the kubectl can look at the config and know where is the address to connect.
root@ip-10-10-2-146 ~]# mkdir -p /etc/kubernetes
[root@ip-10-10-2-146 ~]# echo <<EOF > /etc/kubernetes/admin.conf
> apiVersion: v1
> clusters:
> - cluster:
>     certificate-authority-data: LS0tLS1CRUdJTiBDRVJUSUZJQ0FURS0tLS0tCk1JSUMvakNDQWVhZ0F3SUJBZ0lCQURBTkJna3FoU8KTUF5Q0NtdDFZbVZ5Ym1WMFpYTXdEUVlKS29aSWh2Y05BUUVMQlFBRGdnRUJBSmxReEdwTGkzdFBNV2l2MytYdFFzSUJoTVdkMGNKQWVkNzg4bzVkCmJLZzZTR2J3eGU0blFaeXdMTEUzSTh2U1k3d3RPaEdER0VKSmdLUUtxc3FyTTNvMUFRNzVzUEJlbmpZKyszMVAKZllzPQotLS0tLUVORCBDRVJUSUZJQ0FURS0tLS0tCg==
>     server: https://10.10.2.87:6443
>   name: kubernetes
> contexts:
> - context:
>     cluster: kubernetes
>     user: kubernetes-admin
>   name: kubernetes-admin@kubernetes
> current-context: kubernetes-admin@kubernetes
> kind: Config
> preferences: {}
> users:
> - name: kubernetes-admin
>   user:
>     client-certificate-data: LS0tLS1CRUdJTiBDRVJUSUZJQ0FURS0tLS0tCk1JSURJVENDQWdtZ0F3SUJBZ0lJQ1U2ems2MDlCd2t2tCNWtObG1sT2pFWEkzQ1FQCmVFeUxzNFVwUC9GNlV0cXJ2WjNzYW5KUzNUUnF2MWS0tCg==
>     client-key-data: LS0tLS1CRUdJTiBSU0EgUFJJVkFURSBLRVktLS0tLQpNSUlFb2dJQkFBS0NBUUVBbWZOV3lOVmxjWFJlL3Zja2pnTVJNeEF6Nlgxdit1ckl3bnV5cm5IT0t2Uy9VcHdYCkNhckRQTHJDNU9QK3SE43OVo1Wm5lOTV3N1NjMXJobk9yODllbWh6YTR1aEZOCmZvTGRBb0dBQ1lKdm1JRHJ0bTVycEh4akwZ0FMUDd3ekx0bGVYRjAKb0U4b0lvWFVTeHROV3hlalNkZlZuRURNeFdyLzBSa2NaSDhCOXFTMVVMaVJNS3BjZFRES3VpSUdJWWJvME03Ywo5M0V2YXVxcUdOWmlORzJPM09raUY1VzUwdWpab25sWTR4MDRzNHhsQURjeExCRitQUmc9Ci0tLS0tRU5EIFJTQSBQUklWQVRFIEtFWS0tLS0tCg==
> EOF
[root@ip-10-10-2-146 ~]#
Export the KUBECONFIG variable
[root@ip-10-10-2-146 ~]# export KUBECONFIG=/etc/kubernetes/admin.conf
[root@ip-10-10-2-146 ~]#
Now on the master node , we will create a token for our worker node.
[root@ip-10-10-2-87 ~]# kubeadm token create --print-join-command
kubeadm join 10.10.2.87:6443 --token as509x.u508rekxws1i65a9 --discovery-token-ca-cert-hash sha256:9606c9e00e045034c8462c0ed8f64d1994e9b91413cbe1786d88bc74852a3794
[root@ip-10-10-2-87 ~]#Then go to worker node and run this command from stdout above
[root@ip-10-10-2-146 ~]# kubeadm join 10.10.2.87:6443 --token as509x.u508rekxws1i65a9 --discovery-token-ca-cert-hash sha256:9606c9e00e045034c8462c0ed8f64d1994e9b91413cbe1786d88bc74852a3794
[preflight] Running pre-flight checks
[preflight] Reading configuration from the cluster...
[preflight] FYI: You can look at this config file with 'kubectl -n kube-system get cm kubeadm-config -o yaml'
[kubelet-start] Writing kubelet configuration to file "/var/lib/kubelet/config.yaml"
[kubelet-start] Writing kubelet environment file with flags to file "/var/lib/kubelet/kubeadm-flags.env"
[kubelet-start] Starting the kubelet
[kubelet-start] Waiting for the kubelet to perform the TLS Bootstrap...

This node has joined the cluster:
* Certificate signing request was sent to apiserver and a response was received.
* The Kubelet was informed of the new secure connection details.

Run 'kubectl get nodes' on the control-plane to see this node join the cluster.

[root@ip-10-10-2-146 ~]#
Wait about 1,2 minute then you will see the succesfully message.
Now on the master node you can use kubectl get nodes to get all node in current cluster.
[root@ip-10-10-2-87 ec2-user]# kubectl get nodes
NAME                                             STATUS   ROLES           AGE   VERSION
ip-10-10-2-146.ap-southeast-1.compute.internal   Ready    <none>          66s   v1.25.4
ip-10-10-2-87.ap-southeast-1.compute.internal    Ready    control-plane   20h   v1.25.4
[root@ip-10-10-2-87 ec2-user]#
Do the same thing on worker node
[root@ip-10-10-2-146 ~]# kubectl get nodes
NAME                                             STATUS   ROLES           AGE     VERSION
ip-10-10-2-146.ap-southeast-1.compute.internal   Ready    <none>          3m17s   v1.25.4
ip-10-10-2-87.ap-southeast-1.compute.internal    Ready    control-plane   20h     v1.25.4
[root@ip-10-10-2-146 ~]#
To know which pod is running on this worker node, you can use crictl ps
[root@ip-10-10-2-146 ~]# crictl ps
CONTAINER           IMAGE               CREATED             STATE               NAME                ATTEMPT             POD ID              POD
44f5a8a0cf11d       d66192101c64f       5 minutes ago       Running             kube-flannel        0                   8b14967ce00e4       kube-flannel-ds-4l65g
079758cbd5f3a       2c2bc18642790       5 minutes ago       Running             kube-proxy          0                   5743b683a8dbb       kube-proxy-7c9jx
[root@ip-10-10-2-146 ~]#
Try to running some pod, you will see the pod that was allocated on this worker node.
[root@ip-10-10-2-146 ~]# kubectl run nginx1 --image=nginx
pod/nginx1 created
[root@ip-10-10-2-146 ~]# kubectl run nginx2 --image=nginx
pod/nginx2 created
[root@ip-10-10-2-146 ~]# kubectl run nginx3 --image=nginx
pod/nginx3 created
[root@ip-10-10-2-146 ~]# kubectl get pods -o wide
NAME     READY   STATUS              RESTARTS   AGE   IP           NODE                                             NOMINATED NODE   READINESS GATES
nginx    1/1     Running             0          46s   10.244.1.2   ip-10-10-2-146.ap-southeast-1.compute.internal   <none>           <none>
nginx1   1/1     Running             0          9s    10.244.1.3   ip-10-10-2-146.ap-southeast-1.compute.internal   <none>           <none>
nginx2   1/1     Running             0          5s    10.244.1.4   ip-10-10-2-146.ap-southeast-1.compute.internal   <none>           <none>
nginx3   0/1     ContainerCreating   0          2s    <none>       ip-10-10-2-146.ap-southeast-1.compute.internal   <none>           <none>
That is, after going through 4,5 steps we can able to create a simple cluster, it help us saving a bit money.
Thank for reading !