

1. What is IoT?
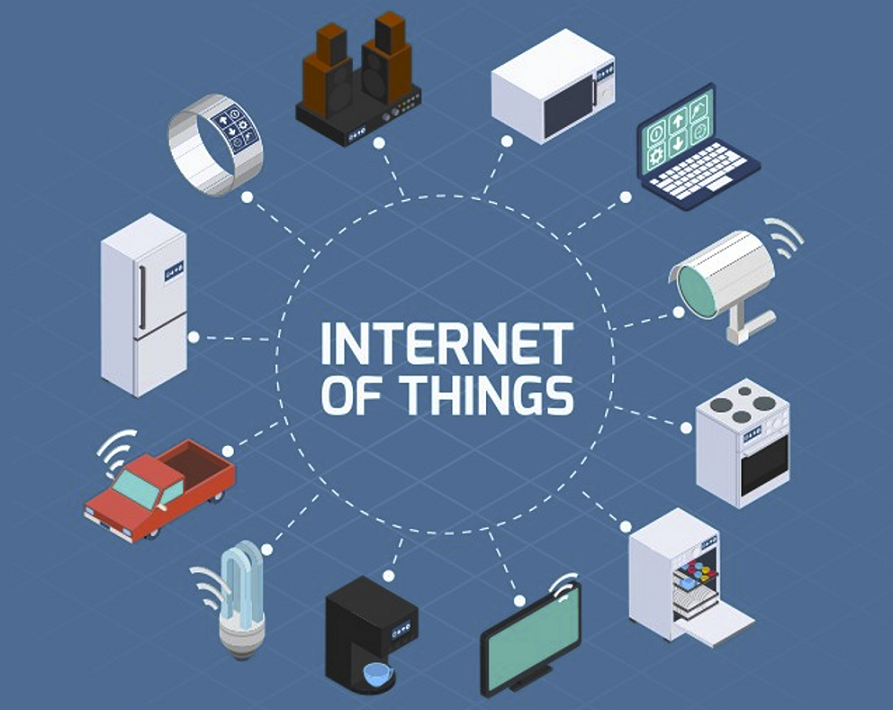
The Internet of Things (IoT) is a network of physical devices that connect to and exchange data with other devices and services over the Internet or other network. There are currently over ten billion connected devices in the world and more are added every year. Anything that can be embedded with the necessary sensors and software can be connected over the internet.
2. What is Azure IoT?
The Azure Internet of Things (IoT) is a collection of Microsoft-managed cloud services that connect, monitor, and control billions of IoT assets. In simpler terms, an IoT solution is made up of one or more IoT devices that communicate with one or more back-end services hosted in the cloud.
2.1. IoT devices
An IoT device is typically made up of a circuit board with sensors attached that use WiFi to connect to the internet. For example:
- A pressure sensor on a remote oil pump.
- Temperature and humidity sensors in an air-conditioning unit.
- An accelerometer in an elevator.
- Presence sensors in a room.
2.2. Back-end services
In an IoT solution, the back-end service provides functionality such as:
- Receiving telemetry at scale from your devices, and determining how to process and store that data.
- Analyzing the telemetry to provide insights, either in real time or after the fact.
- Sending commands from the cloud to a specific device.
- Provisioning devices and controlling which devices can connect to your infrastructure.
- Controlling the state of your devices and monitoring their activities.
- Managing the firmware installed on your devices.
2.3. Azure IoT Hub
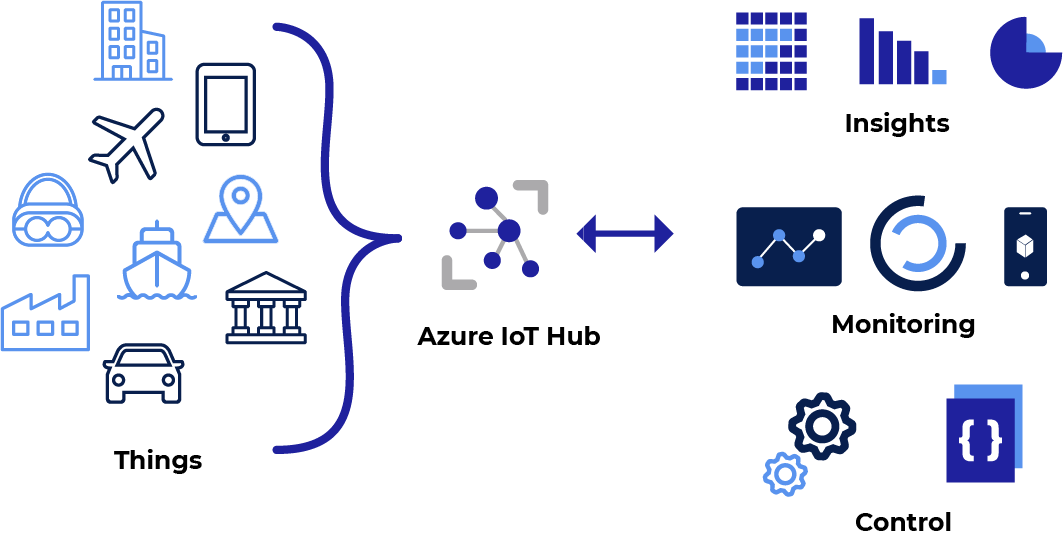
Azure IoT Hub is a managed service hosted in the cloud that acts as a central message hub for communication between an IoT application and its attached devices. You can connect millions of devices and their backend solutions reliably and securely. Almost any device can be connected to an IoT hub.
You can integrate IoT Hub with other Azure services to build complete, end-to-end solutions. For example, use:
Azure Event Grid to enable your business to react quickly to critical events in a reliable, scalable, and secure manner.
Azure Logic Apps to automate business processes.
Azure Machine Learning to add machine learning and AI models to your solution.
Azure Stream Analytics to run real-time analytic computations on the data streaming from your devices.
IoT Hub supports:
- Azure IoT SDK with some popular programming languages such as C, C#, Java, Python, Node.js.
- Multiple protocols such as HTTPS, AMQP, MQTT.
2.4. Azure IoT Central
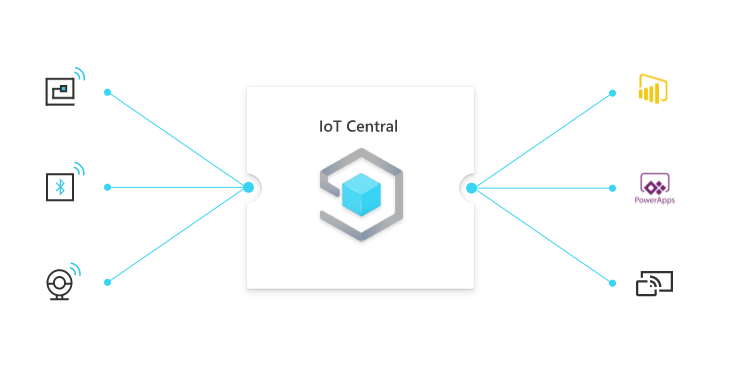
IoT Central is an IoT application platform as a service (aPaaS) that reduces the burden and cost of developing, managing, and maintaining enterprise-grade IoT solutions. If you choose to build with IoT Central, you'll have the opportunity to focus time, money, and energy on transforming your business with IoT data, rather than just maintaining and updating a complex and continually evolving IoT infrastructure.
The web UI lets you quickly connect devices, monitor device conditions, create rules, and manage millions of devices and their data throughout their life cycle. Furthermore, it enables you to act on device insights by extending IoT intelligence into line-of-business applications.
IoT Central supports:
- Industry specific app templates
- No deep technical knowledge required
- Highly secure, scalable and reliable
- Built on top of the IoT Hub service and 30+ other services
2.5. Azure Sphere
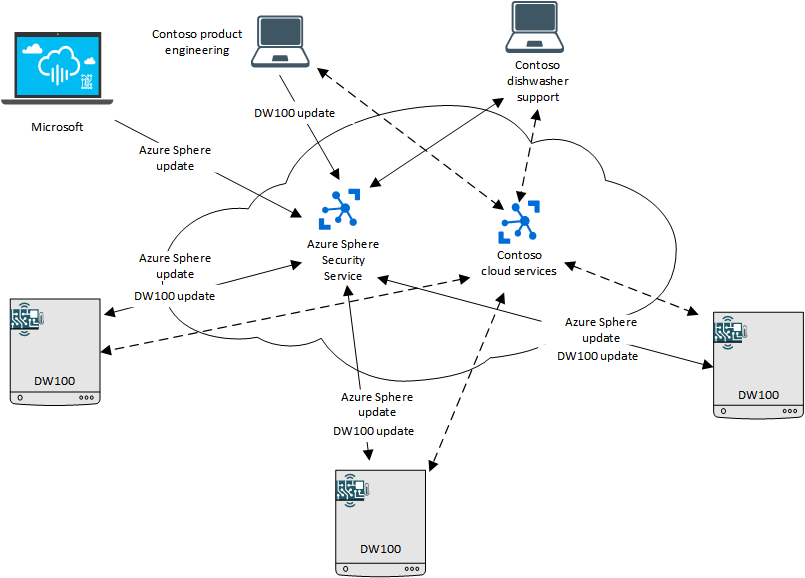
Azure Sphere is a secured, high-level application platform with built-in communication and security features for internet-connected devices. It comprises a secured, connected, crossover microcontroller unit (MCU), a custom high-level Linux-based operating system (OS), and a cloud-based security service that provides continuous, renewable security.
The Azure Sphere MCU integrates real-time processing capabilities with the ability to run a high-level operating system. An Azure Sphere MCU, along with its operating system and application platform, enables the creation of secured, internet-connected devices that can be updated, controlled, monitored, and maintained remotely. A connected device that includes an Azure Sphere MCU, either alongside or in place of an existing MCUs, provides enhanced security, productivity, and opportunity. For example:
- A secured application environment, authenticated connections, and opt-in use of peripherals minimizes security risks due to spoofing, rogue software, or denial-of-service attacks, among others.
- Software updates can be automatically deployed from the cloud to any connected device to fix problems, provide new functionality, or counter emerging methods of attack, thus enhancing the productivity of support personnel.
- Product usage data can be reported to the cloud over a secured connection to help in diagnosing problems and designing new products, thus increasing the opportunity for product service, positive customer interactions, and future development.
3. Demo
We will create a small application that uses Azure IoT Hub to control devices remotely over the internet on a Web interface that can be used on both PC and Smartphone.
Specifically, we will perform the control of a fan with infrared signals controlled by a Raspberry Pi device with LEDs that receive and send infrared signals.
3.1. Preparation
3.1.1. Azure subscription
- Create an Azure IoT Hub used to send and receive messages from/to devices.
- Creating Azure Function App specifically uses HttpTrigger to receive requests from users.
3.1.2. Raspberry Pi (Raspi)
- The Raspi device has GPIO pins are able to connect LEDs to transmit and receive infrared signals.
- The Raspi device will receive the message from the Azure IoT Hub and perform transmitting infrared signals corresponding to the request in the message.
3.1.3. Fan
- A fan which can be controlled by infrared signal.
3.2. Implementation
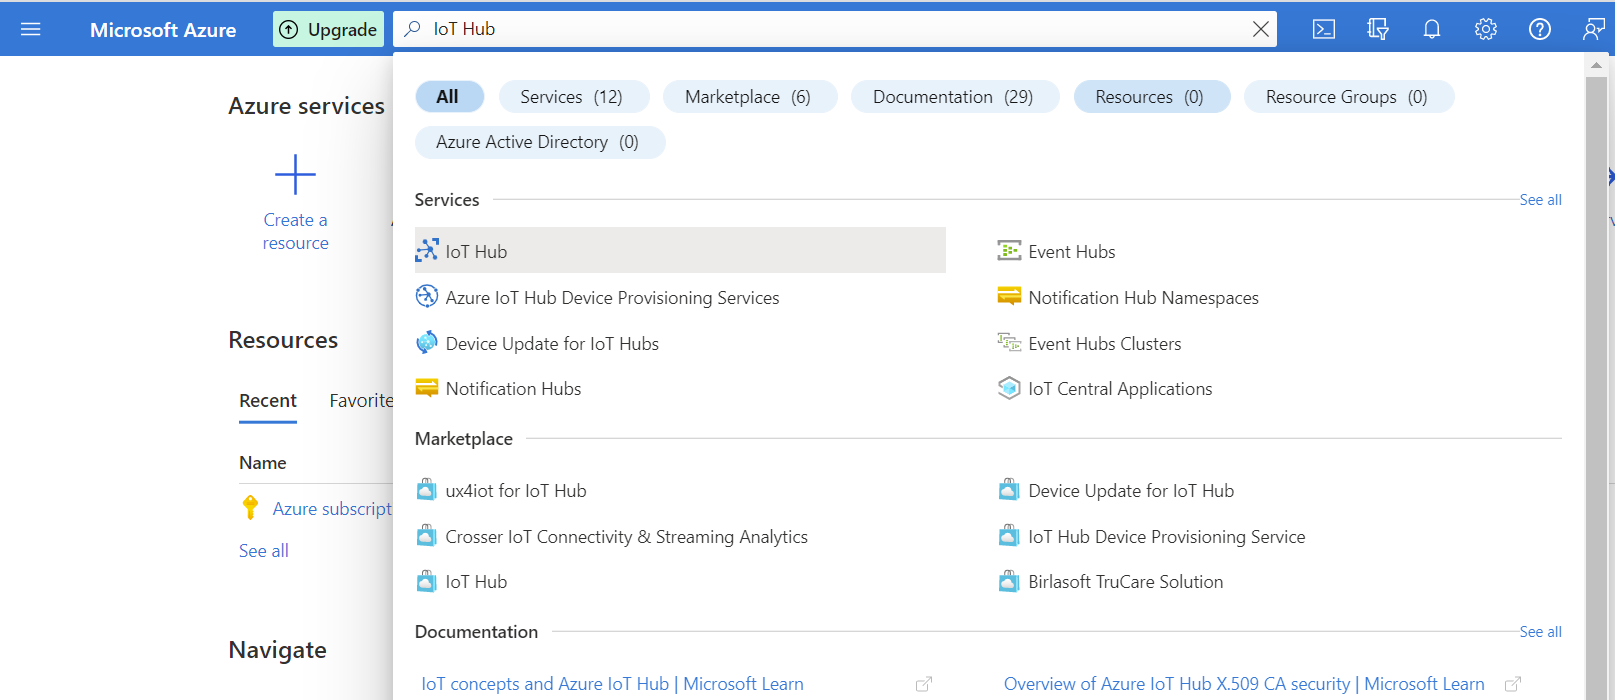
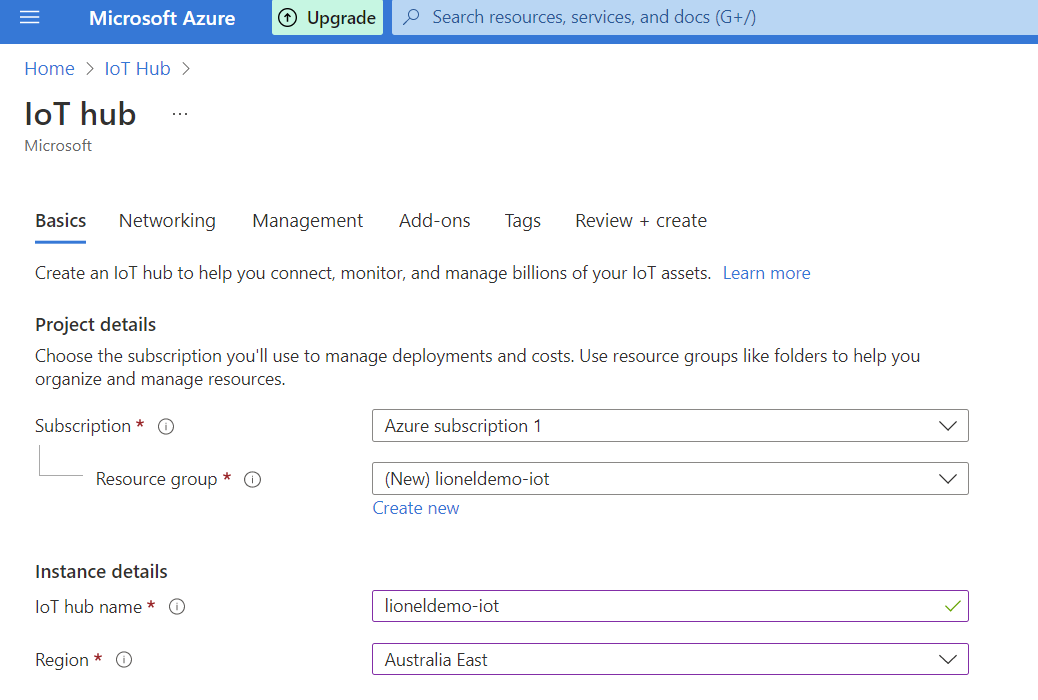
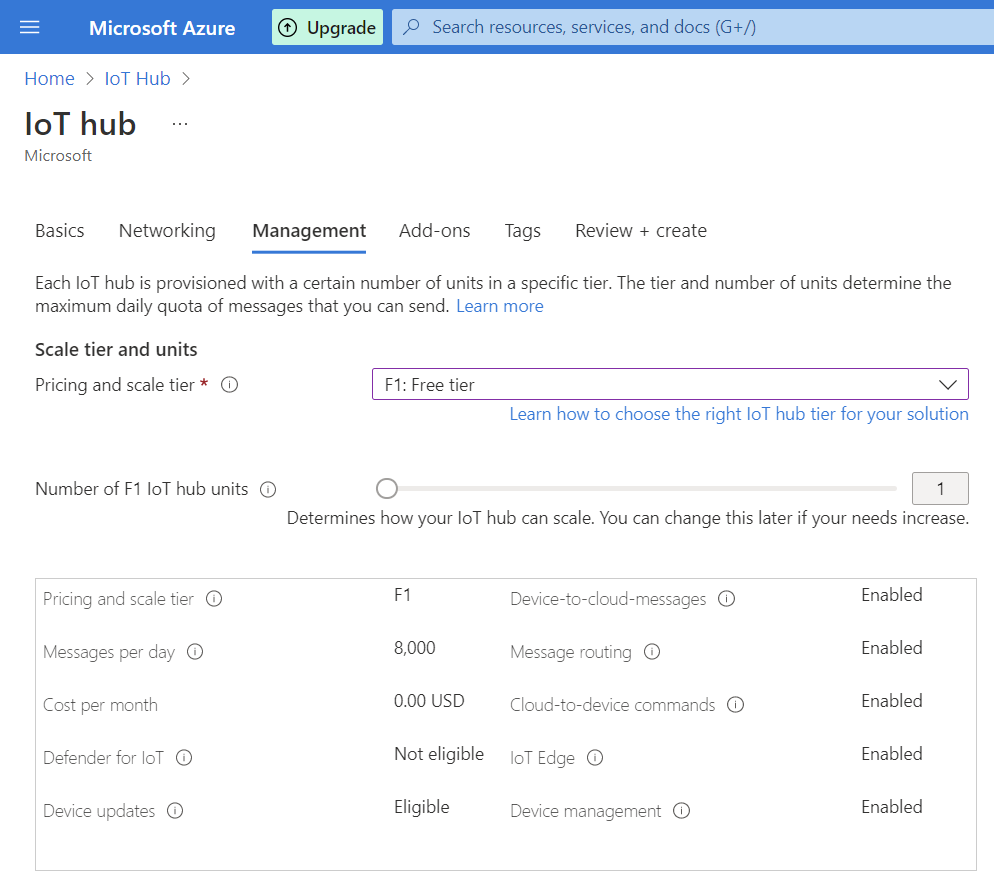
3.2.1. Create Azure IoT Hub
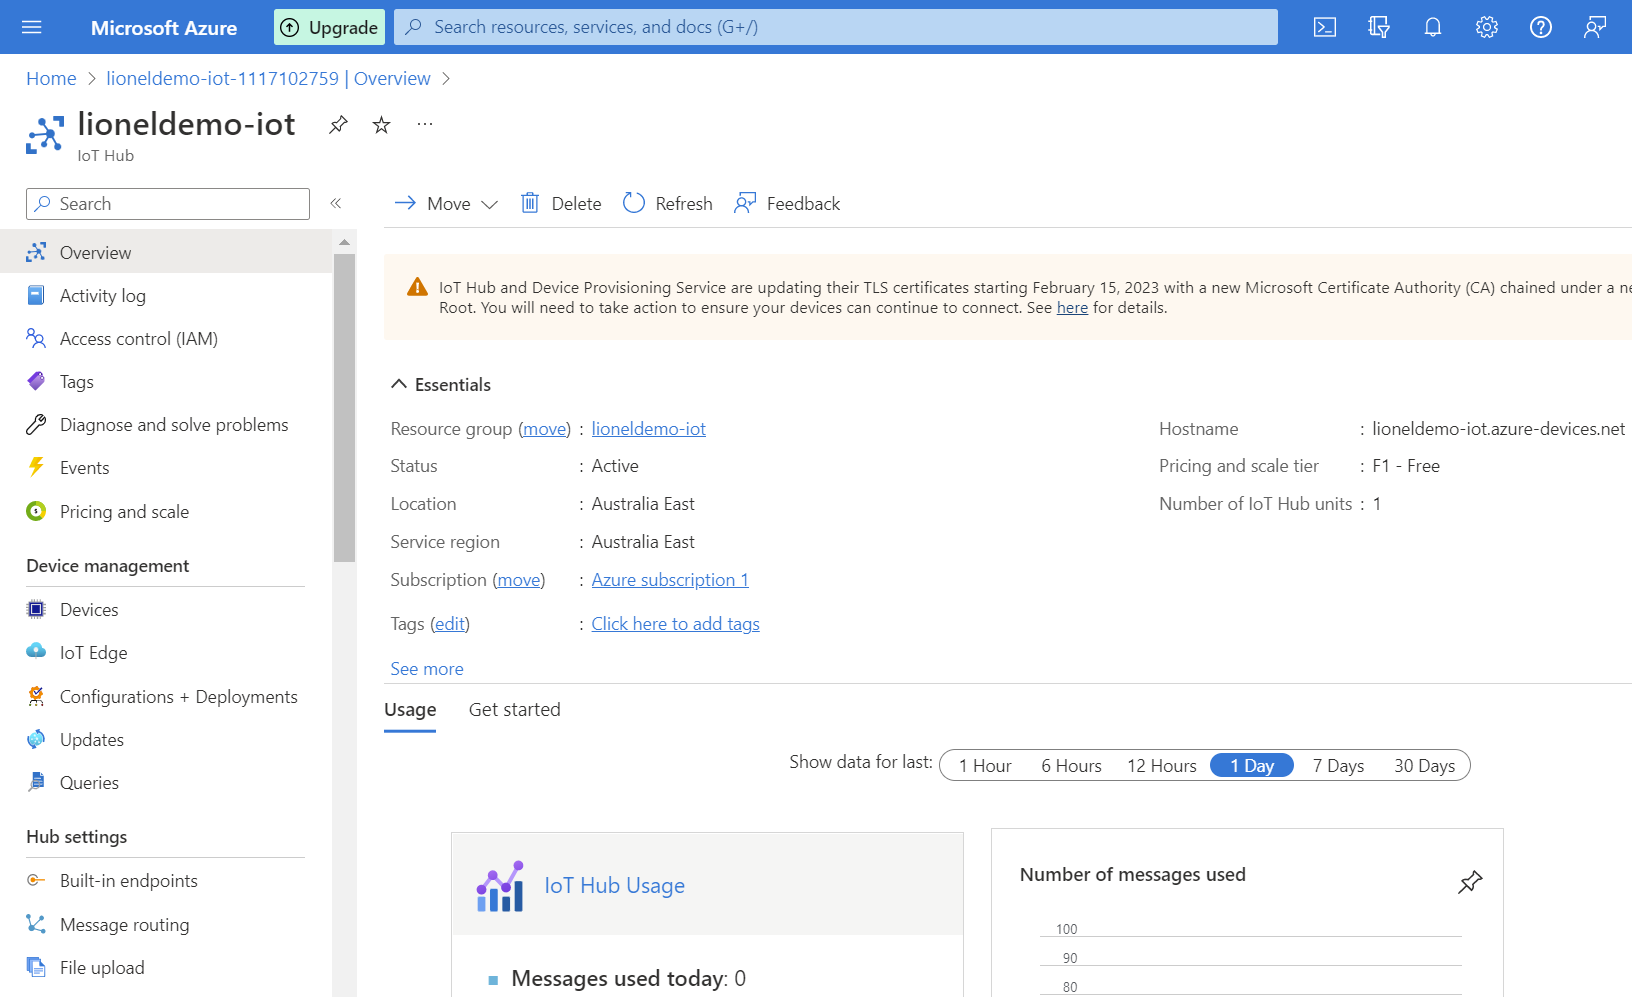
- Enter Azure Portal Site
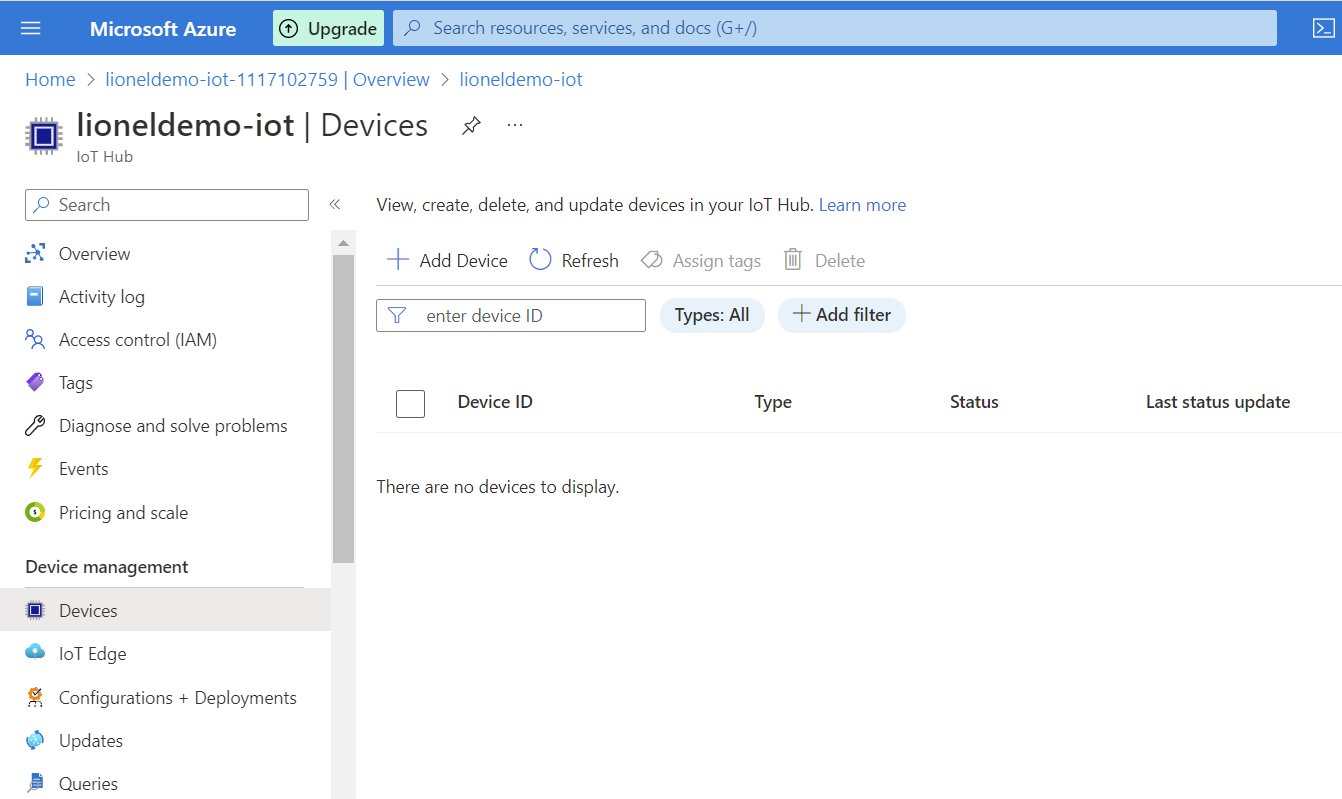
- Perform step-by-step as the following to create Azure IoT Hub
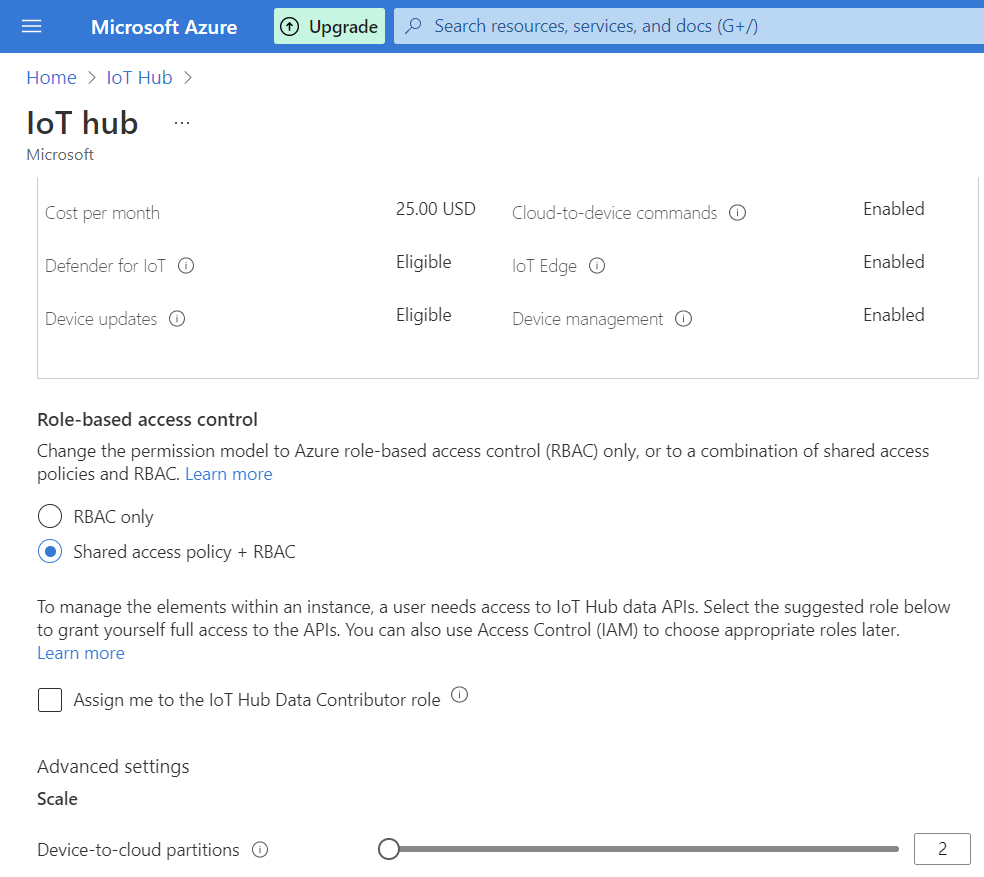
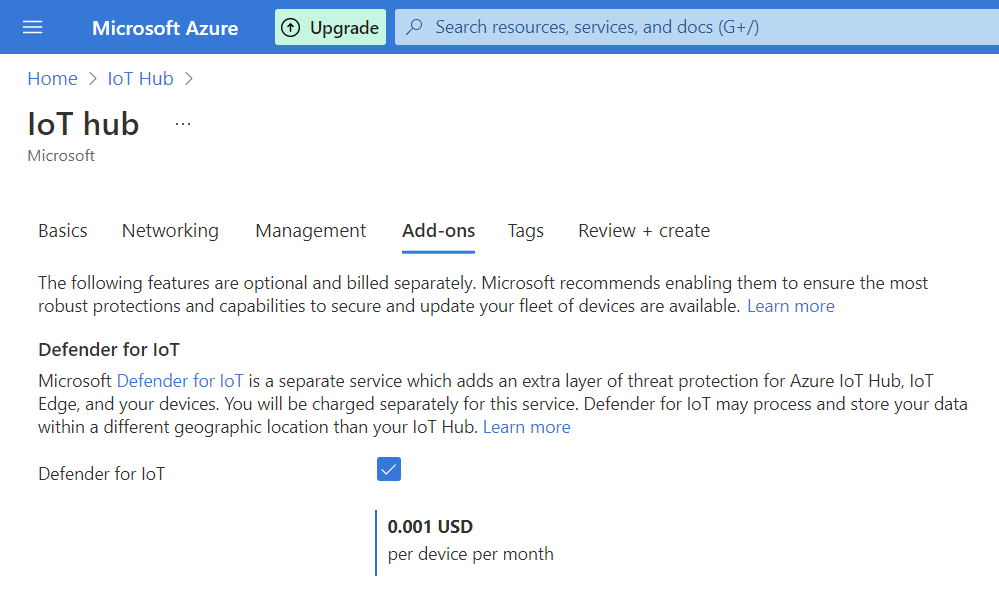
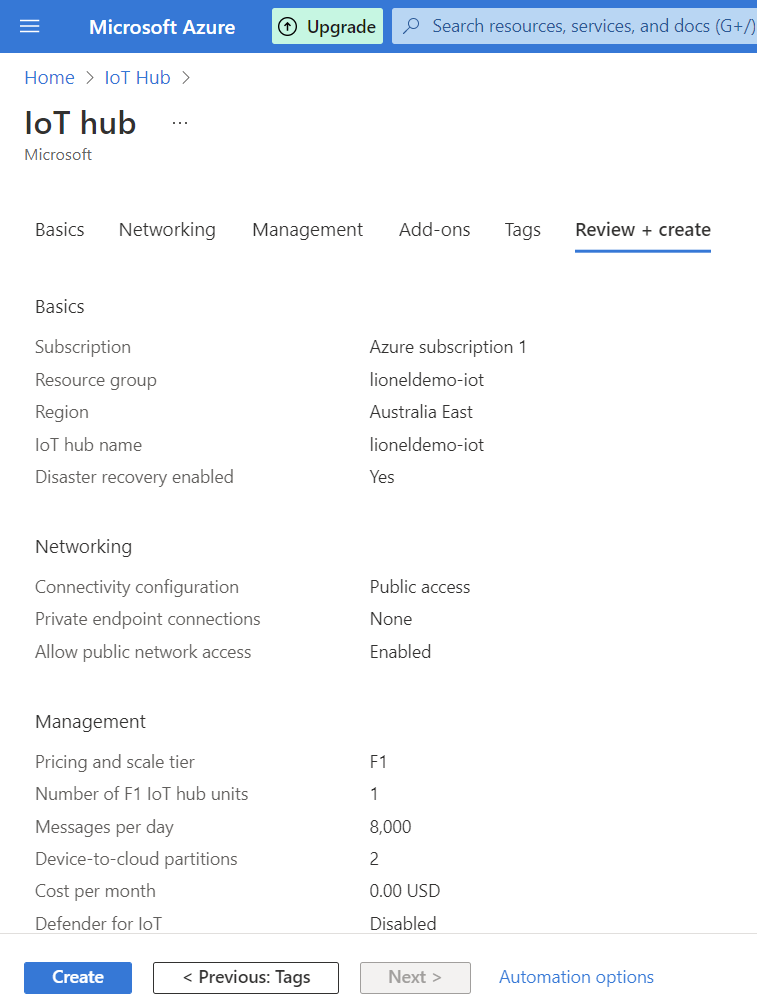
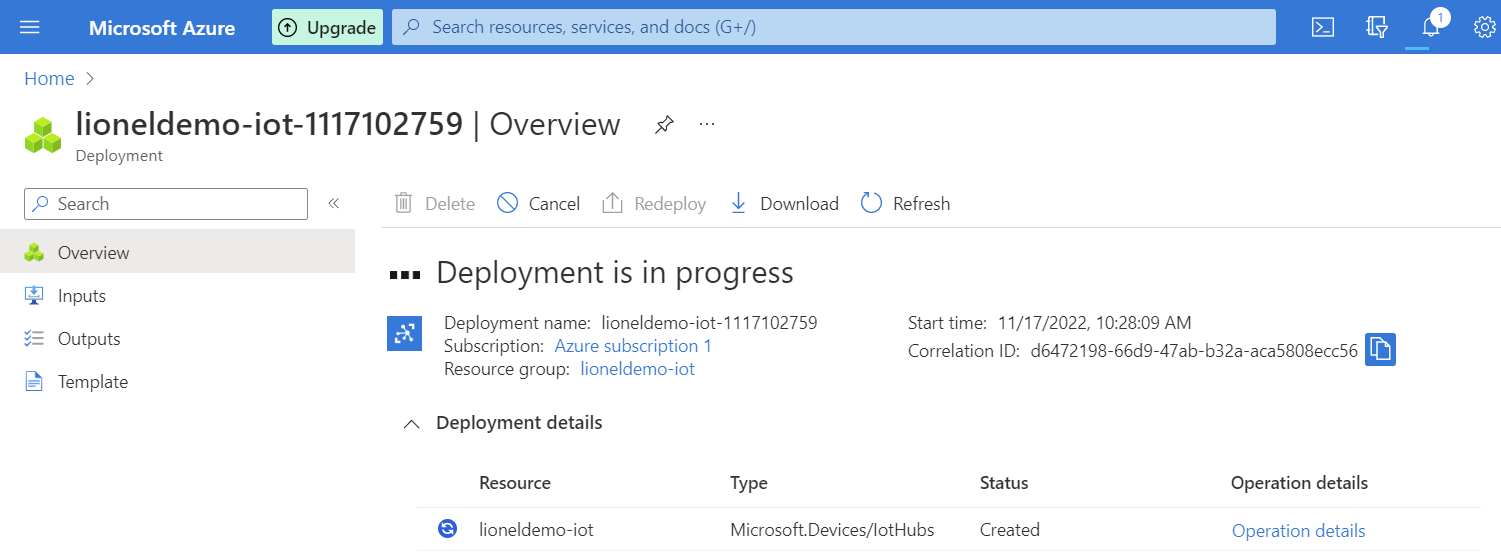
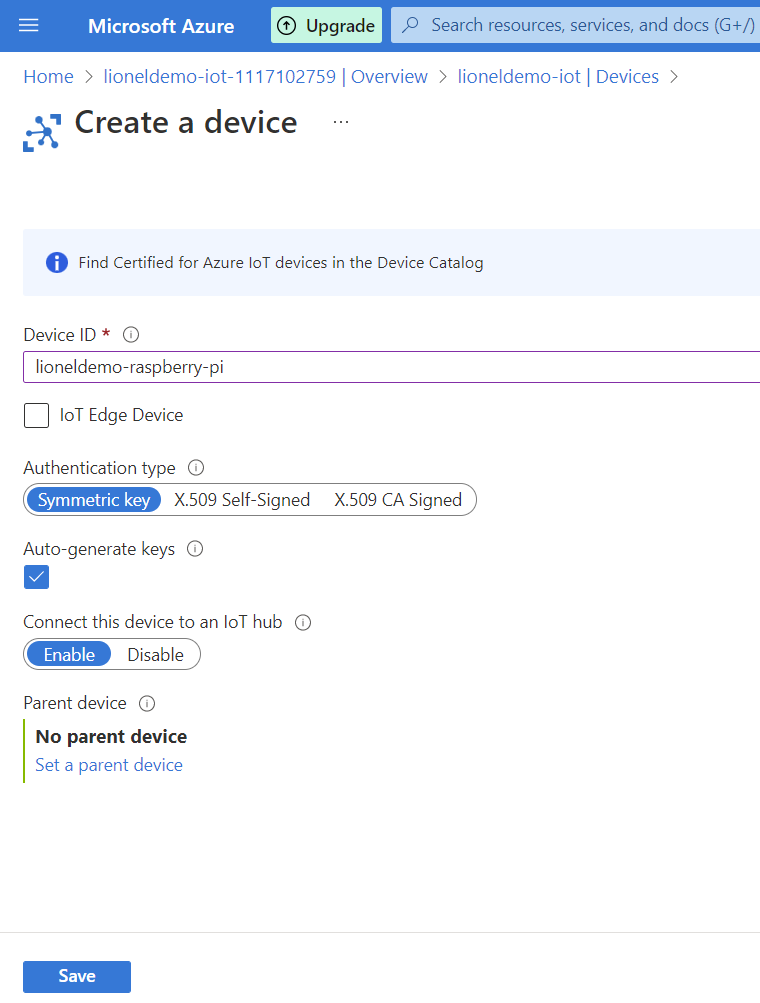
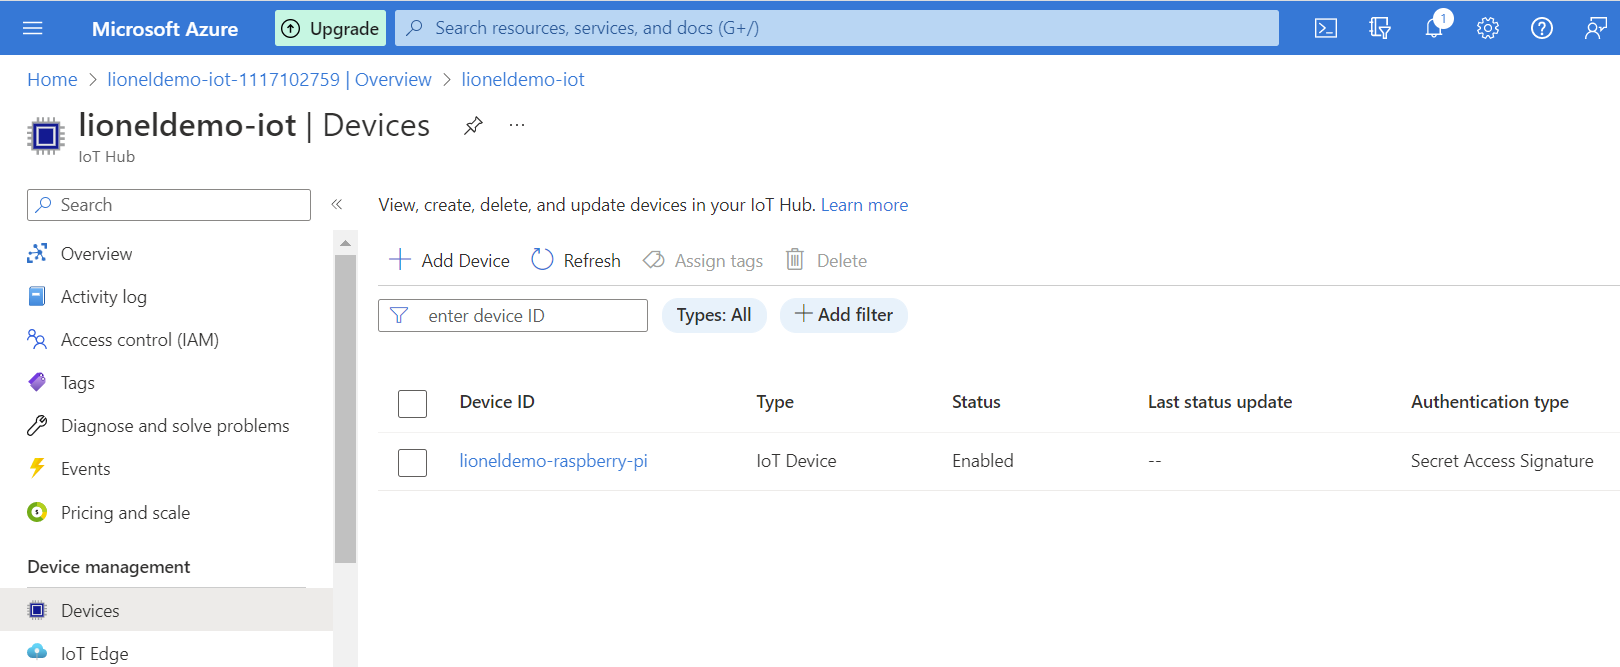
- Next, create a device as the following
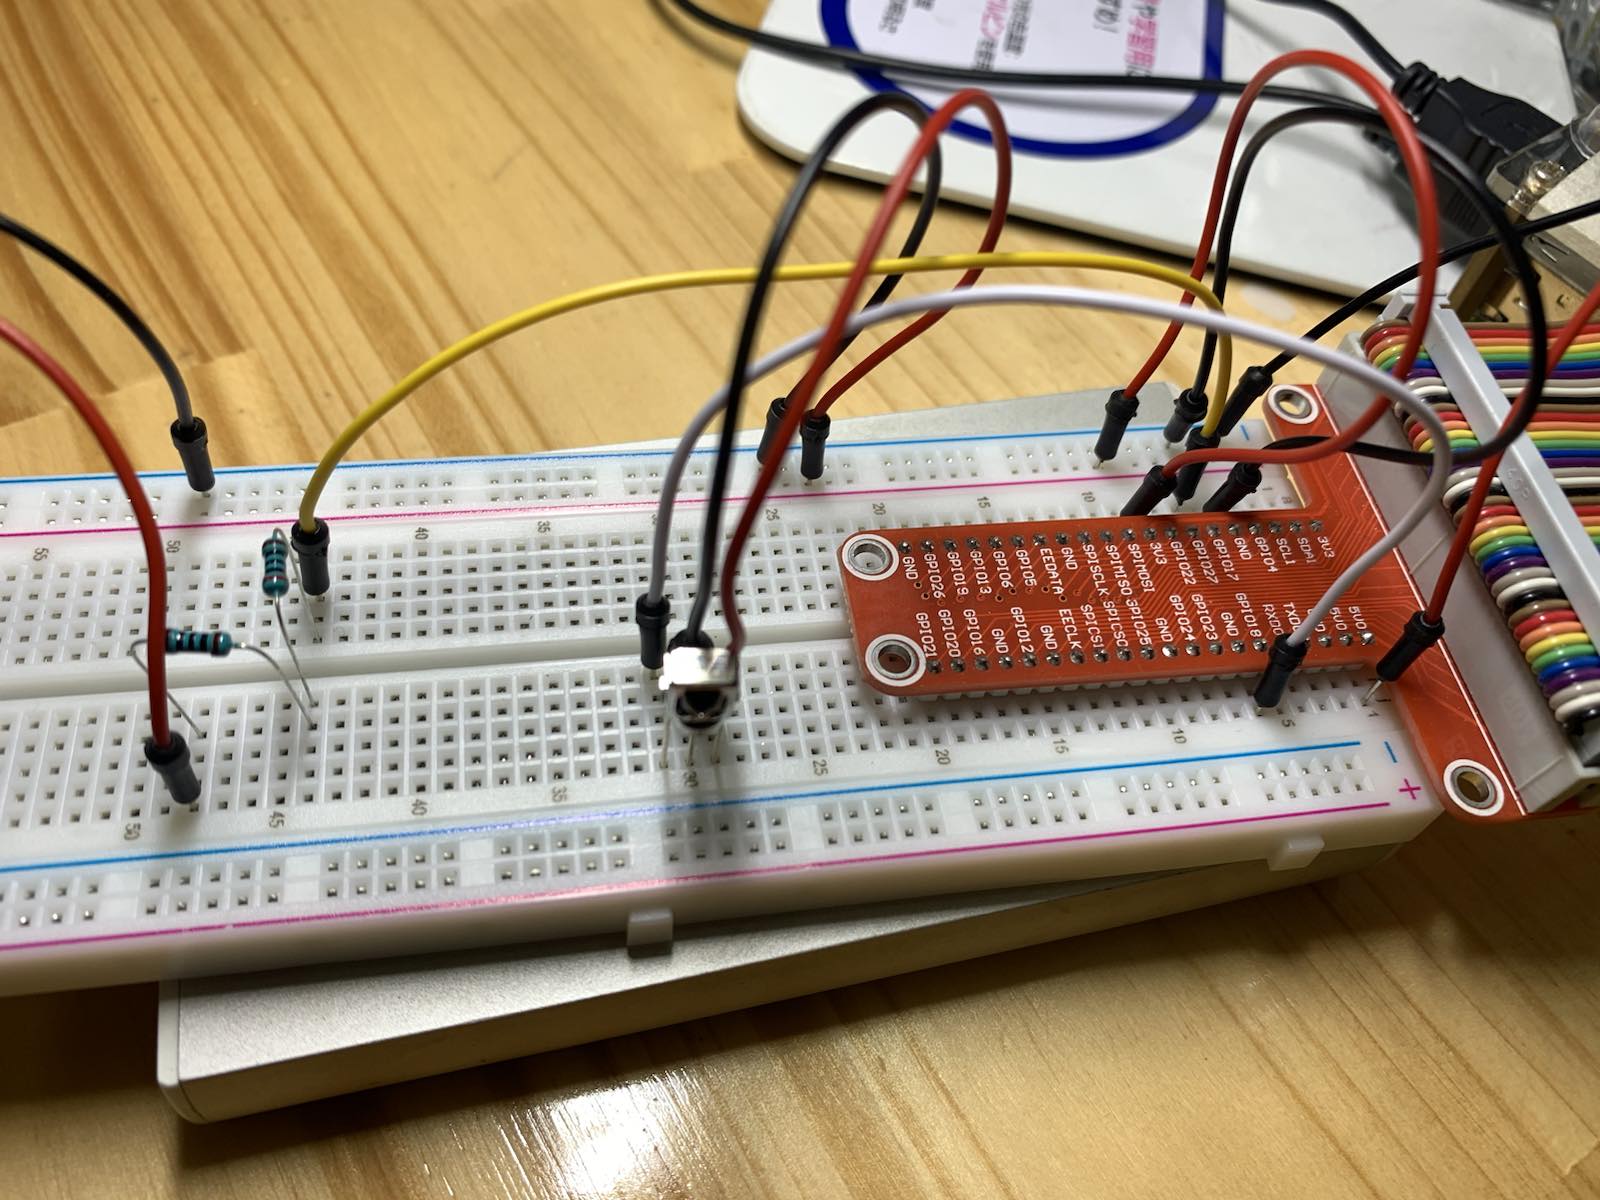
3.2.2. Setting up the control circuit
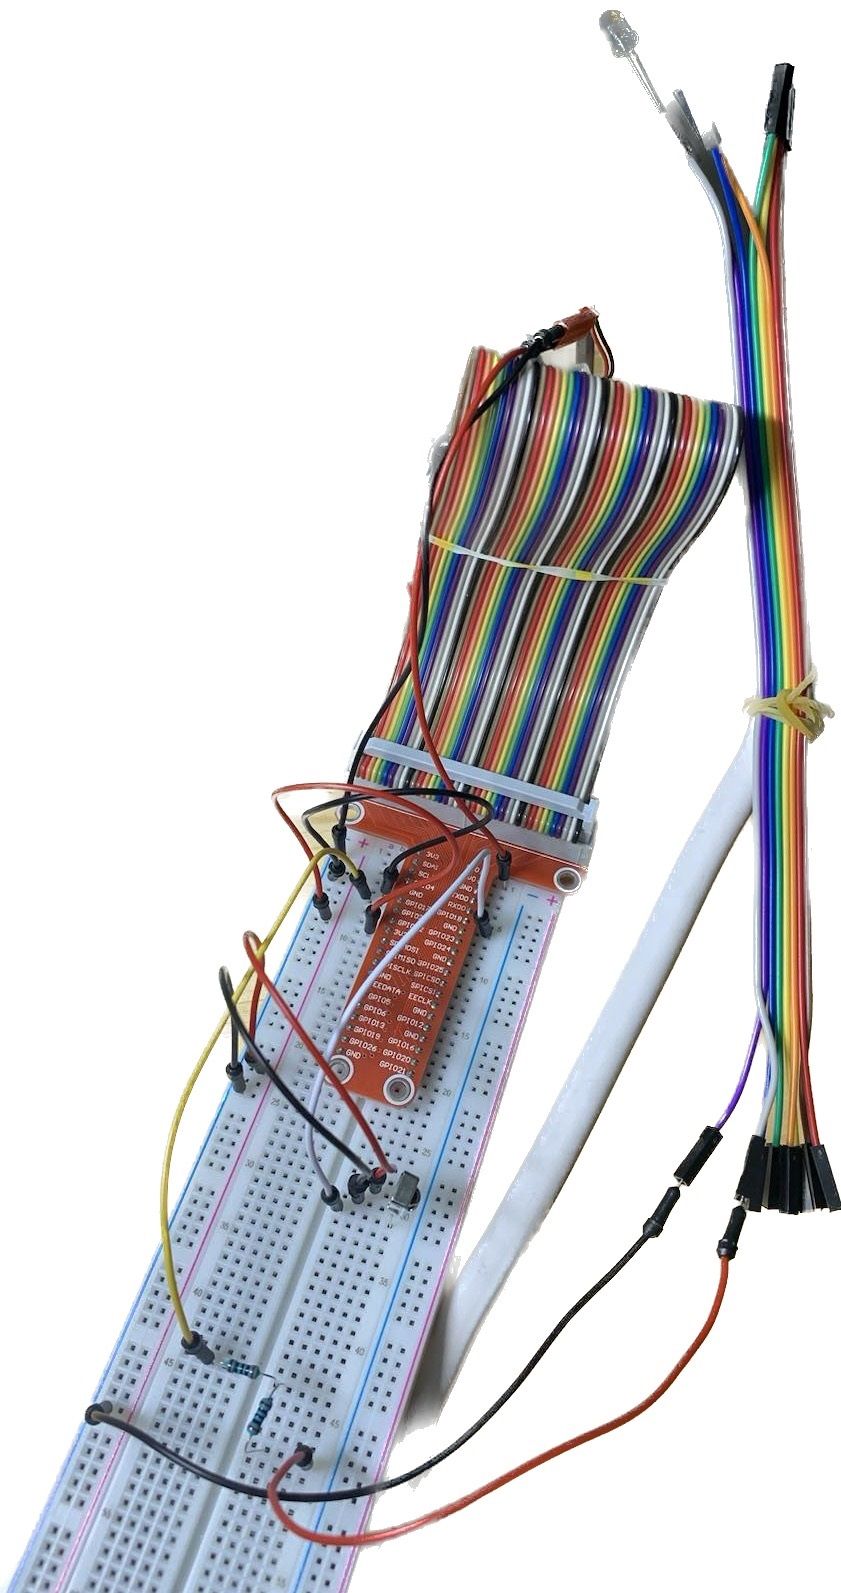
Hardware Preparation
- Raspberry Pi x 01
- Breadboard x 01
- IR Receiver(VS1838B) x 01
- IR Sender x 01
- Infrared Remote Controller of Fan x 01
- Resistor(200Ω) x 02
- Several jumper wires
- T-Extension Board with 40-Pin Cable(Optional) x 01
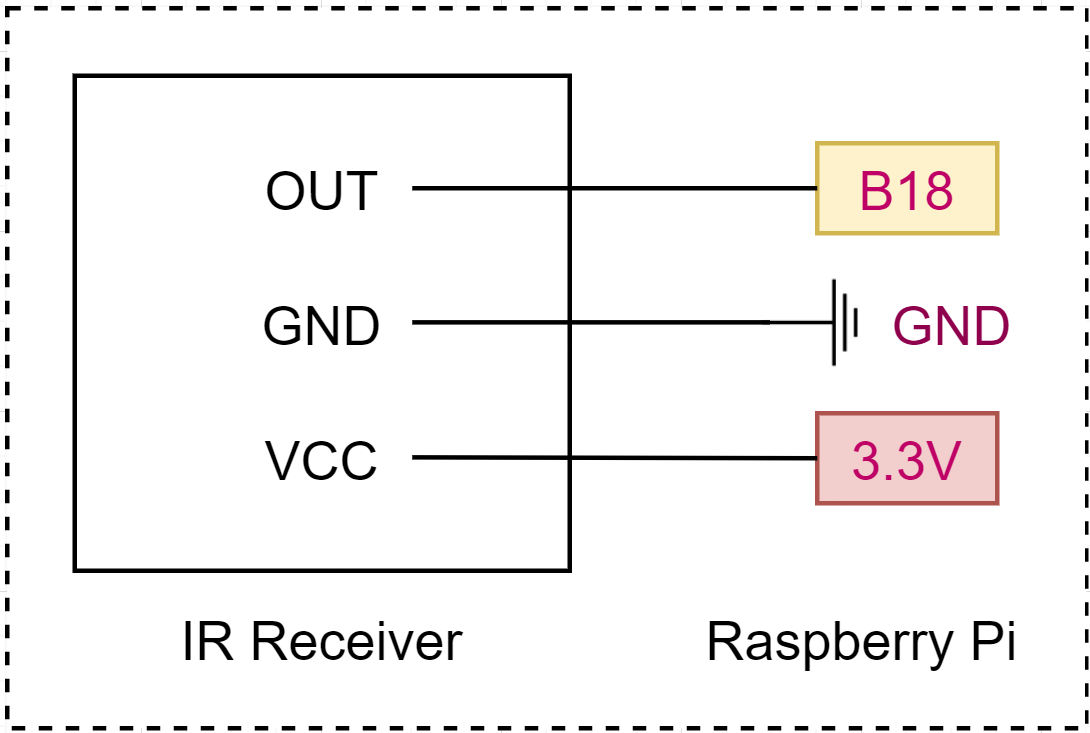
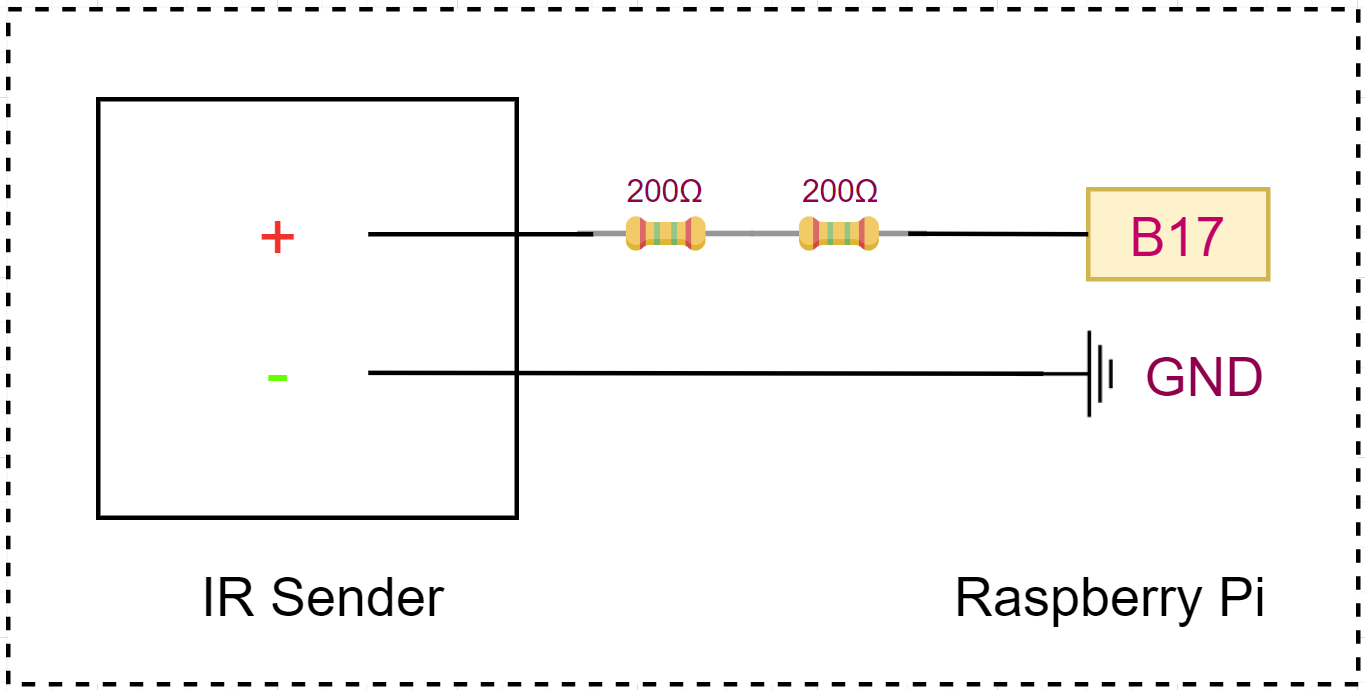
Schematic diagram of IR Receiver and IR Sender with Raspberry Pi:
IR Receiver:
IR Sender:
In reality:
3.2.3. Setting up the remote controller for my fan on Raspberry Pi
LIRC (Linux Infrared Remote Control) Module Installation
The very first step is to install LIRC after setting up the Raspberry PI OS. Enter the command below to install LIRC.
sudo apt-get update -y && sudo apt-get upgrade -y
sudo apt-get install lirc -y
LIRC Module Configuration
Let's configure the LIRC module to send and receive the IR signal.
Bootloader Configuration
sudo vim /boot/config.txt
Uncomment the following lines and correct the pin number. The default values before being uncommented were 17 for gpio-ir and 18 for gpio-ir-tx. But it should be swapped (line #5-6).
# Uncomment this to enable infrared communication.
#dtoverlay=gpio-ir,gpio_pin=17
#dtoverlay=gpio-ir-tx,gpio_pin=18

dtoverlay=gpio-ir,gpio_pin=18
dtoverlay=gpio-ir-tx,gpio_pin=17
LIRC Module Hardware Configuration
Open the file below:
sudo vim /etc/lirc/hardware.conf
Then enter the following:
LIRCD_ARGS="--uinput --listen"
LOAD_MODULES=true
DRIVER="default"
DEVICE="/dev/lirc0"
MODULES="lirc_rpi"
LIRC Module Options Configuration
sudo vim /etc/lirc/lirc_options.conf
Change both driver and device values (line #3-4).
#driver         = devinput
#device         = auto
driver          = default
device          = /dev/lirc0
Once you've completed by now, reboot Raspberry PI to recognise the updated bootloader.
sudo reboot
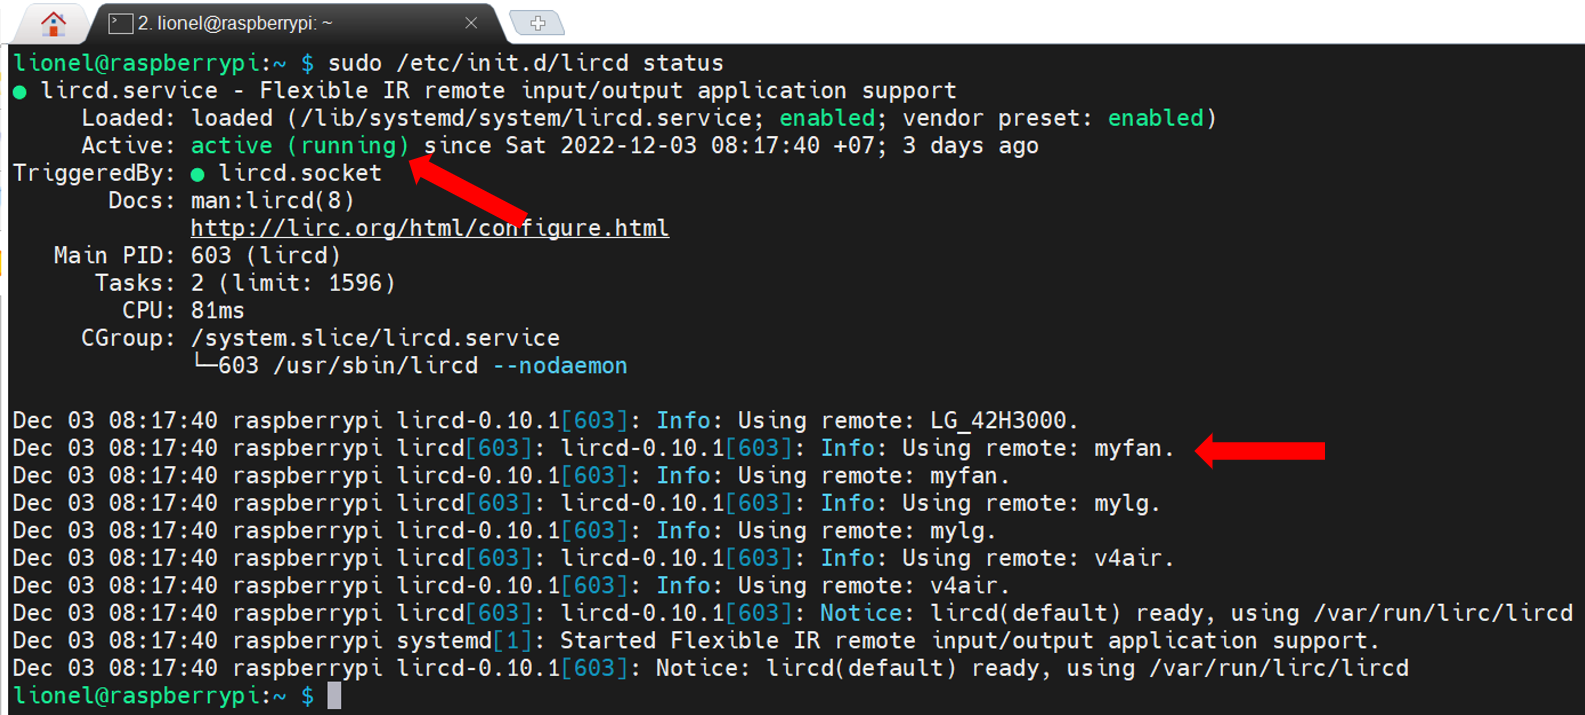
Run this command to check the LIRC module working or not.
sudo /etc/init.d/lircd status
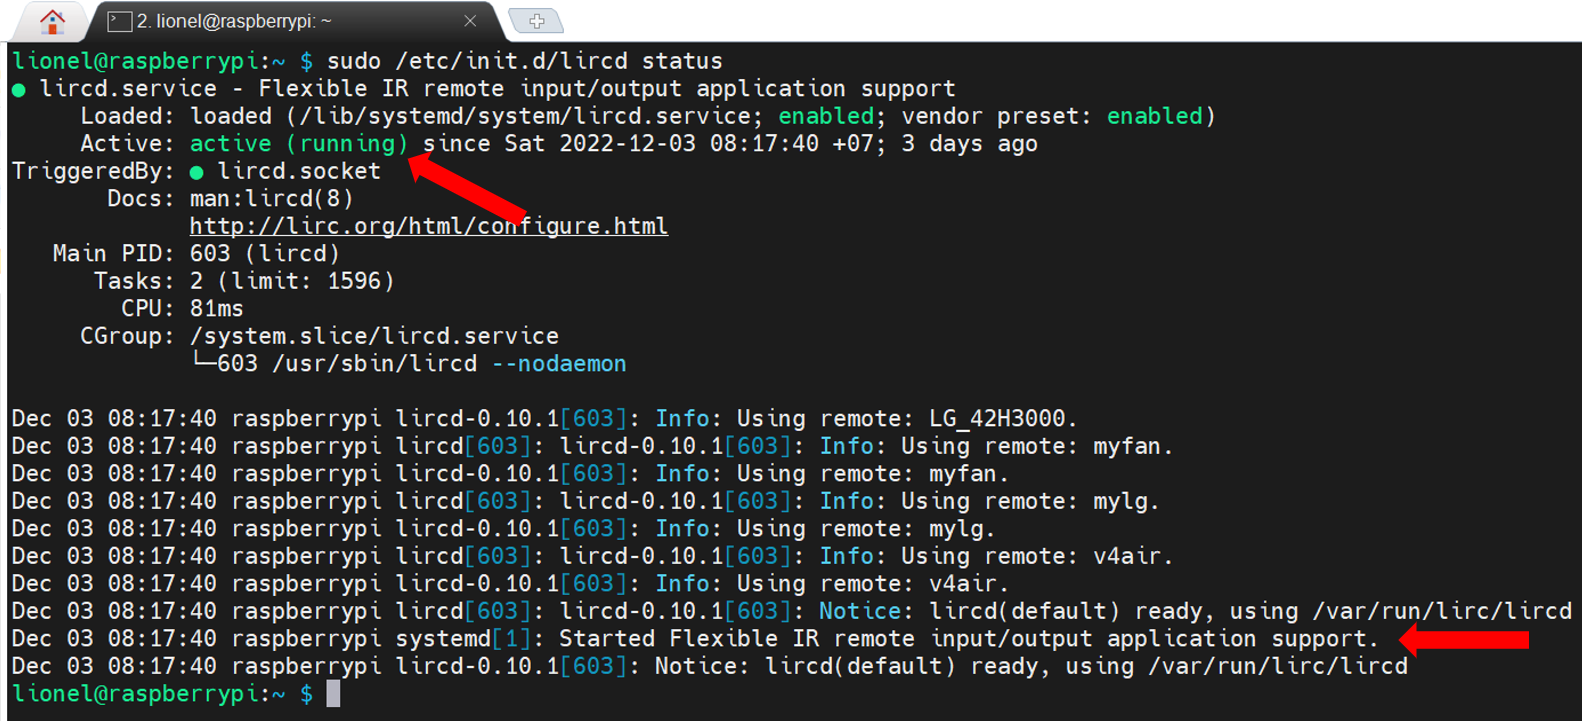
It's now working!
Manual Registration for Remote Controller
We need to create a configuration file to make a remote controller for our fan.
So, firstly, Raspberry PI should be double-checked whether the IR sensor on it captures the remote controller signal or not. First of all, stop the LIRC service.
sudo /etc/init.d/lircd stop
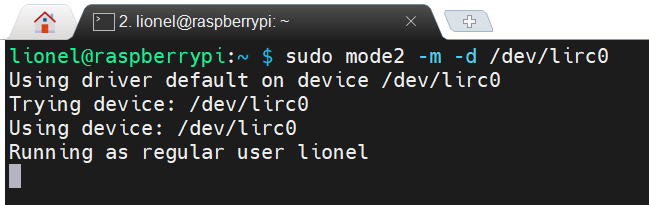
Run the following command to wait for the incoming IR signals.
sudo mode2 -m -d /dev/lirc0
You may get the following error message.

It's because both the IR sender and receiver are active at the same time. For this exercise, we only need the receiver, which is for capturing the IR signals. Disable the sender part. Open the bootloader.
sudo vim /boot/config.txt
We used to have both gpio-ir and gpio-ir-tx activated. As we don't need the sender part for now, update the file like below (line #5-6).
# Uncomment this to enable infrared communication.
#dtoverlay=gpio-ir,gpio_pin=17
#dtoverlay=gpio-ir-tx,gpio_pin=18

dtoverlay=gpio-ir,gpio_pin=18
#dtoverlay=gpio-ir-tx,gpio_pin=17
Once completed, reboot Raspberry PI using the command, sudo reboot. Once it's restarted, stop the LIRC server.
Then, run the following command so that you can confirm it works.
sudo mode2 -m -d /dev/lirc0
Now it's waiting for your IR signal input. Locate your remote controller close to Raspberry PI and punch some buttons. You'll find out the remote controller buttons are captured.
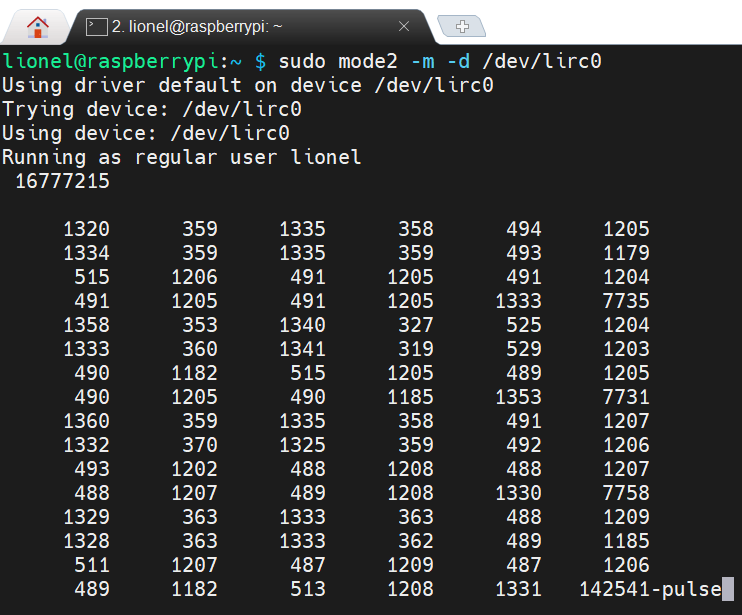
We confirm the incoming signals are properly captured. It's time to generate the remote controller file. Enter the following command:
sudo irrecord -d /dev/lirc0 --disable-namespace
Once running the command above, it gives you instructions to follow. Record your buttons by following the instruction. However, the recording application sometimes doesn't work as expected.
I had to use a different approach. Instead of using irrecord, I had to use mode2 to capture the button signals.
Record the button signals and write to configuration file (e.g., myfan.lircd.conf)
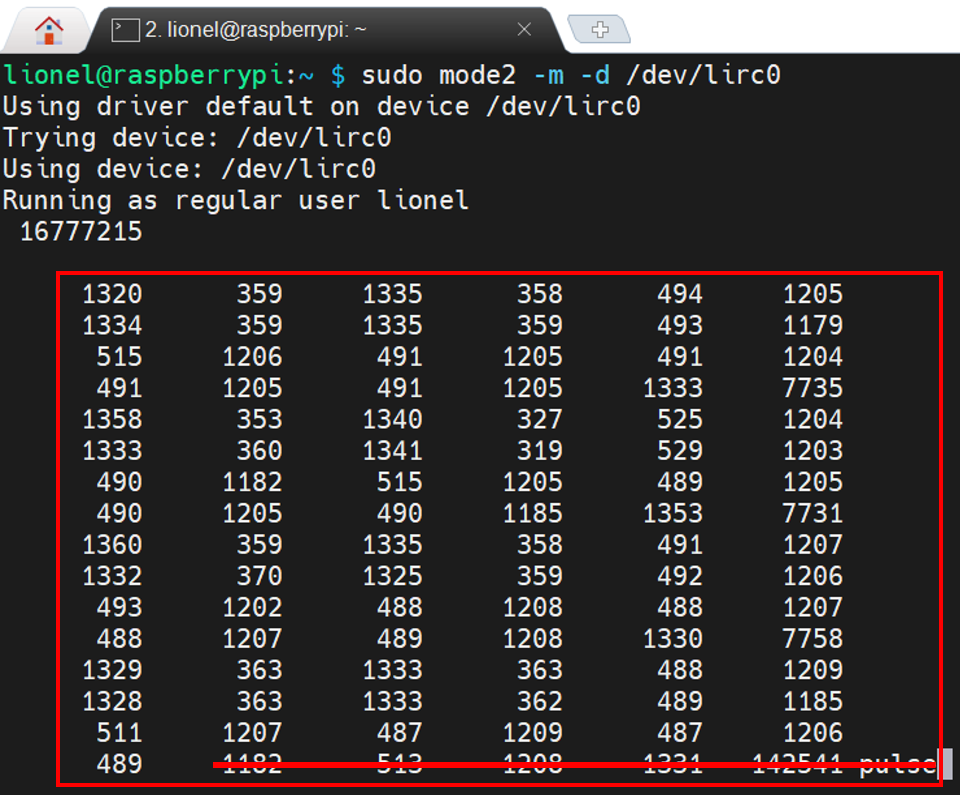
The number blocks in the red rectangle are the set of the controller button (ON_OFF button). As the last values of the box are an outlier, delete them. And remove all others except the number blocks. Let's add the followings around the number blocks.
Add begin remote ... begin raw_codes before the fist number block. They are from the random file on the database. I don't know what the exact value might look like. I just copied and pasted them to the file (line #1-13).
Give each number block a name like name ON_OFF. Each button has a different value represented by the number block. Therefore give those names extensively (line #15, 22).
Add the lines at the end of the final number block (line #29-30).
begin remote

  name   myfan
  flags RAW_CODES
  eps            25
  aeps          100

  ptrail          0
  repeat     0     0
  gap    20921


  begin raw_codes

    name ON_OFF
     1320      359     1335      358      494     1205
     1334      359     1335      359      493     1179
      515     1206      491     1205      491     1204
      ...
      489

    name TIME
     9000     4453      578      548      580      548
      578      549      556      572      552      576
      552     1683      577      551      550     1683
      ...
      573

  end raw_codes
end remote
A completed configuration file is as below:
begin remote

  name   myfan
  flags RAW_CODES
  eps            25
  aeps          100

  ptrail          0
  repeat     0     0
  gap    20921


  begin raw_codes

    name ON_OFF
     1319      359     1336      359      493     1208
     1329      360     1336      359      494     1179
      517     1205      490     1205      490     1208
      488     1206      490     1183     1356     7736
     1355      359     1335      359      495     1205
     1331      329     1377      349      495     1204
      491     1205      490     1206      490     1205
      490     1206      491     1179     1360     7730
     1362      357     1335      358      495     1180
     1358      359     1335      360      493     1209
      485     1205      491     1205      489     1205
      490     1206      490     1205     1334     7730
     1359      359     1338      359      499     1176
     1356      360     1336      360      492     1205
      490     1211      485     1206      489     1205
      491     1205      491     1205     1333     7735
     1355      360     1335      360      493     1206
     1333      362     1330      360      493     1206
      490     1204      492     1204      491     1205
      491     1205      488     1182     1360     7756
     1329      338     1358      365      487     1211
     1329      367     1331      361      487     1210
      486     1209      486     1210      485

    name TIME
     1318      358     1336      359      494     1180
     1358      358     1336      328     1370      356
      493     1205      491     1205      490     1206
     1333      358     1337      359      493     8575
     1360      361     1354      338      493     1206
     1332      360     1334      361     1334      360
      492     1188      508     1183      513     1180
     1358      360     1334      361      491     8580
     1354      360     1335      359      495     1204
     1334      357     1335      359     1336      326
      527     1204      489     1211      485     1205
     1333      357     1336      359      493     8570
     1361      360     1336      324      528     1205
     1341      323     1367      357     1335      358
      500     1201      488     1181      515     1204
     1339      355     1335      357      495     8573
     1359      359     1336      359      494     1205
     1333      359     1337      358     1339      356
      494     1204      491     1204      491

    name UP
     1345      361     1335      362      494     1204
     1331      328     1367      360      493     1207
      489     1182      513     1206     1331      373
      480     1215      481     1206      490     8632
     1355      360     1335      361      491     1207
     1336      356     1336      359      492     1206
      489     1207      489     1208     1330      361
      496     1202      490     1205      489     8584
     1401      361     1334      359      492     1207
     1331      361     1335      359      491     1207
      488     1181      514     1207     1331      361
      493     1182      513     1210      486     8629
     1359      358     1334      367      486     1206
     1331      361     1334      360      493     1206
      490     1205      490

    name DOWN
     1348      359     1336      358      493     1206
     1332      359     1336      359      493     1206
     1333      359      494     1207      488     1206
      490     1205      490     1206      490     8578
     1359      356     1336      358      494     1211
     1327      358     1336      358      495     1205
     1333      325      527     1180      515     1206
      489     1182      513     1205      491     8603
     1330      359     1336      359      494     1205
     1332      358     1342      352      494     1206
     1333      358      494     1205      491     1205
      491     1205      491     1204      491     8575
     1360      360     1333      358      493     1189
     1351      358     1335      359      494     1211
     1326      326      525     1205      491     1179
      515     1205      491     1204      491     8575
     1357      358     1340      321      528     1182
     1356      358     1336      358      494     1206
     1333      363      489     1205      491

    name SWING
     1346      359     1336      357      494     1207
     1333      359     1336      358      494     1206
      489     1207      490     1206      490     1206
      490     1182     1357      359      494     8581
     1355      358     1341      354      494     1205
     1334      358     1337      358      494     1205
      491     1206      491     1206      491     1205
      491     1182     1357      358      494     8601
     1334      359     1337      358      493     1185
     1355      359     1337      323      529     1179
      517     1205      490     1206      491     1205
      490     1206     1334      358      494     8575
     1359      359     1336      359      493     1206
     1334      358     1337      358      493     1206
      491     1179      516     1205      491     1204
      491     1206     1335      357      493     8578
     1361      356     1337      359      494     1206
     1334      359     1337      322      530     1205
      491     1205      491     1205      491     1204
      491     1205     1334      324      529     8575
     1359      359     1338      357      493     1206
     1334      358     1336      360      494     1205
      491     1186      509     1205      491

    name BABY
     1351      361     1334      360      492     1180
     1360      360     1335      326     1369      360
      492     1184      511     1207      489     1207
      490     1207     1331      362     1333     7731
     1358      364     1332      363      487     1210
     1329      364     1337      327     1363      362
      490     1209      487     1209      487     1209
      485     1210     1329      363     1331     7761
     1331      363     1331      365      487     1210
     1329      335     1360      365     1330      364
      488     1219      477     1210      486     1209
      487     1186     1352      366     1333     7732
     1356      364     1331      332      527     1183
     1350      365     1331      364     1331      364
      487     1188      509     1210      486     1184
      511     1211     1329      366     1330     7737
     1354      365     1329      366      487     1229
     1313      364     1331      364     1330      365
      487     1209      486     1211      486     1216
      480     1210     1329      366     1330     7722
     1369      364     1330      365      489     1187
     1352      365     1332      364     1330      363
      489     1208      487     1185      511

    name MEDIUM
     1397      362     1334      361      492     1207
     1332      361     1335      360      491     1207
      488     1207      490     1206      492     1204
     1333      359      492     1182      514     7833
     1464      362     1334      357      493     1206
     1332      360     1336      358      493     1206
      490     1206      489     1205      490     1206
     1333      360      491     1206      491     7845
     1456      354     1334      360      492     1207
     1332      361     1334      360      492     1213
      482     1182      514     1213      483     1205
     1331      361      492     1205      489     7903
     1391      361     1335      360      492     1207
     1330      361     1334      361      491     1207
      489     1206      489     1188      506     1207
     1332      360      492     1206      489     7833
     1463      361     1334      360      492     1207
     1332      360     1336      359      491     1207
      489     1206      489     1206      489

    name HIGH
     1348      359     1336      362      491     1206
     1333      360     1336      359      494     1204
      491     1206     1335      356      494     1206
      491     1180      516     1205      491     8492
     1359      352     1335      358      494     1205
     1340      317     1372      360      493     1179
      516     1206     1334      358      494     1205
      491     1204      491     1205      491     8486
     1358      359     1336      359      494     1206
     1332      359     1342      353      494     1204
      490     1206     1333      359      494     1203
      492     1205      490     1206      490     8483
     1363      321     1373      355      494     1206
     1333      358     1338      357      495     1211
      484     1205     1333      357      495     1205
      491     1205      490     1205      491     8485
     1362      357     1335      360      493     1208
     1328      362     1333      361      492     1209
      488     1206     1341      351      495     1205
      490     1205      492     1204      492     8484
     1356      357     1333      364      489     1188
     1354      363     1330      363      489     1185
      511     1209     1330      363      488

  end raw_codes
end remote
After this update, copy this file to the LIRC directory.
sudo cp myfan.lircd.conf /etc/lirc/lircd.conf.d/
Remote controllers have been registered. Open the bootloader for the update.
sudo vim /boot/config.txt
Reactivate the IR sender part by uncommenting the line (line #5-6).
# Uncomment this to enable infrared communication.
#dtoverlay=gpio-ir,gpio_pin=17
#dtoverlay=gpio-ir-tx,gpio_pin=18

dtoverlay=gpio-ir,gpio_pin=18
dtoverlay=gpio-ir-tx,gpio_pin=17
Run sudo reboot to reboot Raspberry PI. Check whether the LIRC module is working or not.
sudo /etc/init.d/lircd status
3.2.4. Controlling my fan on Raspberry Pi
Let's check which commands the remote controller on Raspberry PI have. Enter the following command to see the list of names that I can execute.
irsend LIST myfan ""

OK. Let's run the command.
irsend SEND_ONCE myfan ON_OFF
Although the terminal shows nothing, I actually turn on my fan.
Controlling my fan on Raspberry Pi by python source code
There is a wrapper of irsend command in python (also known as py_irsend), so, I will use it for coding.
- Install
py_irsend:
pip install py_irsend
- Let's try
py_irsend:
python
>>> from py_irsend import irsend
>>> irsend.list_remotes()
>>> irsend.list_codes('myfan')
>>> irsend.send_once('myfan', ['ON_OFF'])

3.2.5. Receiving requests from Azure IoT Hub on Raspberry Pi and controlling my fan
In order to able to receive requests (messages) from Azure IoT Hub, we need to install the azure-iot-device library.
sudo pip3 install azure-iot-device
I wrote a simple source code file in python to process receiving requests from Azure IoT Hub on Raspberry Pi and controlling my fan.
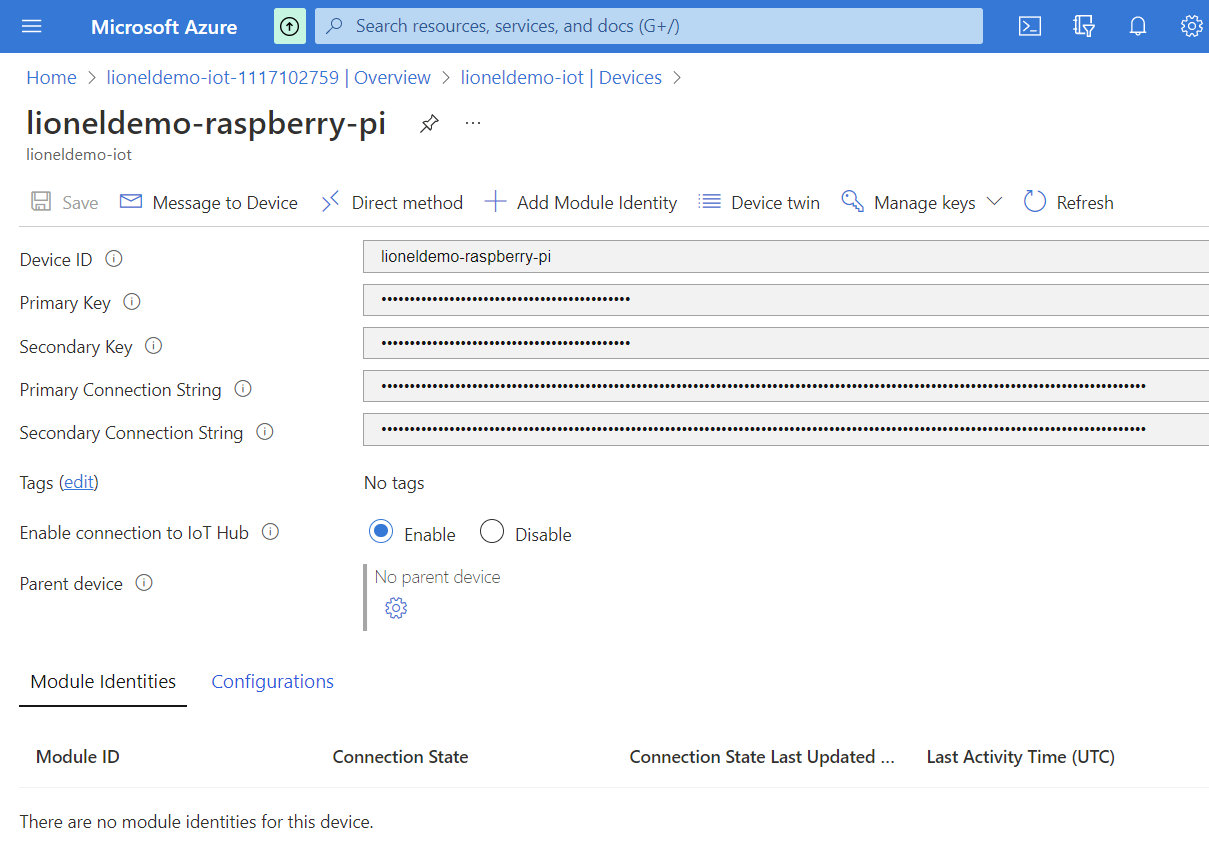
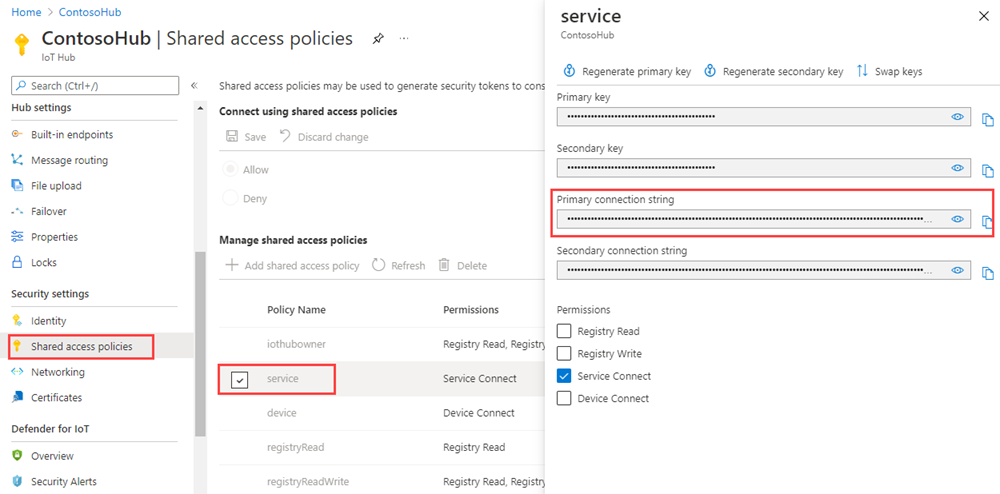
In the source code file, I hardcode a variable CONNECTION_STRING. You can find its value in the end of section 3.2.1. Create Azure IoT Hub at Primary Connection String of lioneldemo-raspberry-pi device.
# receivec2d.py
import time
from azure.iot.device import IoTHubDeviceClient
import myfan

CONNECTION_STRING = "HostName=lioneldemo-iot.azure-devices.net;DeviceId=lioneldemo-raspberry-pi;SharedAccessKey=FyzOwxwsK0wlkgQZpGPQIT2dLUCemi3btmbnzSd3DB8="

def message_handler(message):
    print("Message received:", message.data.decode('utf-8'))
    myfan.exe_cmd(message.data.decode('utf-8'))

def main():
    print ("Starting the Python IoT Hub C2D Messaging device sample...")

    # Instantiate the client
    client = IoTHubDeviceClient.create_from_connection_string(CONNECTION_STRING)

    # print ("Waiting for C2D messages, press Ctrl-C to exit")
    try:
        # Attach the handler to the client
        client.on_message_received = message_handler
        while True:
            selection = input("Press Q to quit\n")
            if selection == "Q" or selection == "q":
                print("Quitting...")
                break
    except KeyboardInterrupt:
        print("IoT Hub C2D Messaging device sample stopped")
    finally:
        # Graceful exit
        print("Shutting down IoT Hub Client")
        client.shutdown()

if __name__ == '__main__':
    main()
To controll my fan, I also imported myfan module. The source code of this module is as below:
# myfan.py
from py_irsend import irsend

DEVICE_KEY = "myfan"
CMD_LIST =  ["ON_OFF", "TIME", "UP", "DOWN", "SWING", "BABY", "MEDIUM", "HIGH"]

def exe_cmd(cmd_str = ""):
    if cmd_str == None:
        return
    cmd_str = cmd_str.upper()
    if cmd_str in CMD_LIST:
        irsend.send_once(DEVICE_KEY, [cmd_str])
- Execute this source code file on Raspberry Pi
python receivec2d.py

3.2.5. Sending requests from Azure IoT Hub to Raspberry Pi
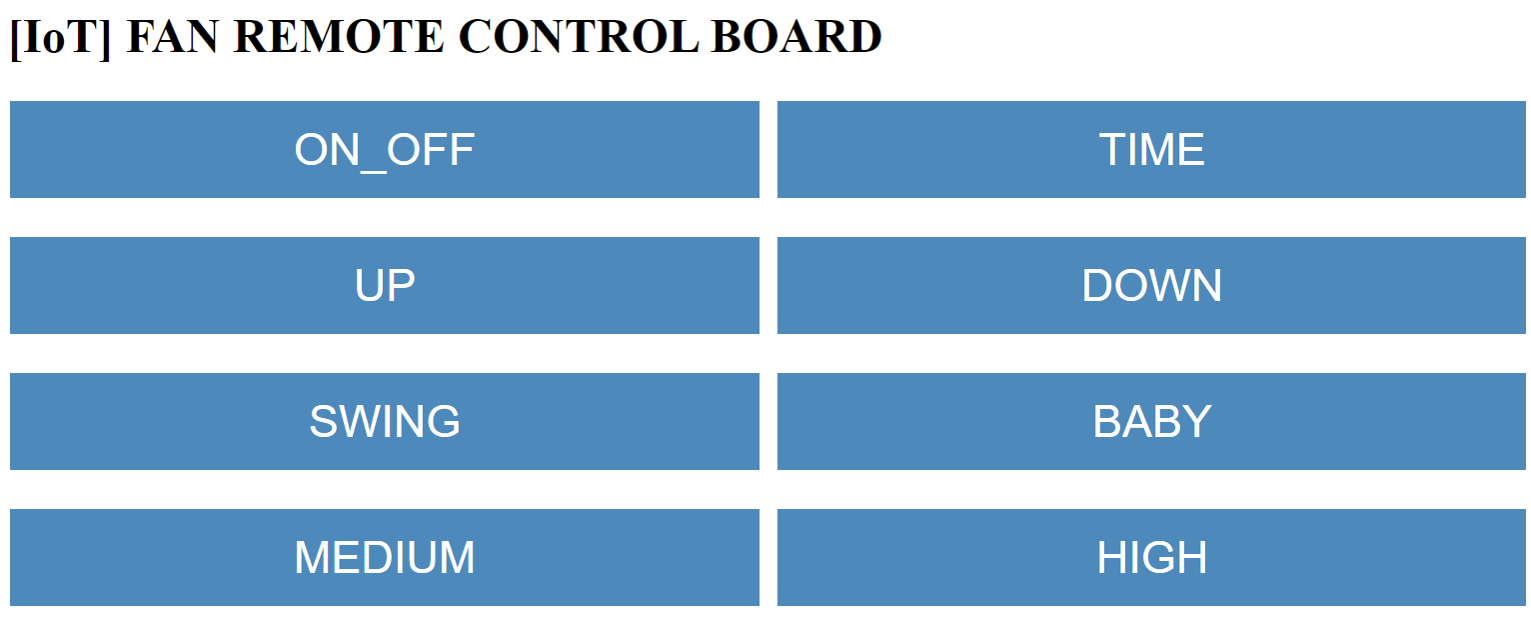
In order to control my fan over the internet, I need a simple Web UI where show command buttons to control as below.
So, I am going to use the Azure Function App with HttpTrigger type to implement that requirement.
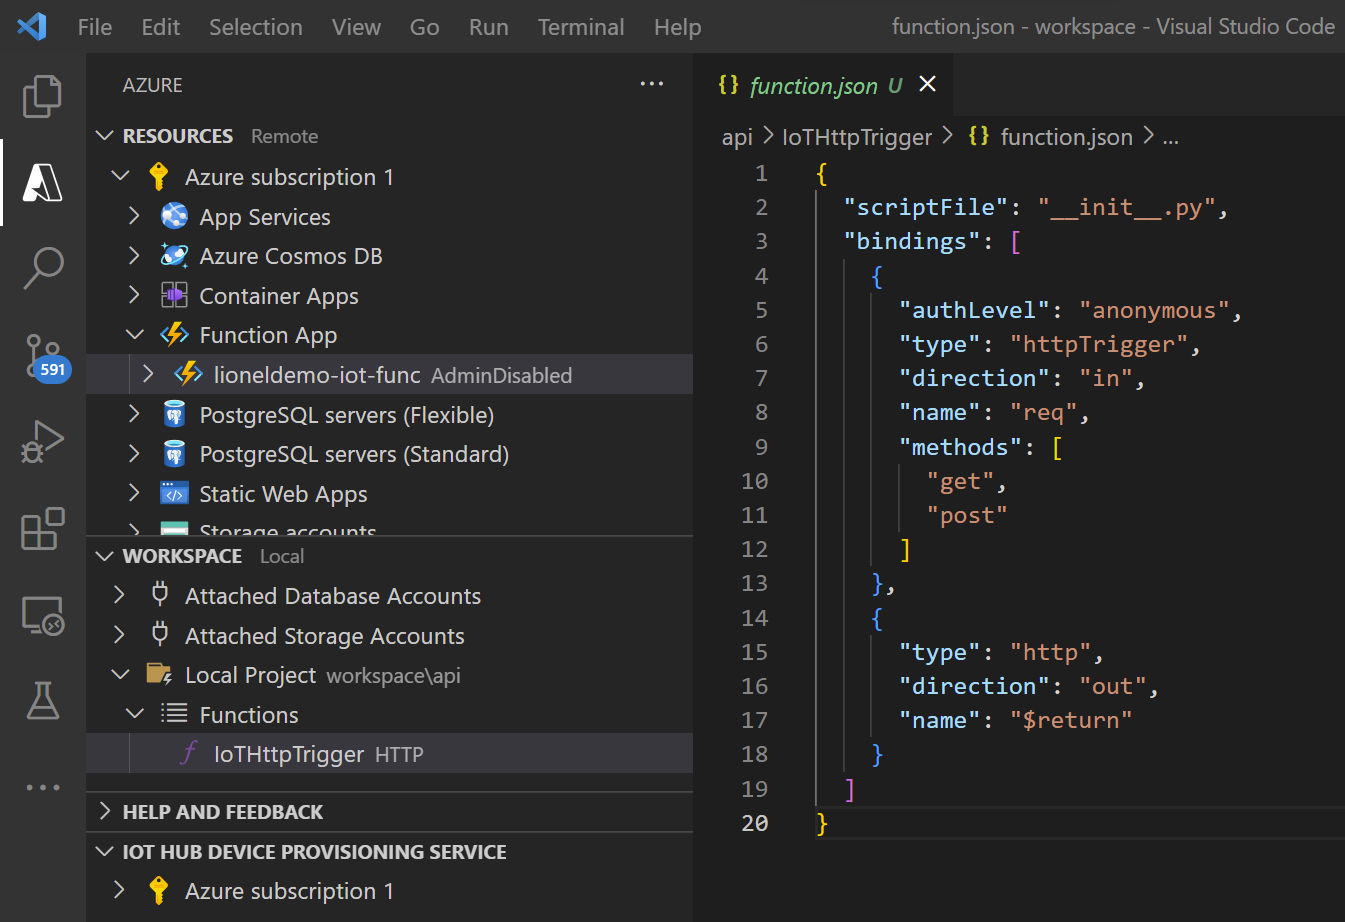
Create Azure Function App in Azure Portal (e.g., lioneldemo-iot-func)
Create HttpTrigger function (e.g., IoTHttpTrigger)
- Detail source code of the function is as below:
# __init__.py
import logging
import azure.functions as func
from azure.iot.hub import IoTHubRegistryManager
CONNECTION_STRING = "HostName=lioneldemo-iot.azure-devices.net;SharedAccessKeyName=device;SharedAccessKey=3CBwHsZyeHGtVIV8/KkqZosrqN4LfLfeKI+6jCok/Ss="
DEVICE_ID = "lioneldemo-raspberry-pi"
# Send a message (command) from cloud to device (C2D)
def send_cmd(cmd_str = ""):
try:
# Create IoTHubRegistryManager
registry_manager = IoTHubRegistryManager(CONNECTION_STRING)
data = cmd_str
props={}
registry_manager.send_c2d_message(DEVICE_ID, data, properties=props)
except Exception as ex:
print ( "Unexpected error {0}" % ex )
return
except KeyboardInterrupt:
print ( "IoT Hub C2D Messaging service sample stopped" )
# Create UI (html source code) for client to control a device (fan)
def body_html():
title = '<h1>[IoT] FAN REMOTE CONTROL BOARD</h1>'
# Create CSS for button
css = '<style>'\
'.button {'\
' background-color: #008CBA;'\
' border: none;'\
' color: white;'\
' padding: 15px 32px;'\
' text-align: center;'\
' text-decoration: none;'\
' display: inline-block;'\
' margin: 4px 2px;'\
' cursor: pointer;'\
'}'\
'.button_size {font-size: 30px; width: 500px}'\
'</style>'
# Set content with CSS and Title
content = css + title
# A fan control button list
CMD_LIST = ["ON_OFF", "TIME", "UP", "DOWN", "SWING", "BABY", "MEDIUM", "HIGH"]
# Set content with html buttons for each command above and return the content.
count = 0
for cmd in CMD_LIST:
count += 1
content += f'<button type="button" class="button button_size" onclick="document.location = \'IoTHttpTrigger?cmd={cmd}\'">{cmd}</button> '
# Create a new line of buttons when a row had 2 buttons
if count == 2:
count = 0
content += '<br/><br/>'
return content
def main(req: func.HttpRequest) -> func.HttpResponse:
logging.info('Python HTTP trigger function processed a request.')
cmd = req.params.get('cmd')
if not cmd:
try:
req_body = req.get_json()
except ValueError:
pass
else:
cmd = req_body.get('cmd')
content = body_html()
# If there is a command is set, we will execute the command and update UI with the command is executed
if cmd:
text = f"<h3> Executed command: <strong>{cmd}</strong></h3>"
content += f"<p>{text}</p>"
send_cmd(cmd)
# Return the html page
return func.HttpResponse(
body=content,
status_code=200,
headers=None,
mimetype='html'
)
In the source code file above, I hardcode a variable CONNECTION_STRING for IoT Hub. You can find its value by following the guide. See more detail here.
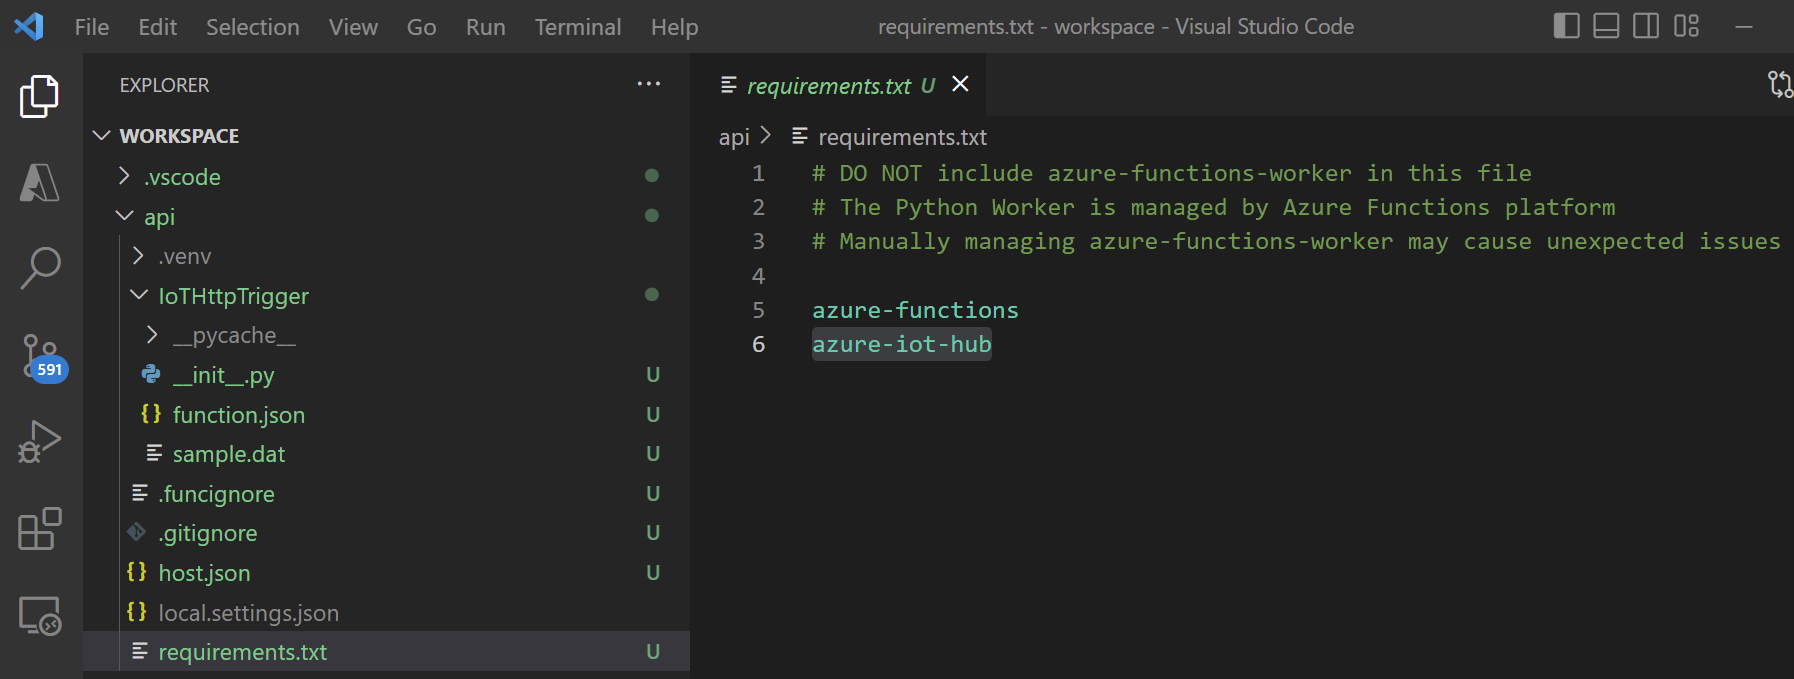
We also need to add azure-iot-hub library to \app\requirements.txt file to support sending a command (message) from cloud to device.
Now, I deploy the Azure function IoTHttpTrigger to Azure cloud, then I can control my fan over the internet by using a browser on PC or Smartphone.
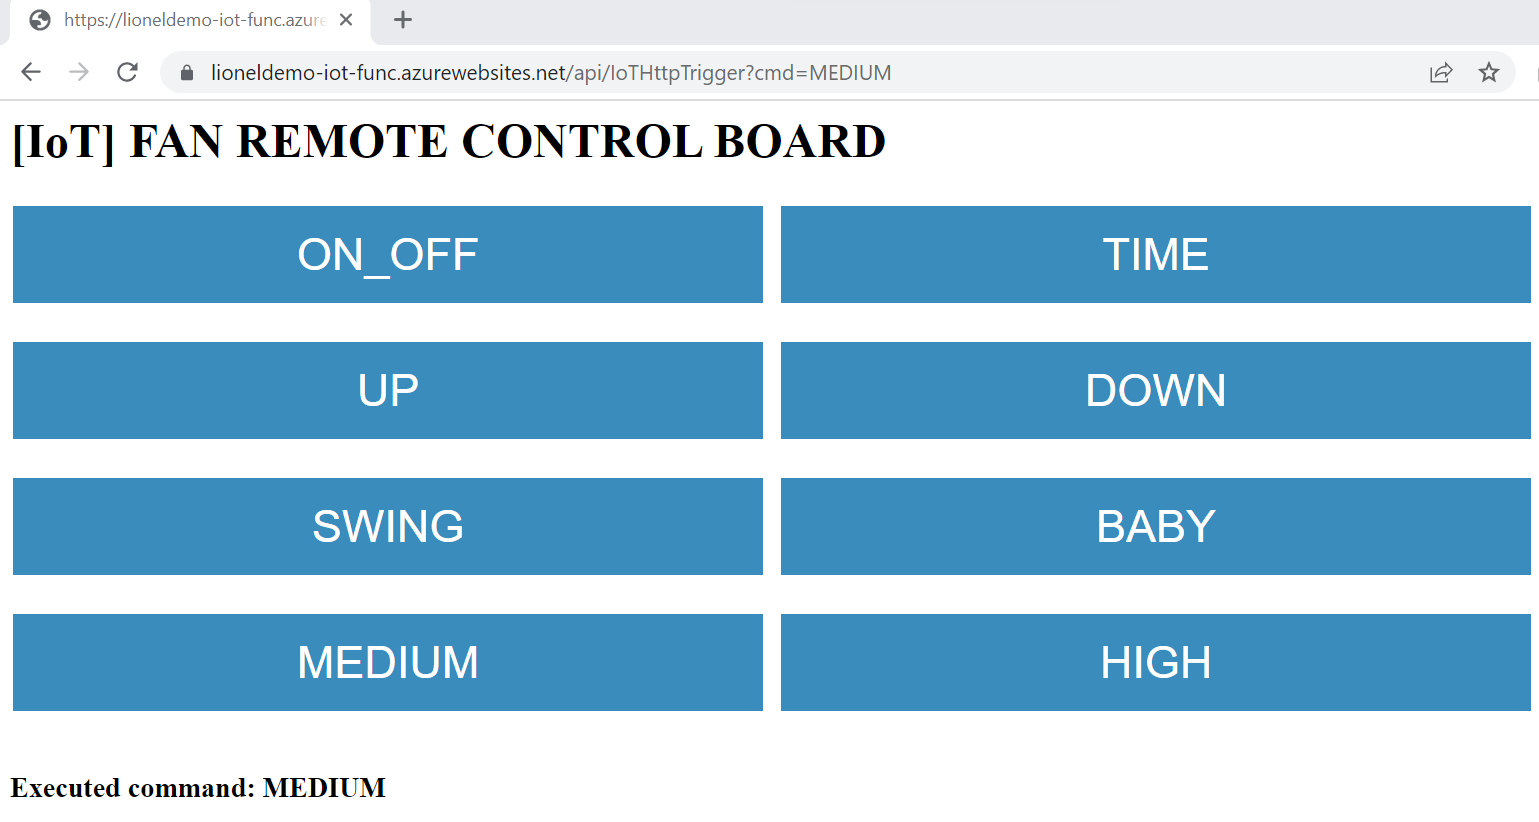
Demo Video
![[IoT] FAN REMOTE CONTROL BOARD](https://blog.shiftasia.com/content/images/2022/12/03-05-06.png)
4. Summary
With the use of Azure IoT services, you can implement IoT applications more easily, quickly, and conveniently.
The Demo above is just a simple application to help beginners understand the basics of how the link of works between IoT devices and Azure IoT services.
5. References
- Azure IoT documentation
- AZ-900 Episode 14 | Azure IoT Services | IoT Hub, IoT Central, Azure Sphere
- Get started with device development on Azure IoT