


In this article, I will explain Redux and delve into Redux Toolkit. A collection of tools that simplify using Redux. These tools help make Redux less daunting and easier to use.
What is Redux?
Redux is like other tools for state management. It makes the application work consistently, run in different environments, and be easy to test and debug.
Redux contains 3 components: Action, Store, and Reducers.
How does Redux work?
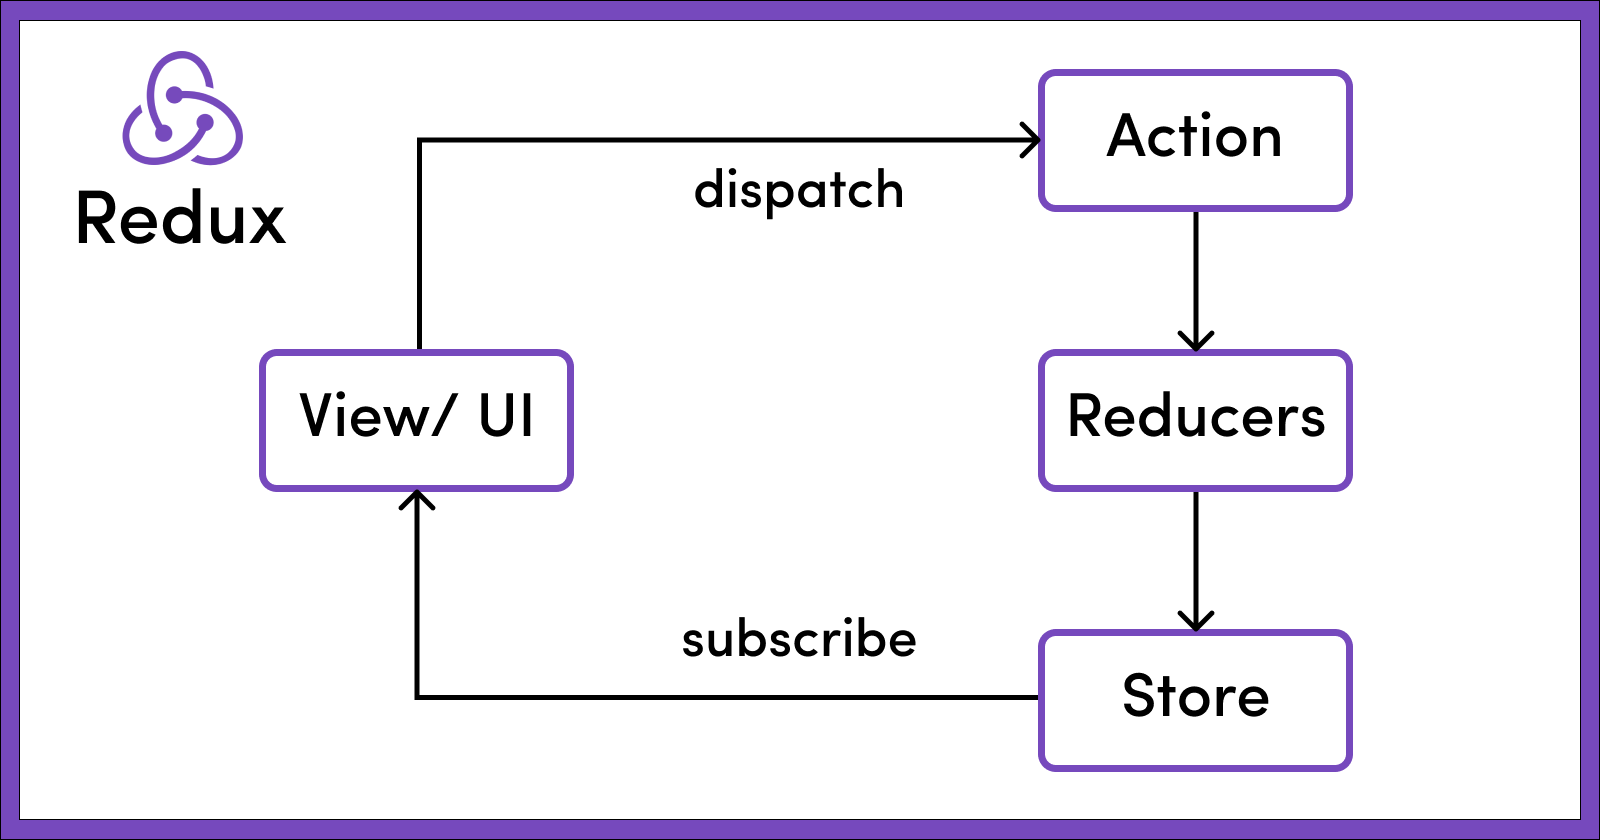
What is the Redux Store?
Used to store application states and it is unique.
What are actions in Redux?
It is events to change the state of the application and is also the only way to change those states through store.dispatch()

What are reducers in Redux?
Responsible for creating new states from an existing state of the application from an action above.

Why is use Redux Toolkit?
The Redux Toolkit is like Redux, I will recommend Redux Toolkit than Redux. Having 6 points:
- Redux Toolkit uses a code boiler template lesser than Redux.
- Easy to use because Redux Toolkit provides hooks like useSelector and useDispatch. This is made short.
- Having createAsyncThunk instead of setup thunk manually on Redux which is easy to implement with async operations task.
- getState is also very helpful in obtaining state variables across any of your actions or async operations.
- Debug is easier, it helps you know where bugs occur.
- Create your own slices very easily.
Setup Redux Toolkit in React
There are 2 packages that must be installed on your project.
npm install @reduxjs/toolkit react-redux
Create a slice:
create a new file named src/lib/slices/auth.slice.ts and add the following code
import { PayloadAction, SerializedError, createSlice } from '@reduxjs/toolkit';

export type AppSliceLoading = 'idle' | 'pending' | 'succeeded' | 'failed';

// create slice
const name = 'auth';
const initialState = createInitialState();
const extraActions = createExtraActions();
const reducers = createReducers();
const extraReducers = createExtraReducers();
const slice = createSlice({ name, initialState, reducers, extraReducers });

// exports
export const authActions = { ...slice.actions, ...extraActions };
export const authReducer = slice.reducer;

// implementation
export interface AuthState {
  loading: AppSliceLoading;
  token?: string;
  currentUser?: IUser;
}

function createInitialState(): AuthState {
  return {
    loading: 'idle',
  };
}

function createExtraActions() {
  return {};
}

function createReducers() {
  return {
    updateCurrentUser,
    updateToken,
    reset,
    setLoading,
  };

  function setLoading(state: AuthState, action: PayloadAction<AppSliceLoading>) {
    state.loading = action.payload;
  }

  function updateCurrentUser(state: AuthState, action: PayloadAction<IUser>) {
    state.currentUser = action.payload;
  }

  function updateToken(state: AuthState, action: string) {
    state.token = action.payload;
  }

  function reset(state: AuthState) {
    state = createInitialState();
  }
}

function createExtraReducers() {
  return {
    [`${authService.signIn.fulfilled}`]: loginFulfilled,
    [`${authService.logout.fulfilled}`]: logoutFulfilled,
    [`${authService.refreshToken.fulfilled}`]: refreshTokenFulfilled,
  };

  function refreshTokenFulfilled(state: AuthState, action: PayloadAction<AuthState>) {
    state.token = action.payload.token;
    state.currentUser = action.payload.currentUser;
  }

  function loginFulfilled(state: AuthState, action: PayloadAction<AuthState>) {
    state.token = action.payload.token;
    state.currentUser = action.payload.currentUser;
  }

  function logoutFulfilled(state: AuthState, action: PayloadAction<any>) {
    state.token = undefined;
    state.currentUser= undefined;
  }
}
Setup Redux Store:
To create a store for the application, add a file named src/lib/store.ts and add the following code:
import { Action, AnyAction, ThunkAction, combineReducers, configureStore } from '@reduxjs/toolkit';

import { authReducer } from './slices/auth.slice';

const combinedReducers = combineReducers({
  authReducer,
});

export type AppStore = ReturnType<typeof combinedReducers>;

const rootReducer = (state: any, action: AnyAction) => {
  return combinedReducers(state, action);
};

export const store = configureStore<AppStore>({
  reducer: rootReducer,
});

export type AppDispatch = typeof store.dispatch;
export type RootState = ReturnType<typeof store.getState>;
export type AppThunk<ReturnType = void> = ThunkAction<
  ReturnType,
  RootState,
  unknown,
  Action<string>
>;

const makeStore = () => store;

export const wrapper: any = createWrapper(makeStore, { debug: !config.isProd });
Setup Redux Store in React:
The Provider component takes in the store as a prop and passes it down to all the child components that need access to it.
import { Provider } from 'react-redux';

import { wrapper } from '@/lib';

function App({ Component, pageProps }: AppProps) {
  const { store, props } = wrapper.useWrappedStore(pageProps);

  return (
    <Provider store={store}>
      <Component {...props} />
    </Provider>
  );
}

export default App;
Create a component:
In your components, You will have 2 hooks:
- The useSelector hook to access the current state from the store.
- The useDispatch hook to dispatch actions to update the store.
You should now have the same app as before with a few updates from Redux Toolkit and a lot less code to maintain.
Summary
You can still use the old-fashioned way of using Redux but Redux Toolkit simplify things. With createSlice and useSelector we can reduce our boilerplate code and make the code easier to develop and read.
Wrapping up
Thank you for reading, and happy coding!
I hope this article will help make the concepts of Redux more accessible to beginner learners.
References: