

In this post, I will introduce to you a powerful service from Azure - Machine Learning. I also give a short demonstration of how to prepare data, select training model, train and publish to a service endpoint that can be used by clients.
Introduction to Azure Machine Learning service
What is Azure Machine Learning?
Azure Machine Learning is a cloud service for accelerating and managing the machine learning project lifecycle. Machine learning professionals, data scientists, and engineers can use it in their day-to-day workflows: Train and deploy models, and manage MLOps.
Supported model from open source: TensorFlow, Pytorch, scikit-learn.
Strongly supported by other Azure services like: Storage Account, AKS, Container for data storage, training machine and deployment.
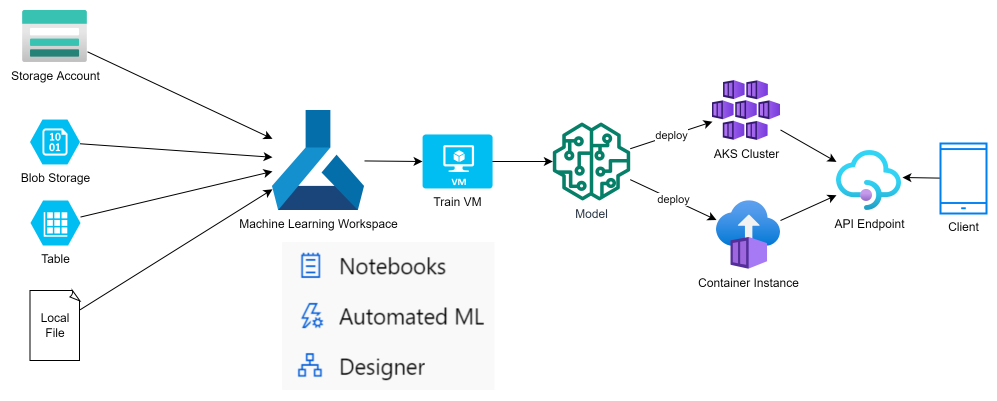
Below image show how Machine Learning is integrated with other Azure services to receive training data, train the model and publish as an endpoint to provide service to clients.
For user who not familiar with Machine Learning or just want to take a quick try, Azure Machine Learning provide a low-code method called Designer where you can use built-in component to design your own Machine Learning pipeline, submit to train and get output, deploy trained model as a service.
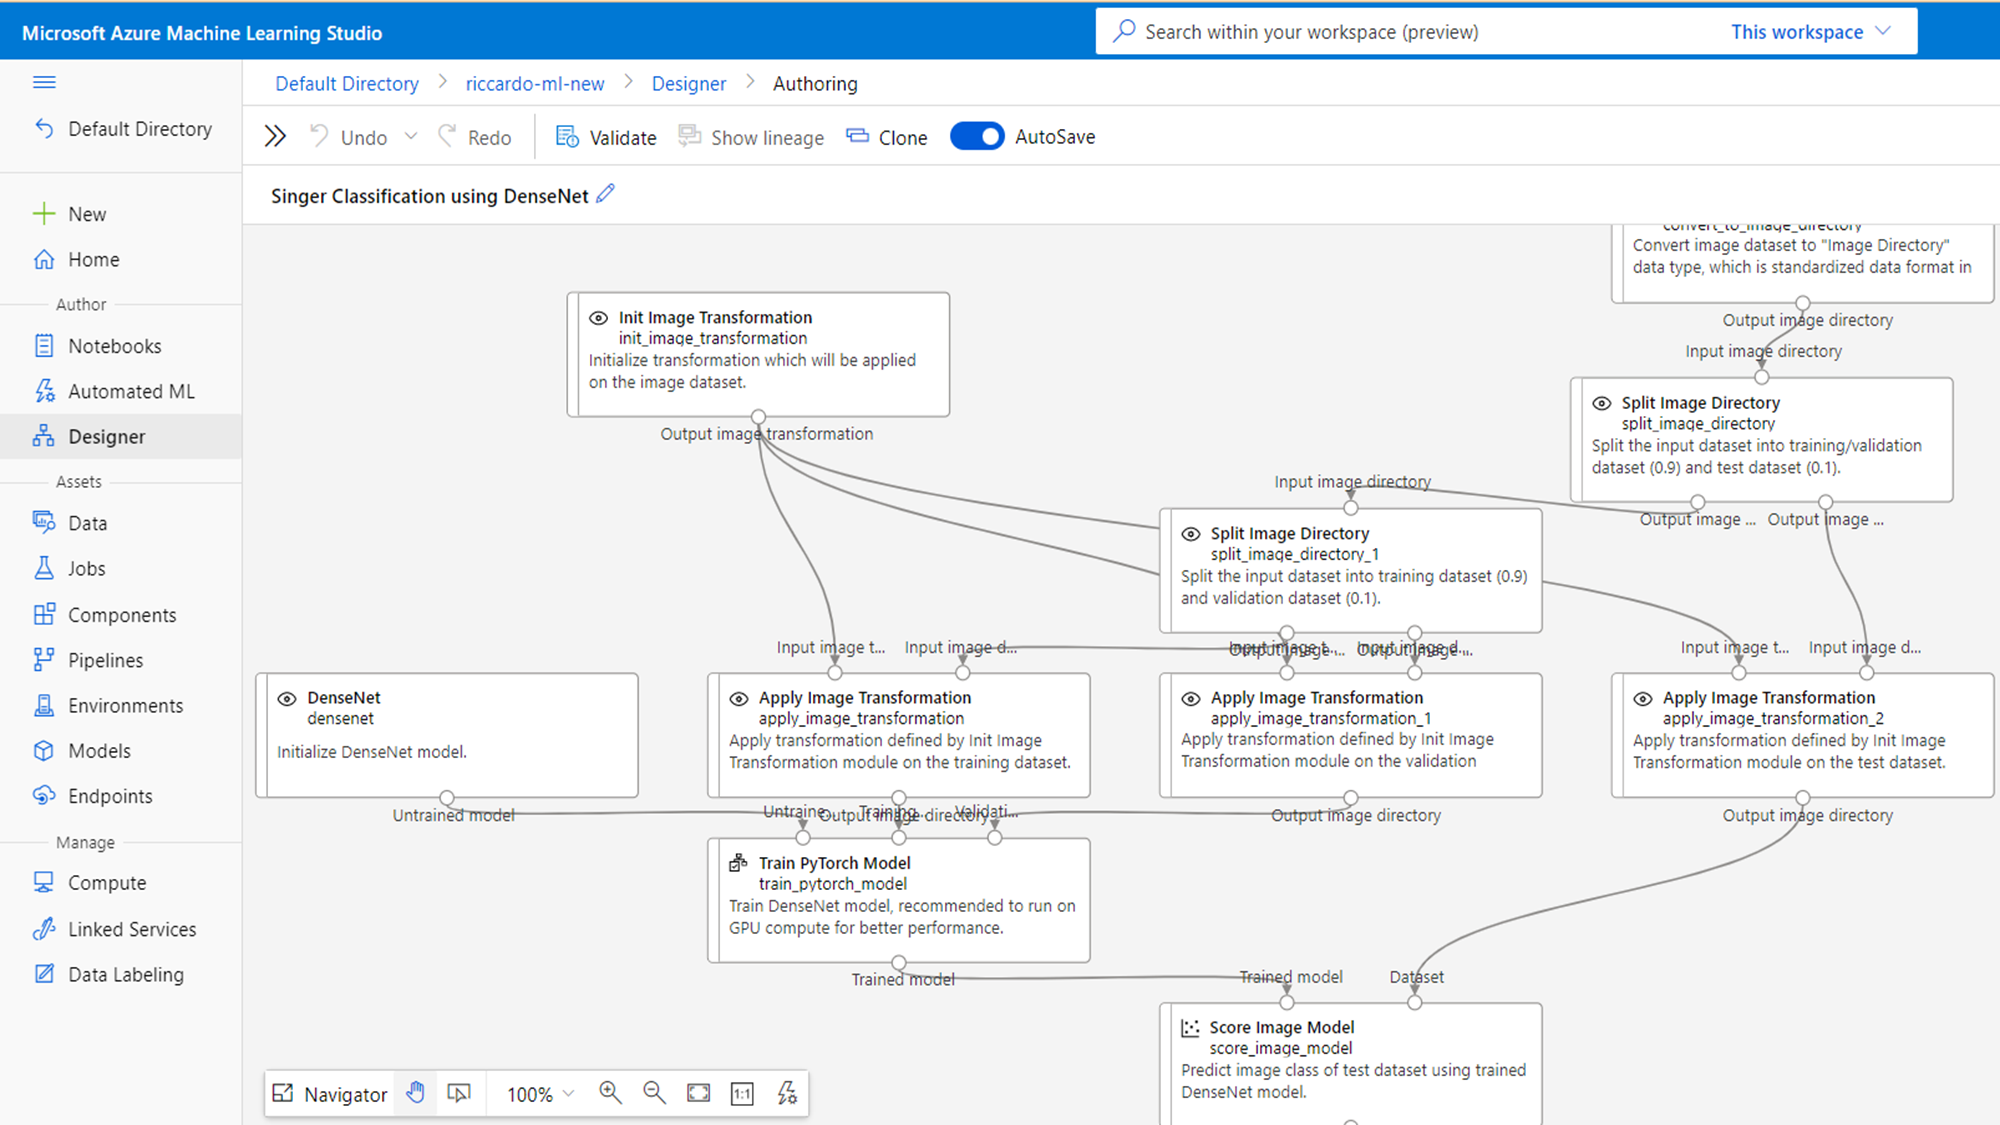
The image below is the sample of Machine Learning pipeline designed using Designer.
Steps to design, train and deploy your Machine Learning model
The process of Machine Learning often follow below steps:
- Prepare your data to train: Data can be statistic file (csv), image or a table.
- Select model, algorithm: Linear regression, DenseNet, Binary classification,…
- Design your pipeline: Choose built-in pipeline or build your custom pipeline
- Train and evaluate: Train and adjust until you get acceptable accuracy
- Deploy your model: Deploy to web endpoint, real-time endpoint or batch endpoint
PREPARE DATA
Azure machine learning support below method to create a dataset
- Upload a file from local machine
- Using an URL
- Using file from Storage Account (ex Blob storage)
- Using a Table of data
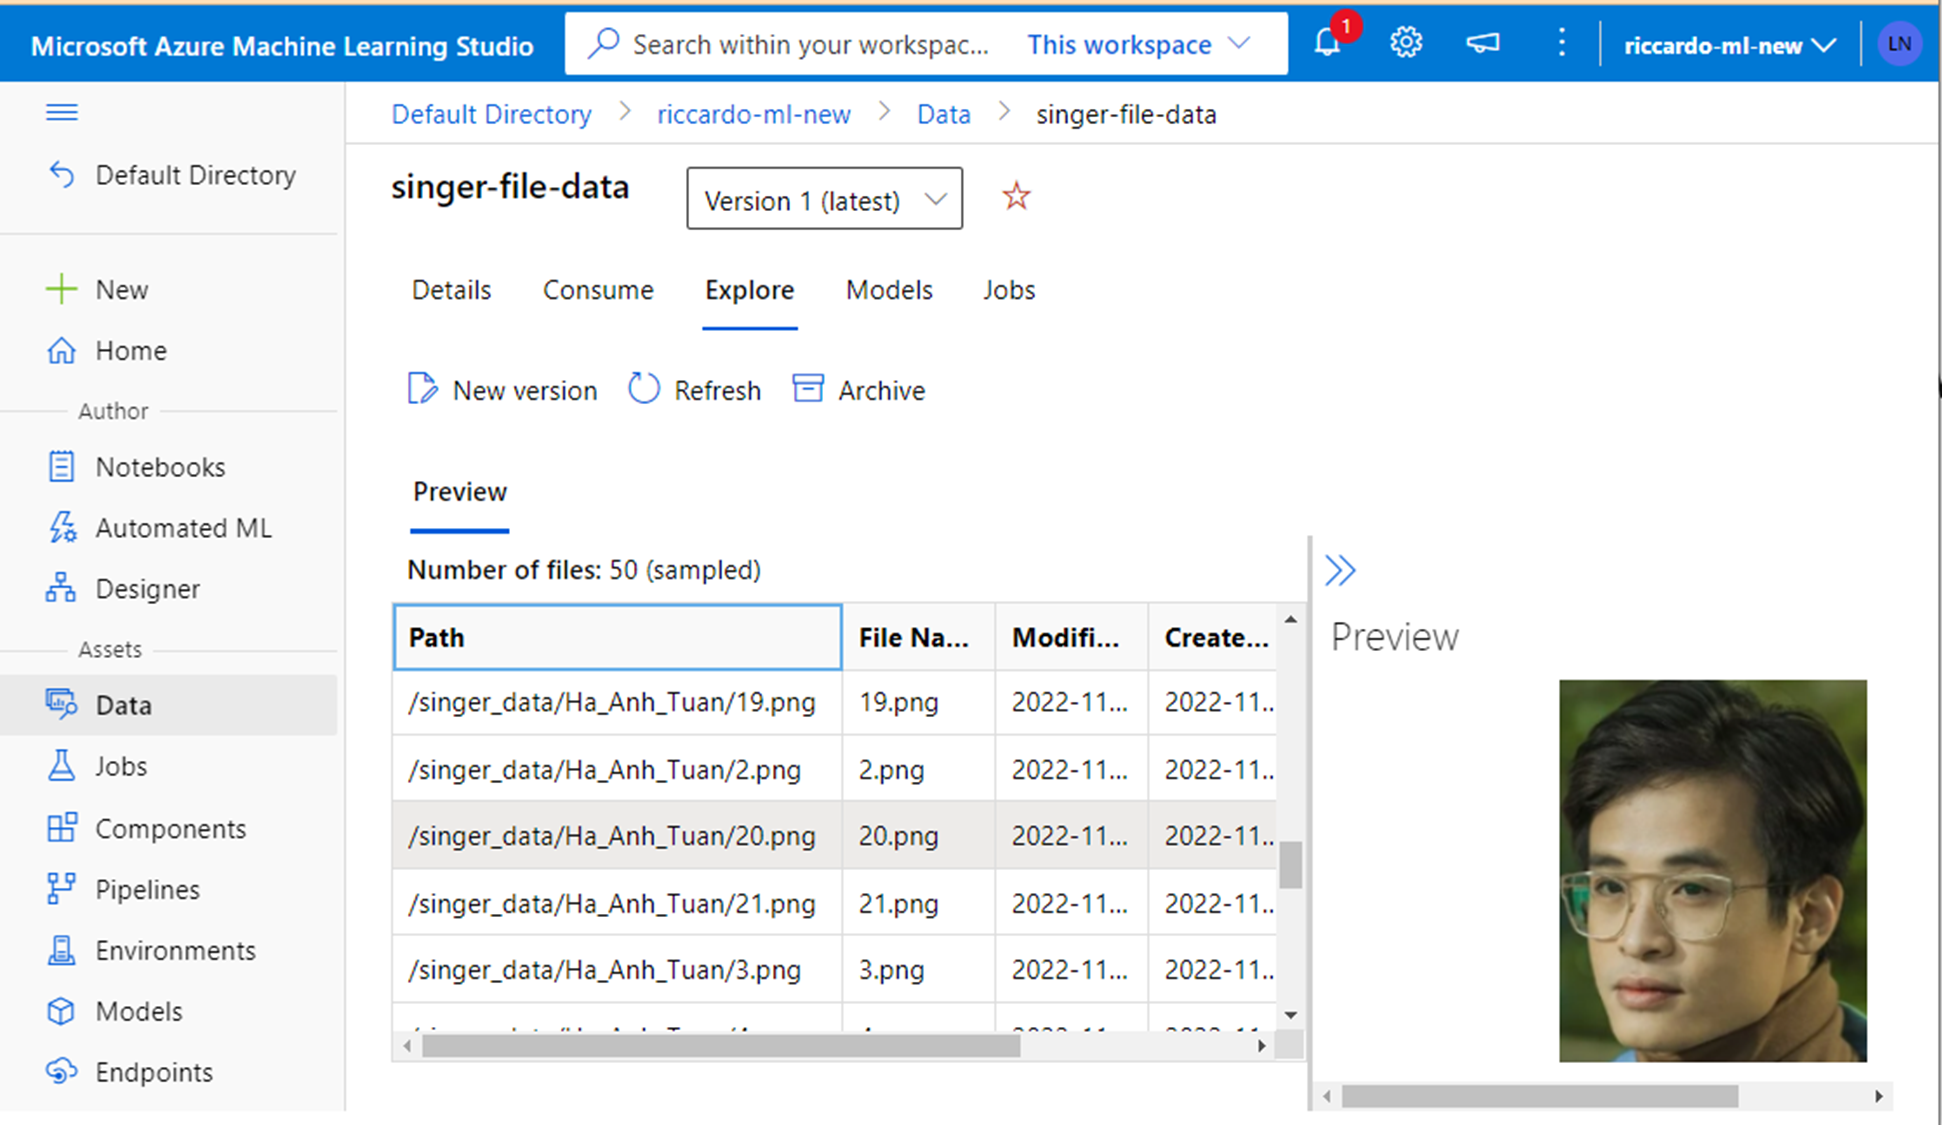
Below image show an example of using Storage Account (Blob) as a data source for training
SELECT AN APPROPRIATE MACHINE LEARNING MODEL
Depends on your purpose and characteristic of your data, you need to choose appropriate training model
You can choose built-in model support by Azure or create your own using Open-source.
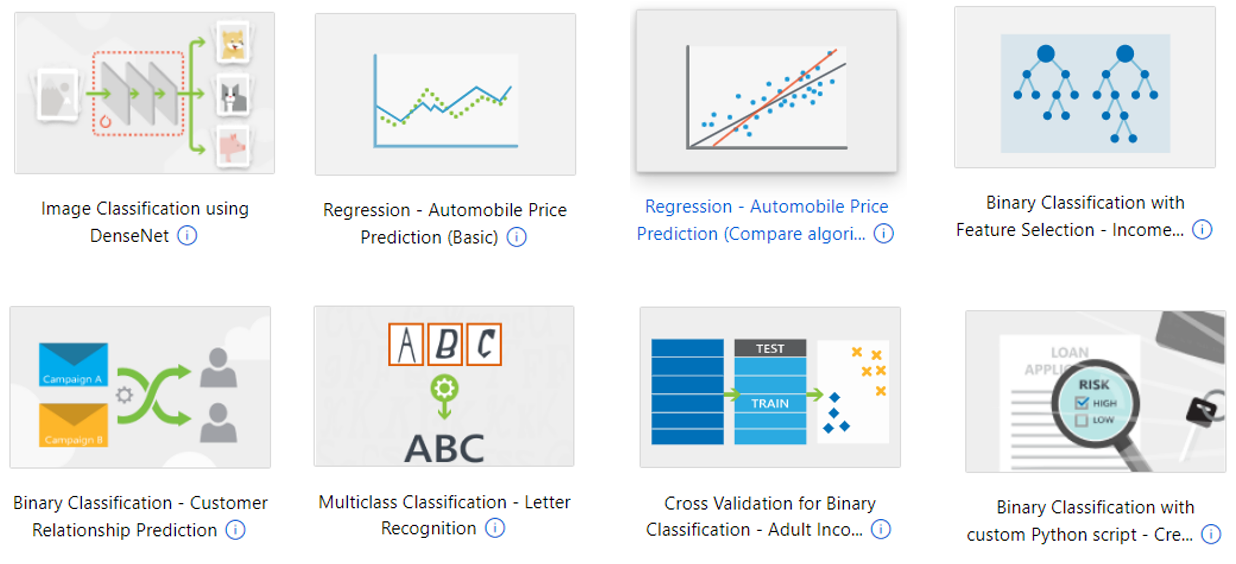
Image below are some built-in Machine Learning models that you can select and build pipeline to train your data.
DESIGN YOUR MACHINE LEARNING PIPELINE
Azure machine learning support below method to create pipeline
- Using ML Studio Designer
- Using Notebooks
- Using Visual Studio Code
Basic components of a Machine Learning pipeline
- Receive input dataset
- Data pre-processing (Image transform, clear missing data,…)
- Split data into two part: train data and test data (ex: 9:1)
- Train model
- Score model
- Evaluate model
Note: Additional processing step can be added to improve quality of your training.
TRAIN AND EVALUATE THE MODEL
In this step you submit a pipeline to specific training machine (Ex: Azure VM or even your local PC), Azure machine learning will automate train the model with inputted dataset and give output.
Output of this step is:
- A trained model file
- An ENV configuration file
- A Scoring script
- Report (like accuracy, confusion matrix,…)
DEPLOY YOUR TRAINED MODEL AS A SERVICE
There are 3 way to deploy your trained model
- Deploy to a Web service endpoint
- Deploy to Real-time endpoint
- Deploy to Batch endpoint
Endpoint can run on Azure Kubernetes Cluster or Container Instance.
DEMO
Preparation
1. An Azure account which activated and can access Machine Learning Service normally.
2. An images set of singers or animals, about ~20 images for each singer/animal.
Step by Step to execute
Step 1: prepare train data in your local machine.
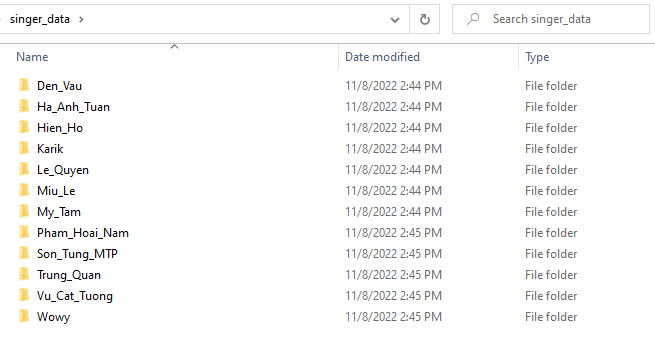
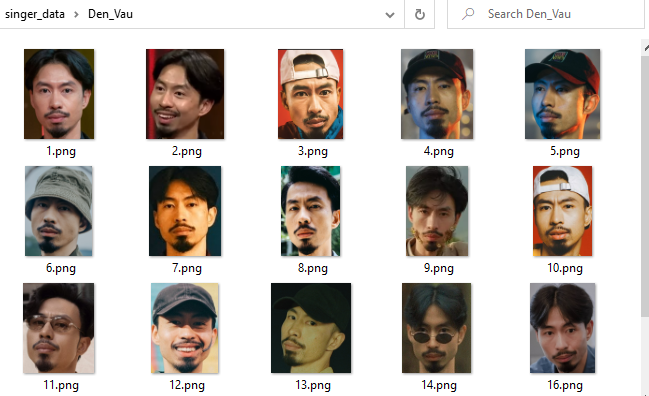
In this demonstration, I prepared images of 12 Vietnamese singers, I only use image contains their face to make it more accurate.
*You can checkout my data at below Github repository:
https://github.com/hoanglinhdigital/azure-training/tree/develop/azure-machine-learning
Folder Structure
/singer-data/{singer-name}/1~20.jpg
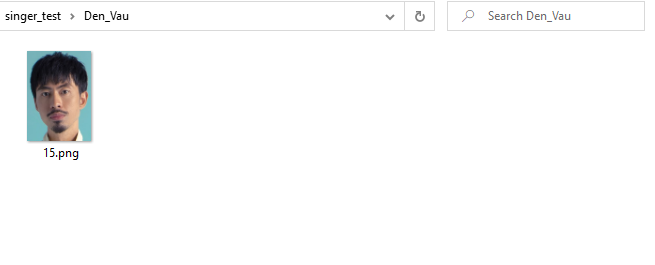
/singer-test/{singer-name}/1.jpg
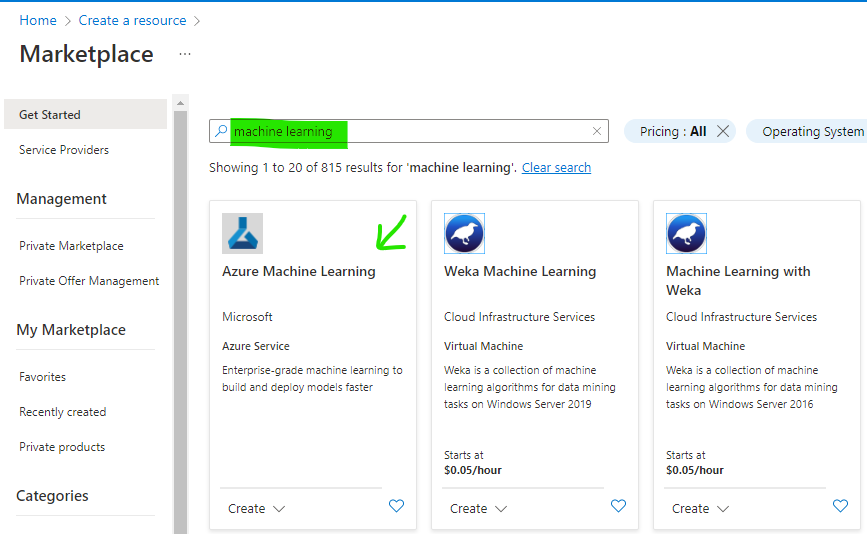
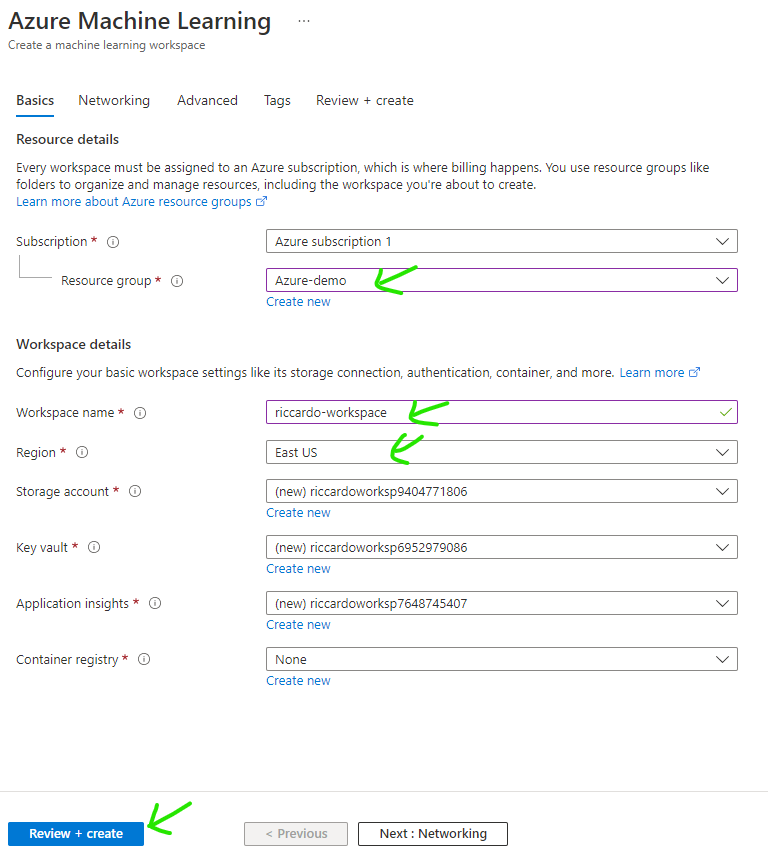
Step 2: Create Machine Learning Workspace
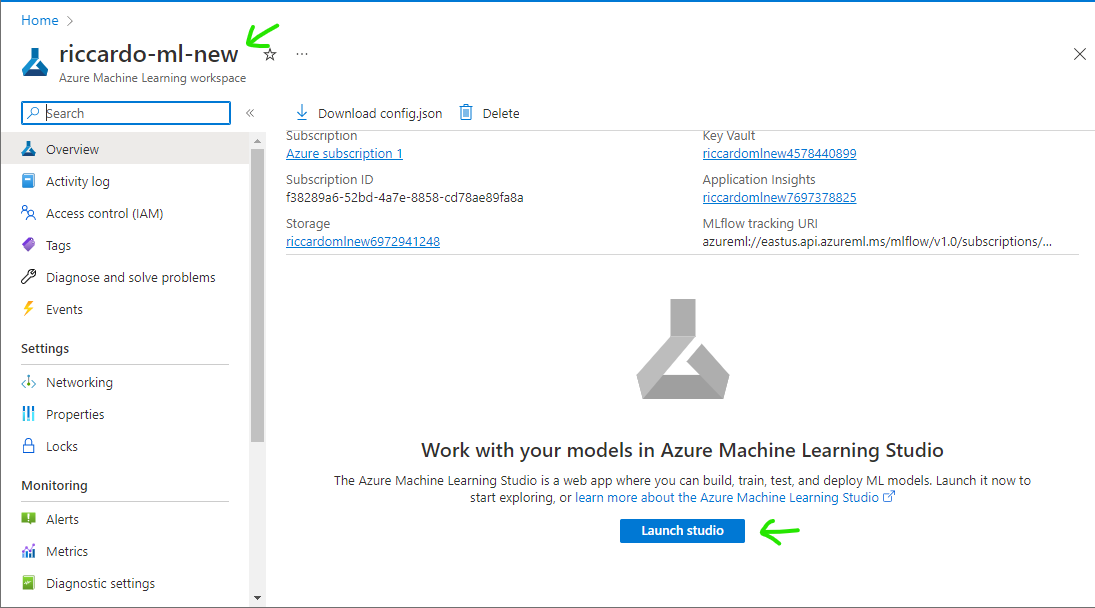
Create a new resource type: Azure Machine Learning work space
After workspace creation is completed, find your Machine Learning then click [Launch Studio]
Step 3: Upload prepared images to dataset
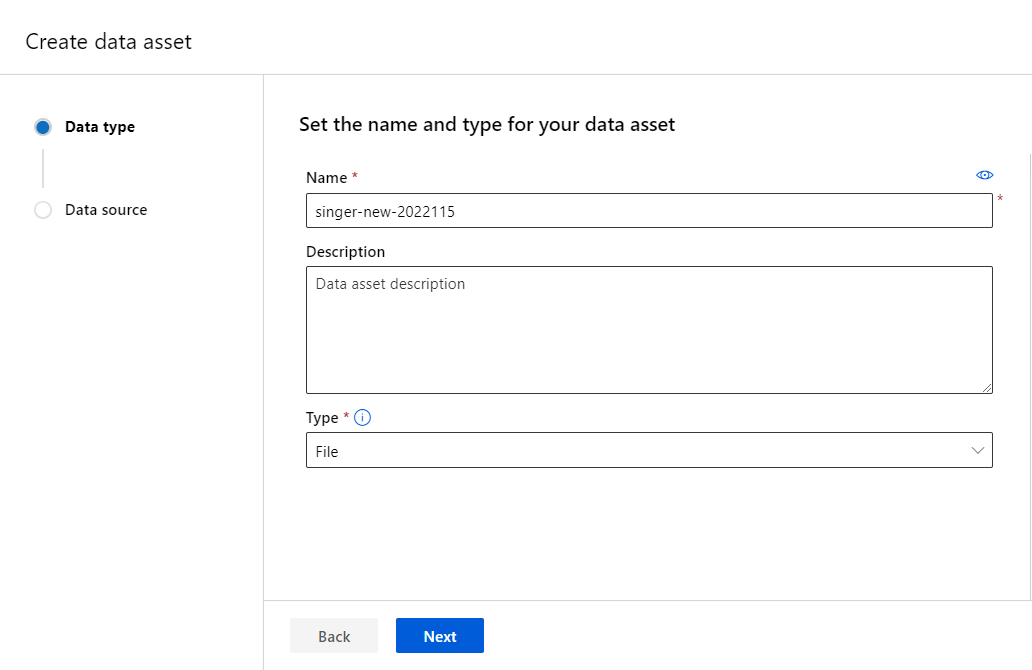
Select [Data] on the left side menu, click [Create] button

Input name for new data set example [singer-new-20221115], select type [File] then click [Next].
Select [From local files] then click [Next] button

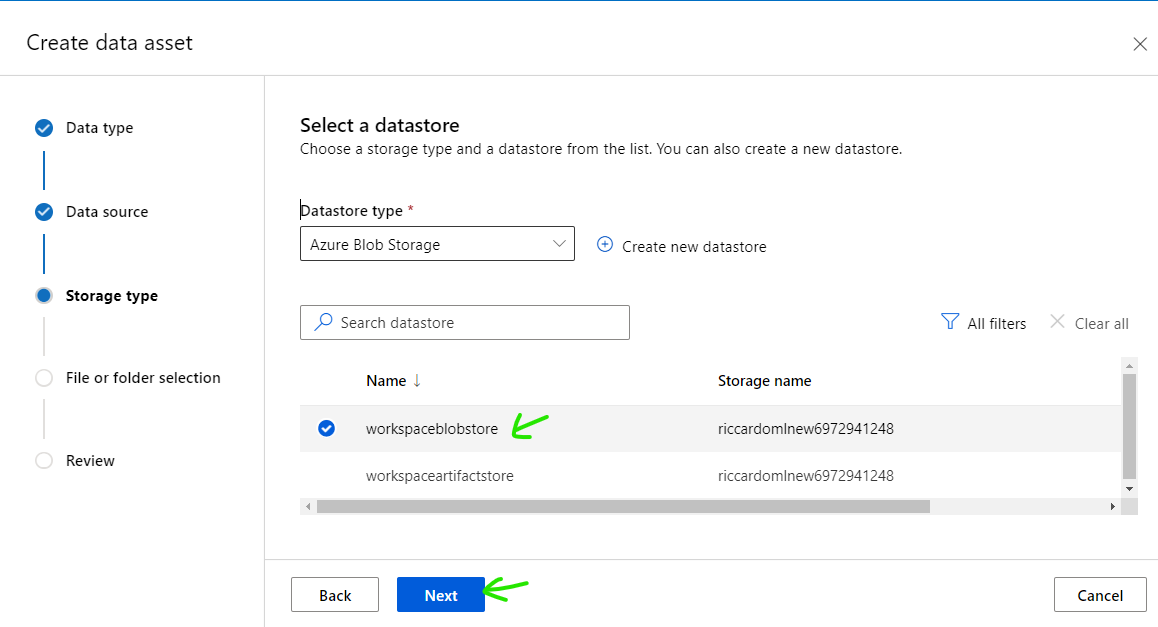
Select [workspaceblobstore] then click [Next]
Click [Upload] button then select [Upload folder]
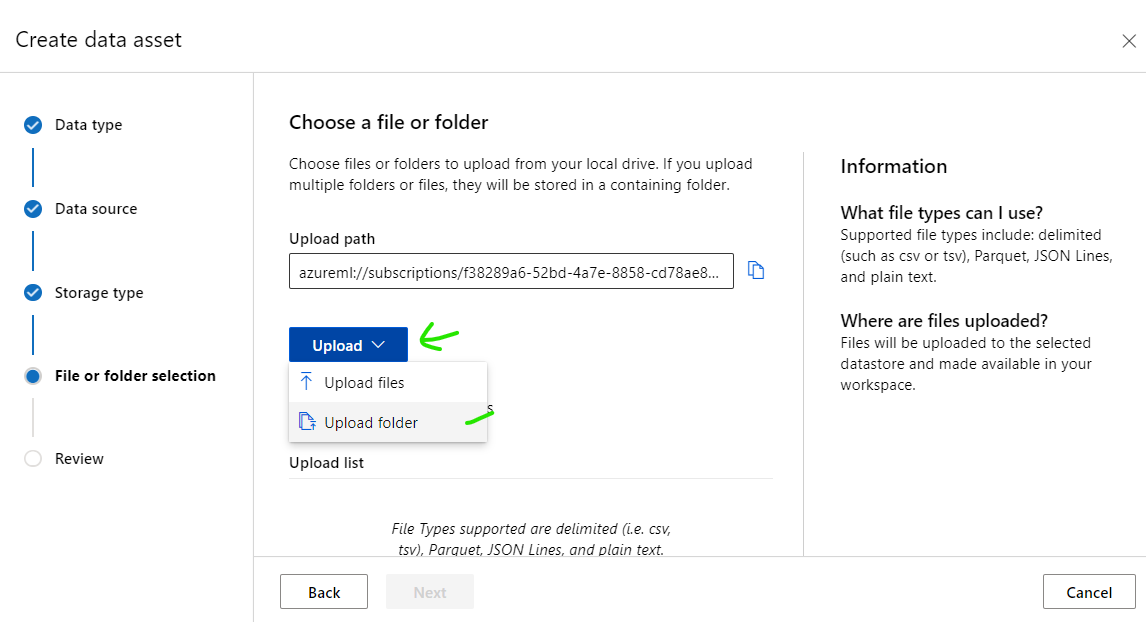
Select [singer-data] folder then wait until all images is loaded complete, click [Next]
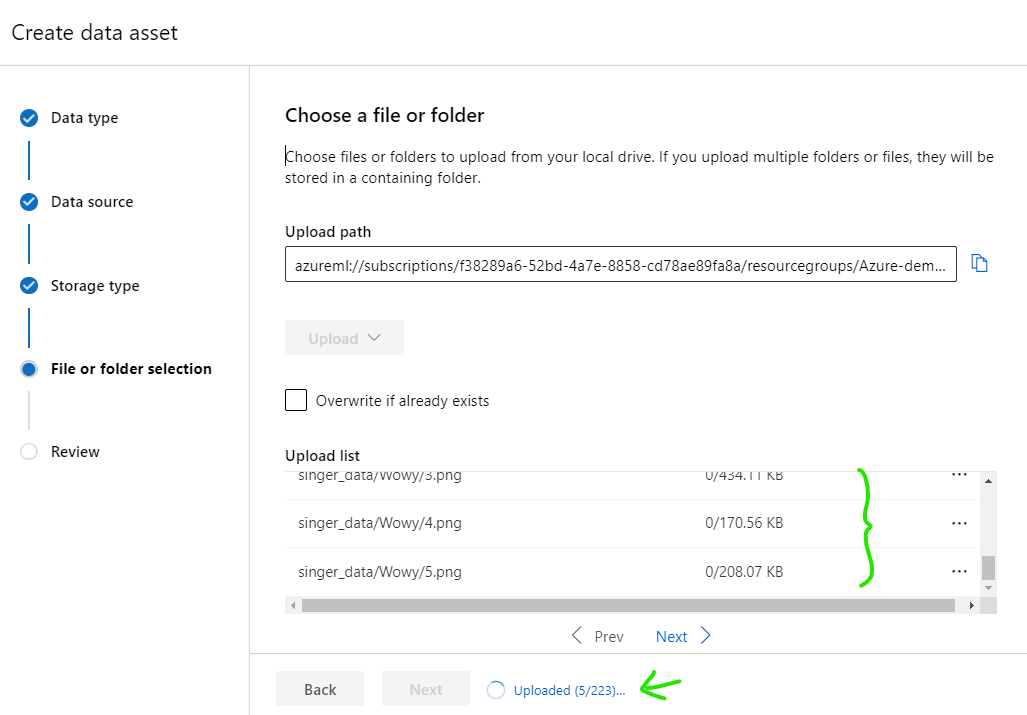
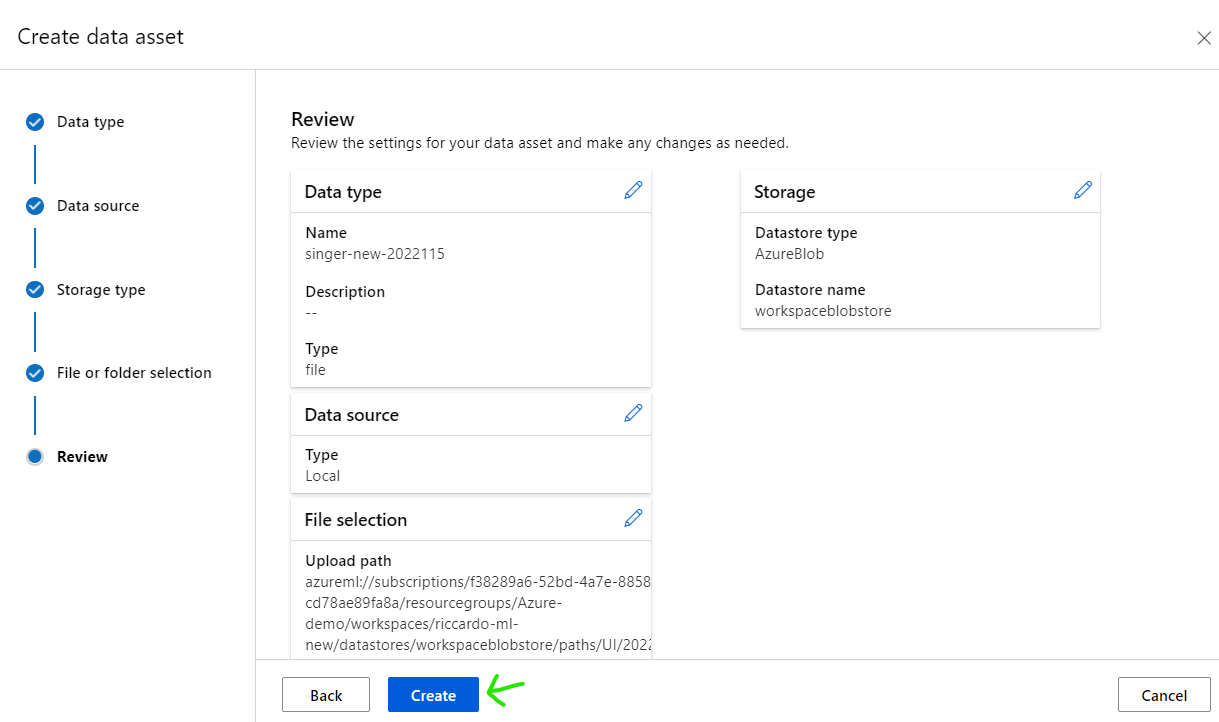
Click [Create] button
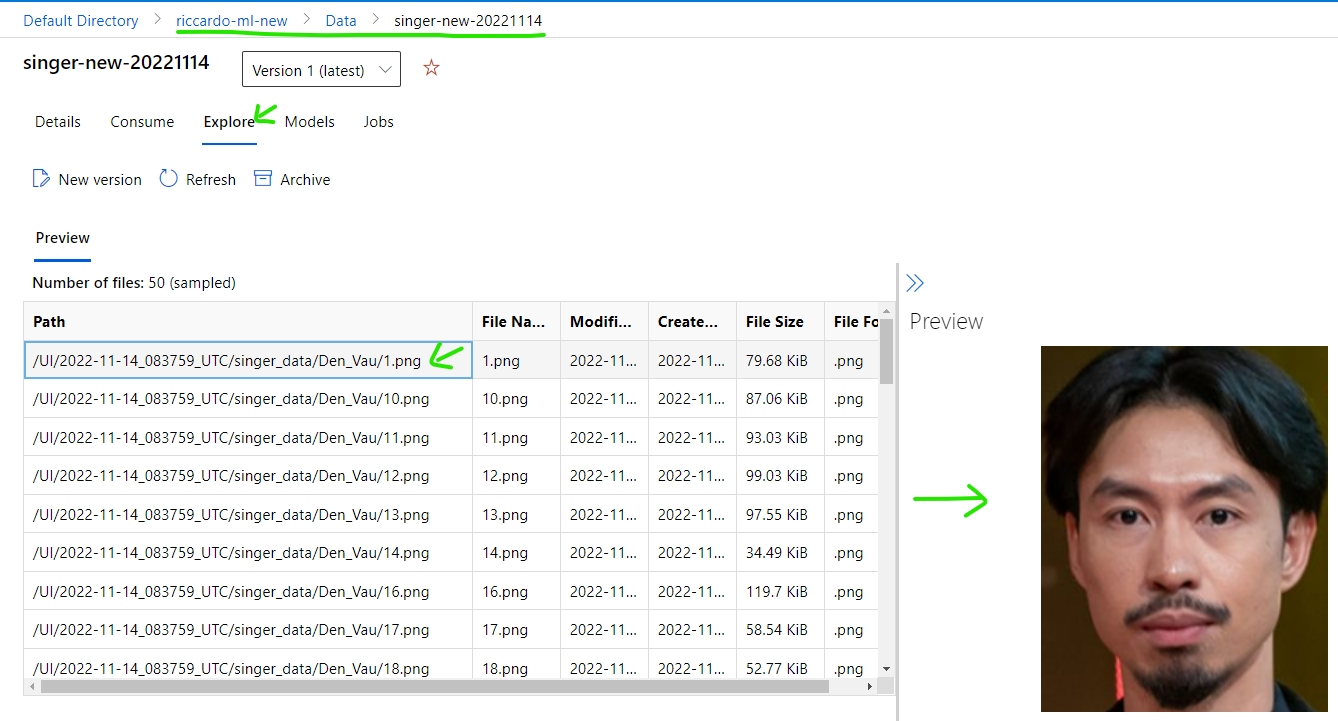
After dataset creation is complete, you can confirm items by select Data -> {data set name} -> Explore
Step 4: Create your Machine Learning Pipeline
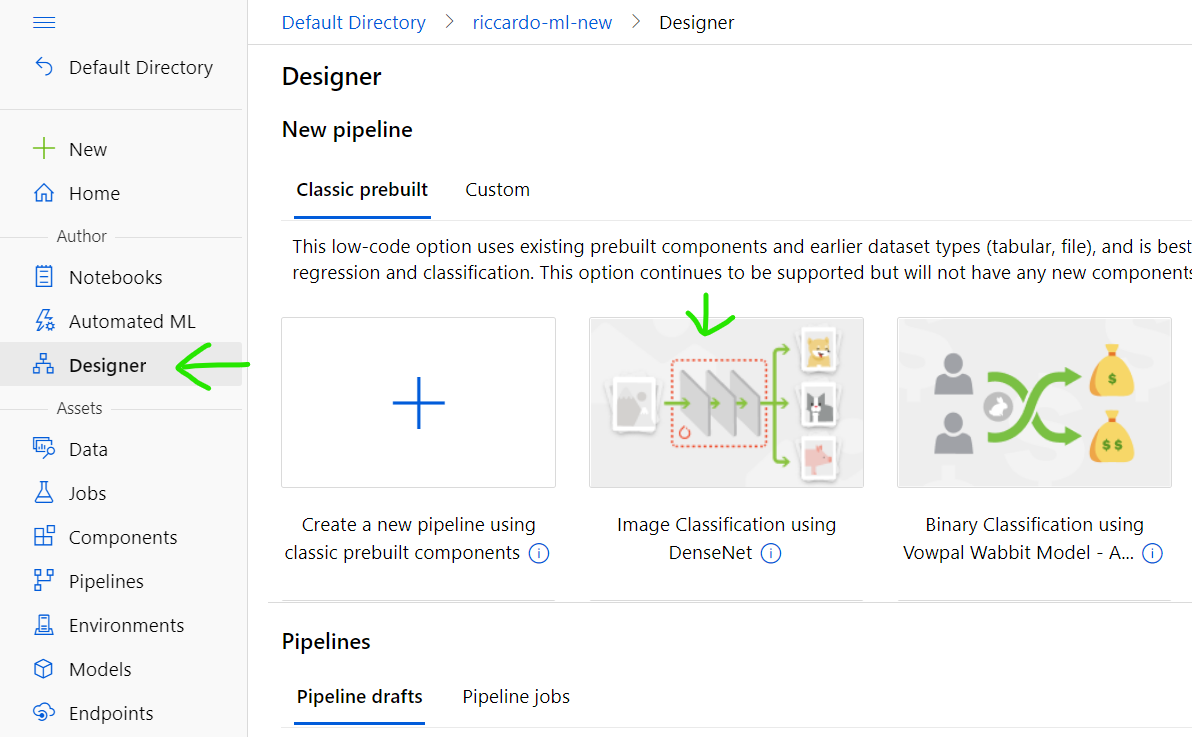
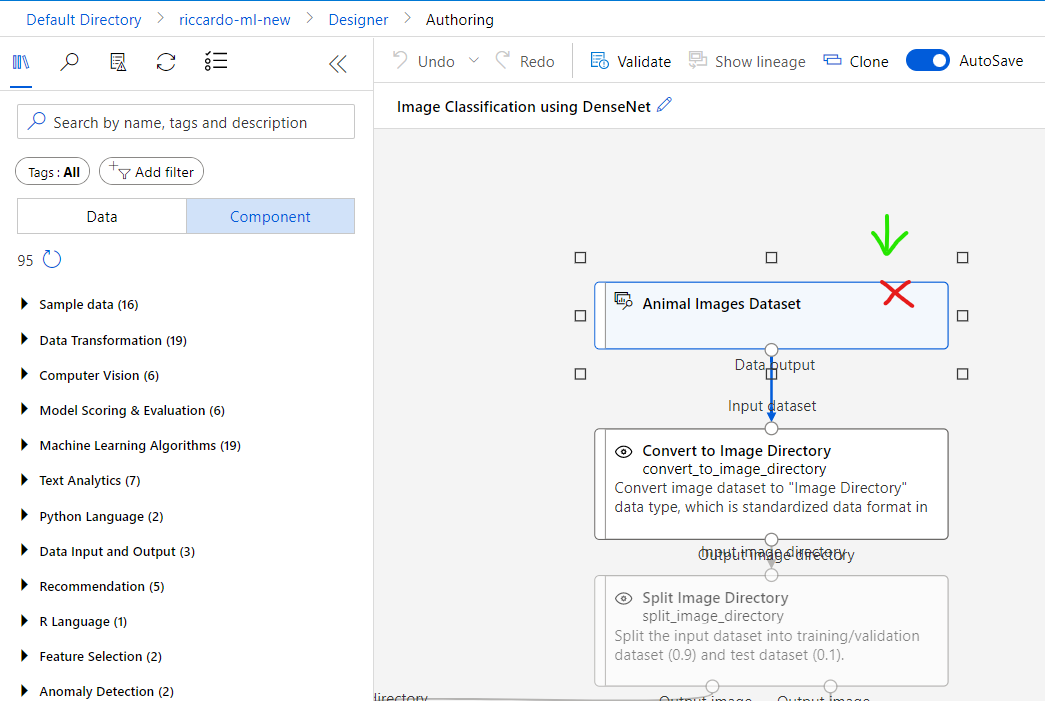
Select [Designer] tab on the left, select [Image Classification using DenseNet]
Remove [Animal Images Dataset] by select it and press Delete key.
Select [Data] tab on the left, drag data example [singer-new-20221114] then drop to the right panel. Connect data to [Convert to Image Directory] step.
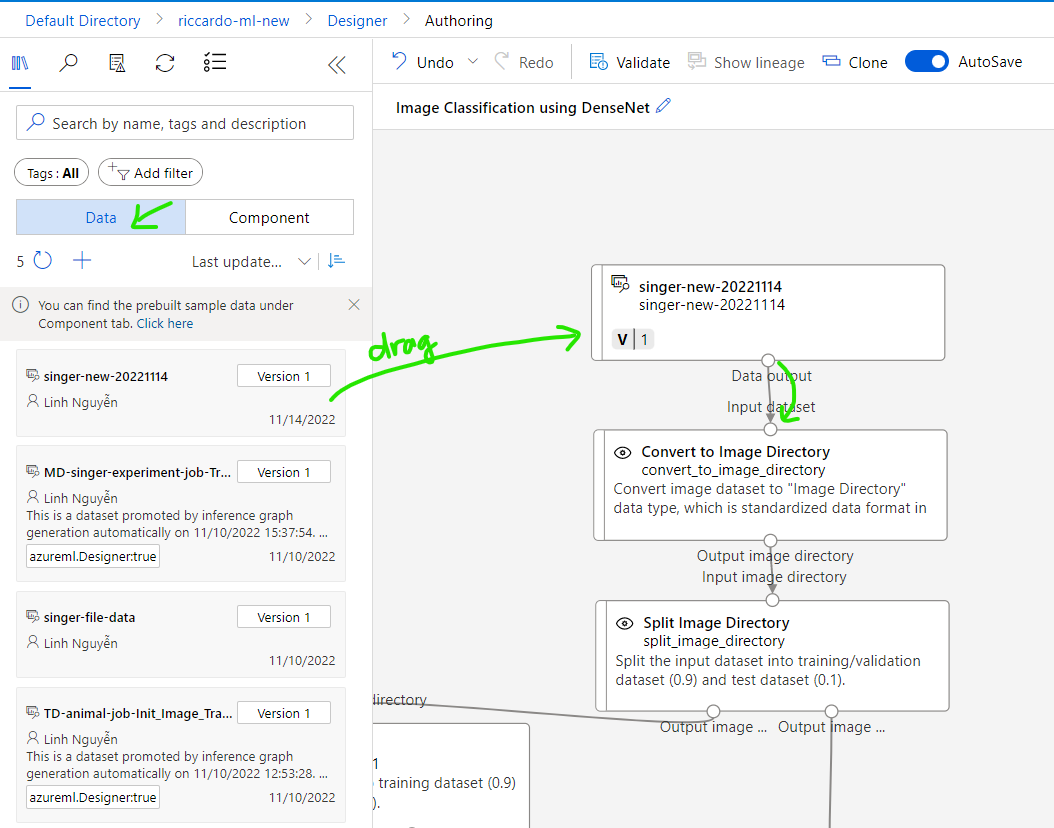
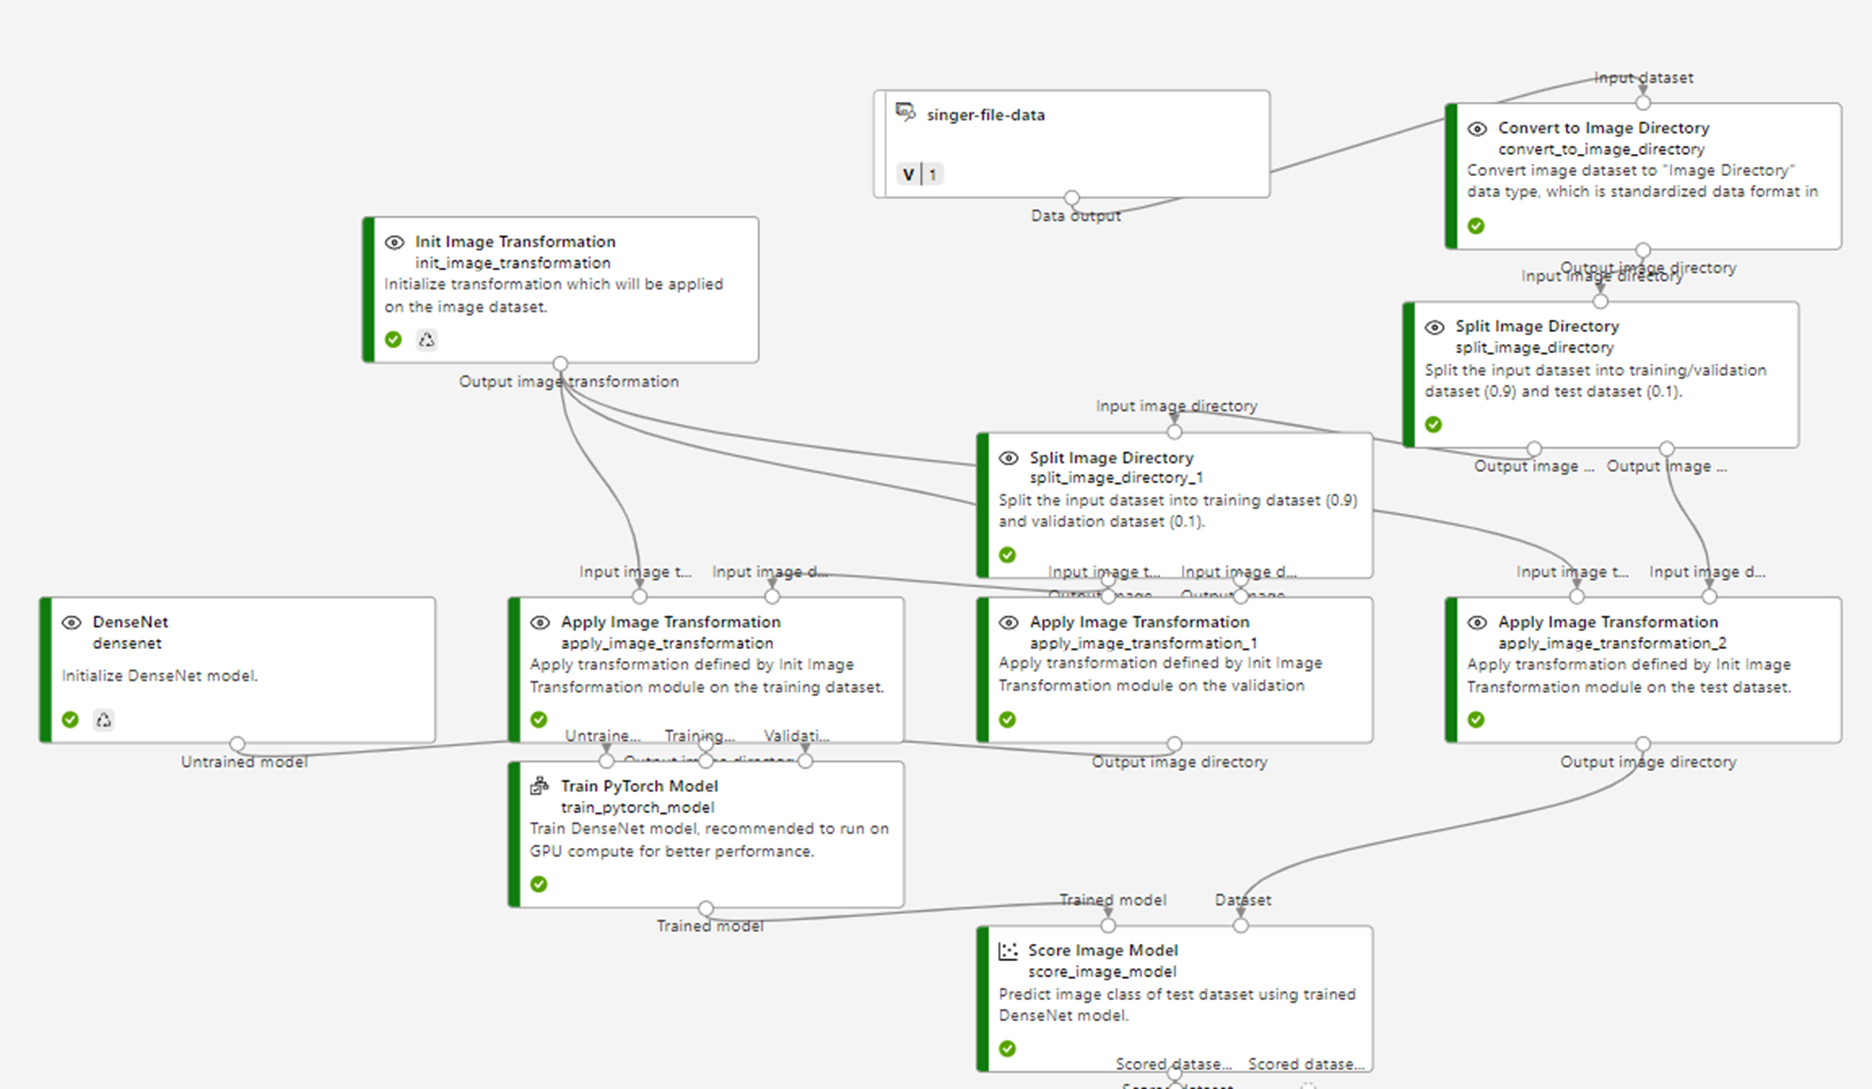
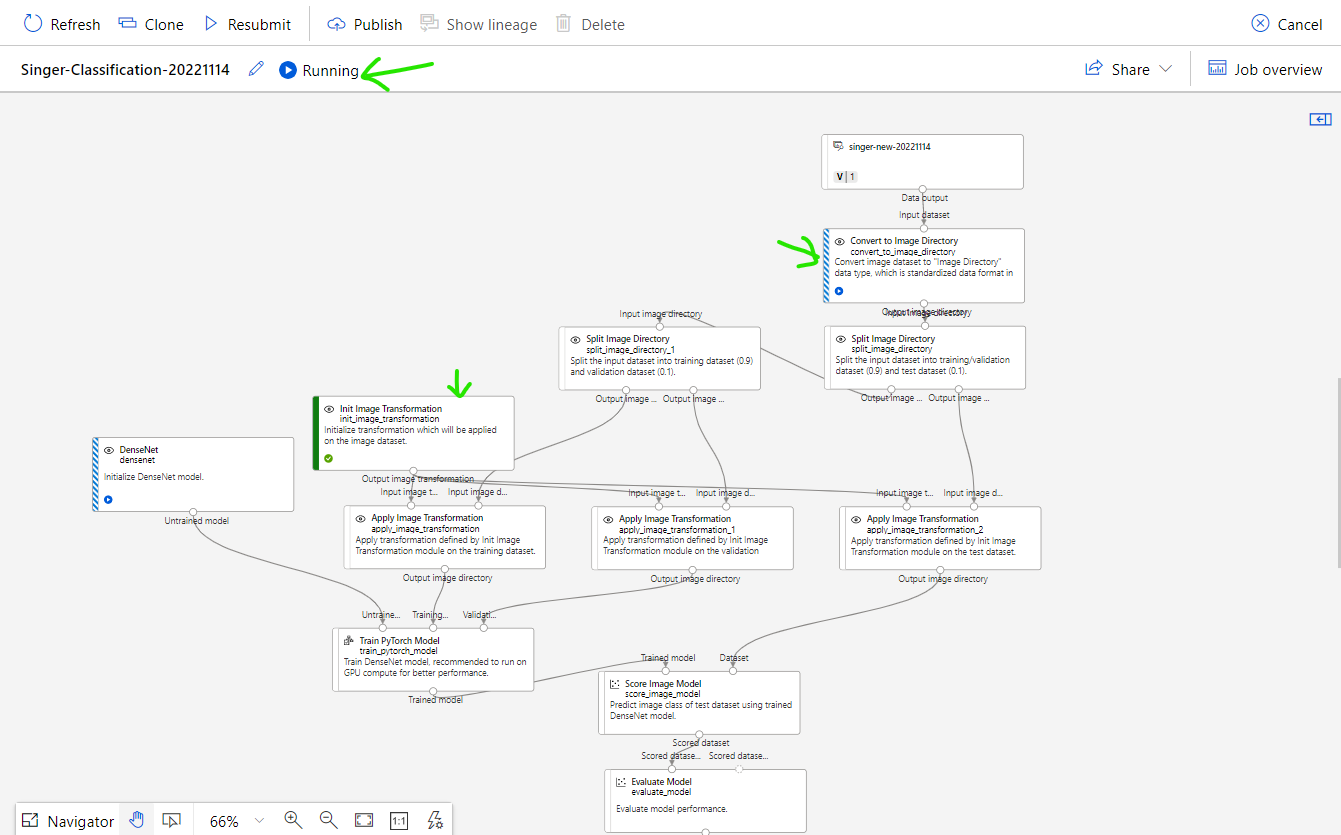
Rename training model if needed. Finally, pipeline will look like this
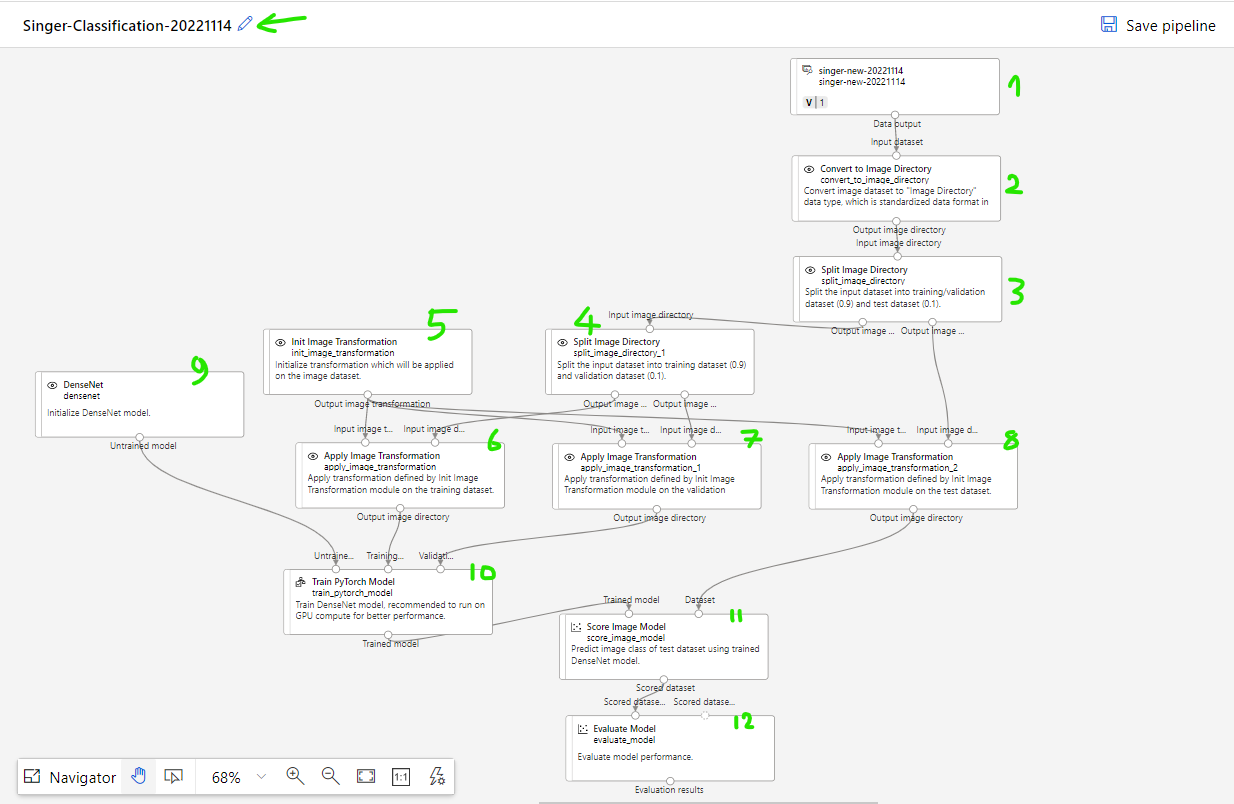
Explanation for each step in Machine Learning Pipeline
(1) Load data set has been prepared before. In this case is singer data set with list of singer images.
(2) Convert to Image Directory: This step will use folder name above image to make the label. Example image with path ~/Den_Vau/1.jpg will be loaded and labeled to "Den_Vau".
(3) Split Image Directory: This step will separate input training image to 2 parts with fraction default is 0.9 (90% data to train and 10% data to test). You can double click to change the fraction that you want, example 0.8.
(4) Split Image Directory: Same as step 3. Because DenseNet itself require two parts of input data, one for train and one for test so we need to split data set into two parts then input to DenseNet.
(5) Init Image Transformation: Initialize image transformation setting. You can double click to change some value like Size, Center Crop, Gray Scale,...
(6),(7),(8) Apply Image Transformation: This step will apply pre-defined transformation for images. There are two mode of transformation: For train and For inference (test), double click to change it if needed.
(9) DenseNet: Initialize DenseNet training model.
(10) Train PyTorch Model: Train with provided input then generate output.
(11) Score Image Model: This step will use trained model to evaluate using test data (10% of images has been split before) then give the score.
(12) Evaluate Model: this step will give report for trained model and evaluated result like accuracy, confusion matrix.
Step 5: Train your model and get output.
After finished design your pipeline, you can start to train the model.
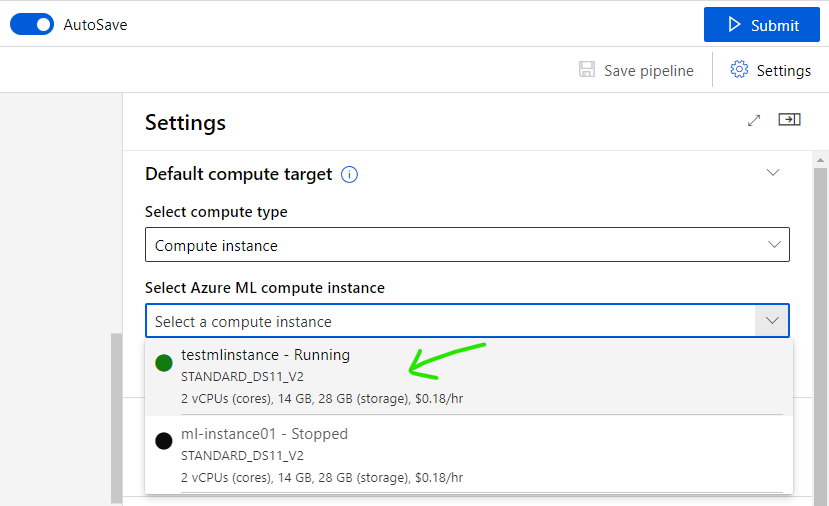
Click [Setting] button, in [Select compute type] choose [Compute instance].
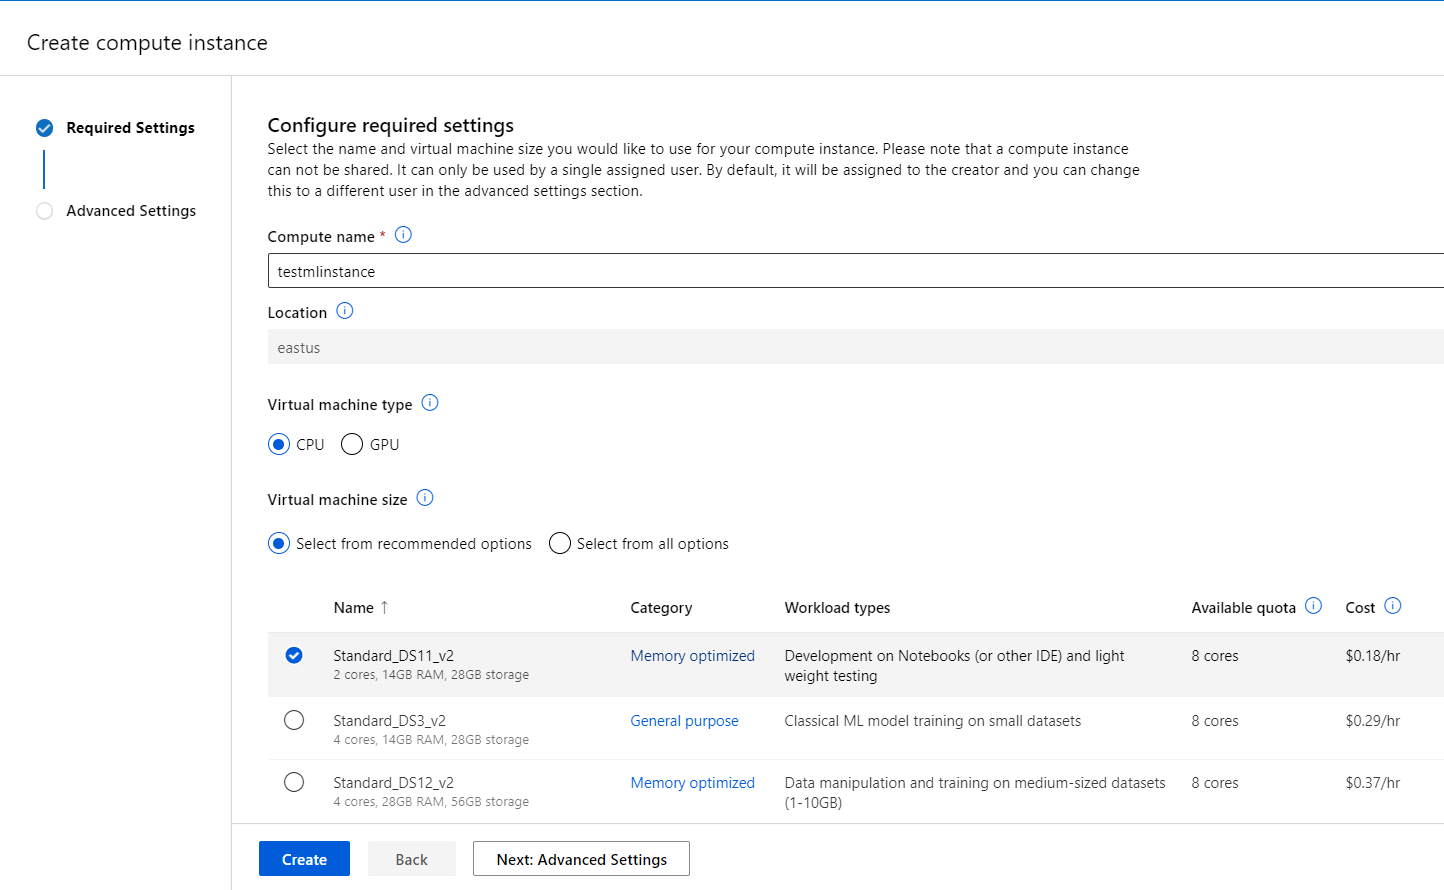
Click [Create Azure ML compute instance]
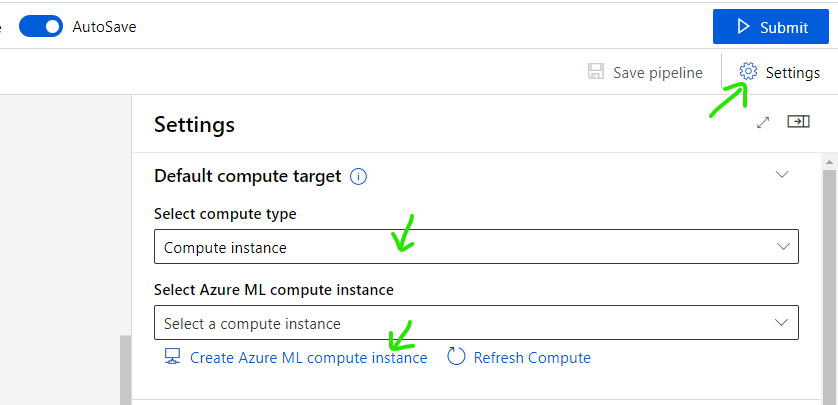
Input instance name, select instance type then click [Create] button
Back to previous screen to select instance
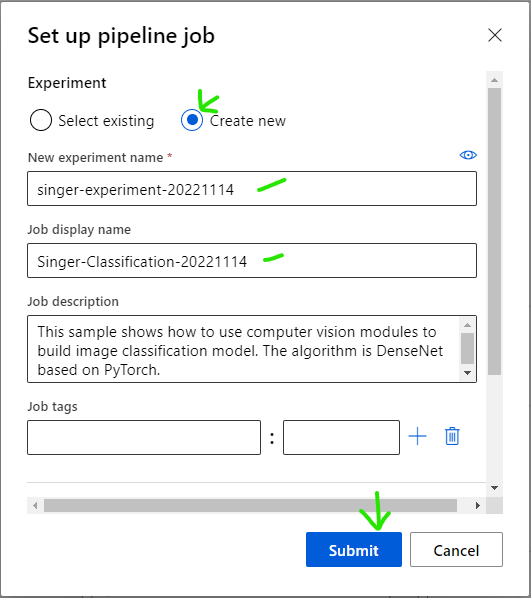
Click [Submit] button to start train your model

Create new Experiment, input name of experiment and name for new job then click [Submit] button
Confirm result of executed job
Select [Job] tab on the left, select experiment
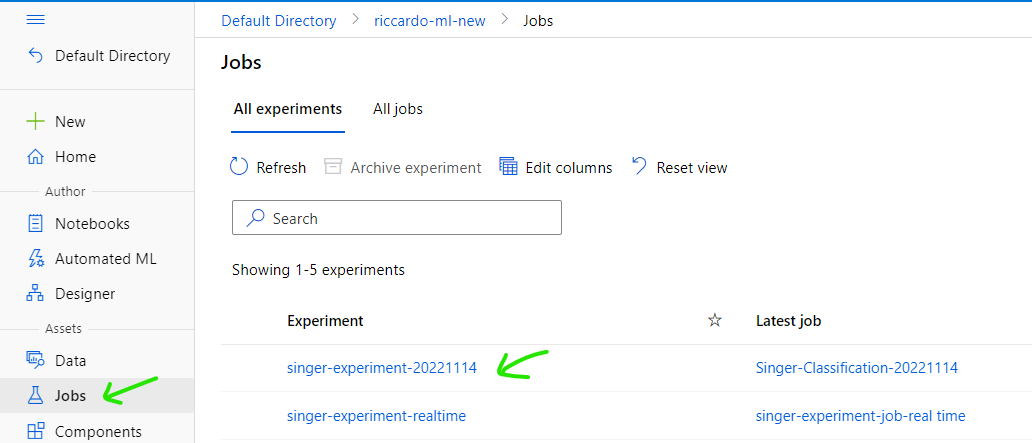
Select Job has been submitted
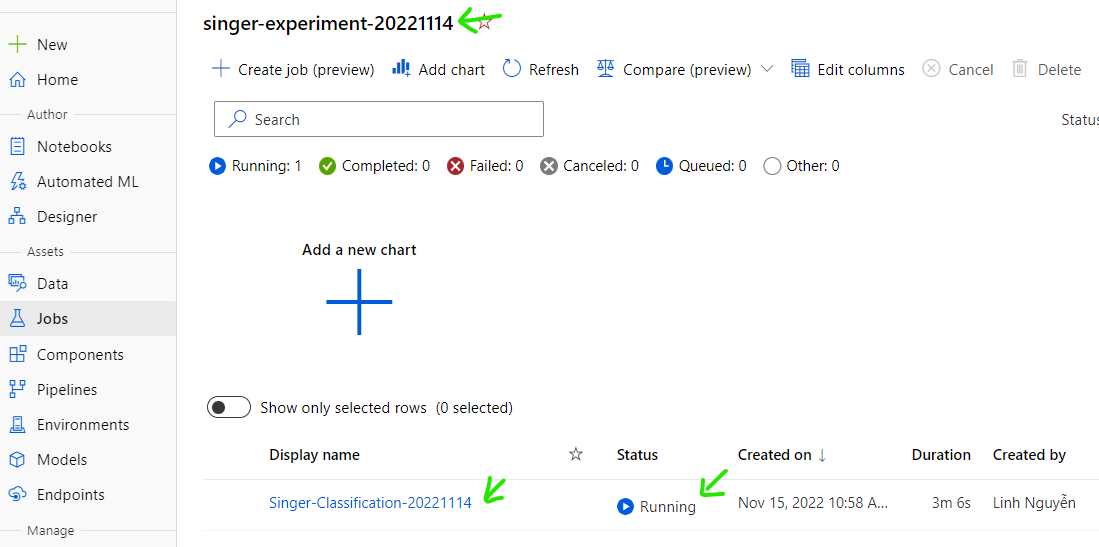
View status of Job in realtime. Wait until it finished.
Confirm Training job's output by click [Train PyTorch Model] step.
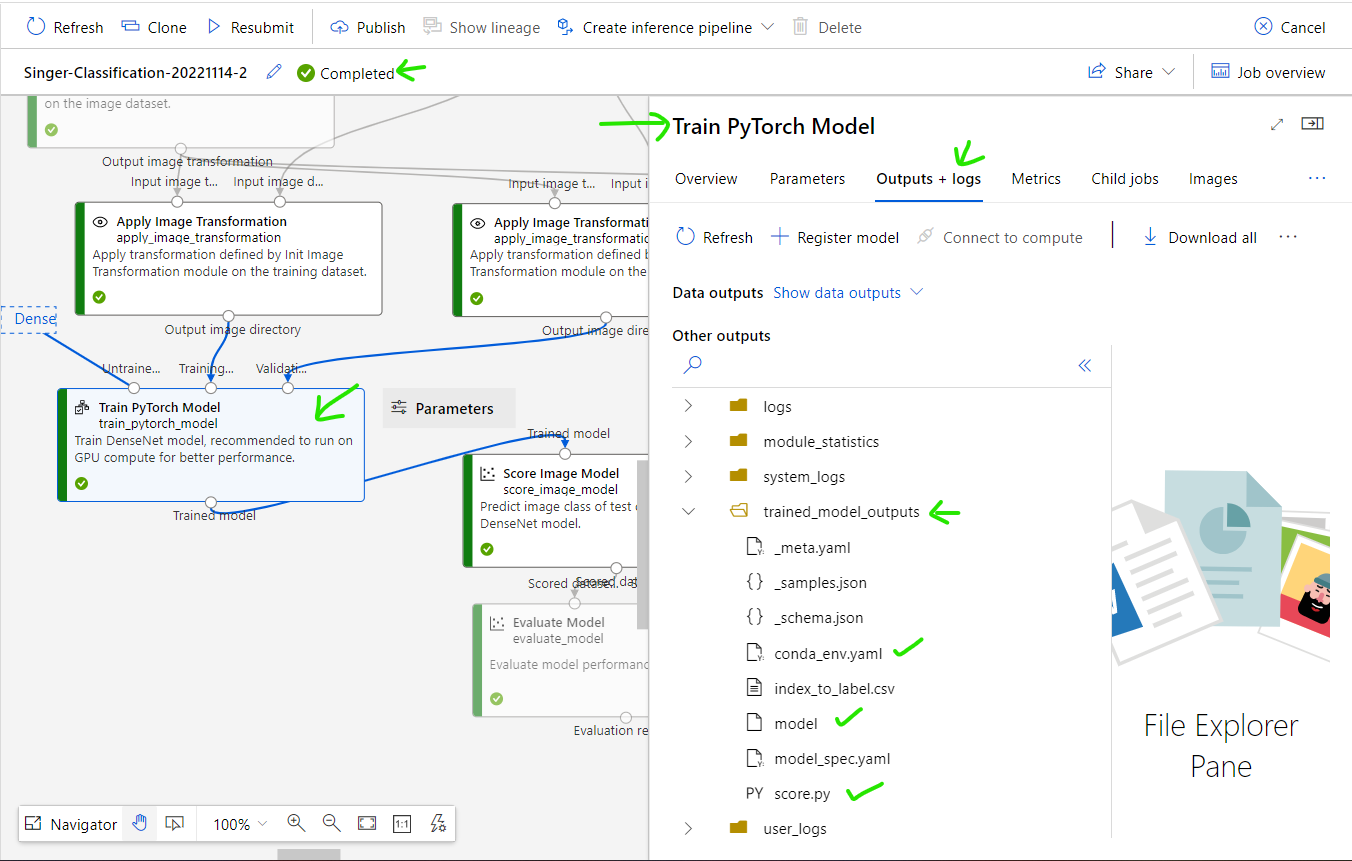
You can deploy trained model by yourself using below 3 file:
-conda_env.yaml
-model
-score.py
*In this tutorial, I will not use deployment method by myself, instead I will use deployment method support by ML Studio. So I can skip above output files.
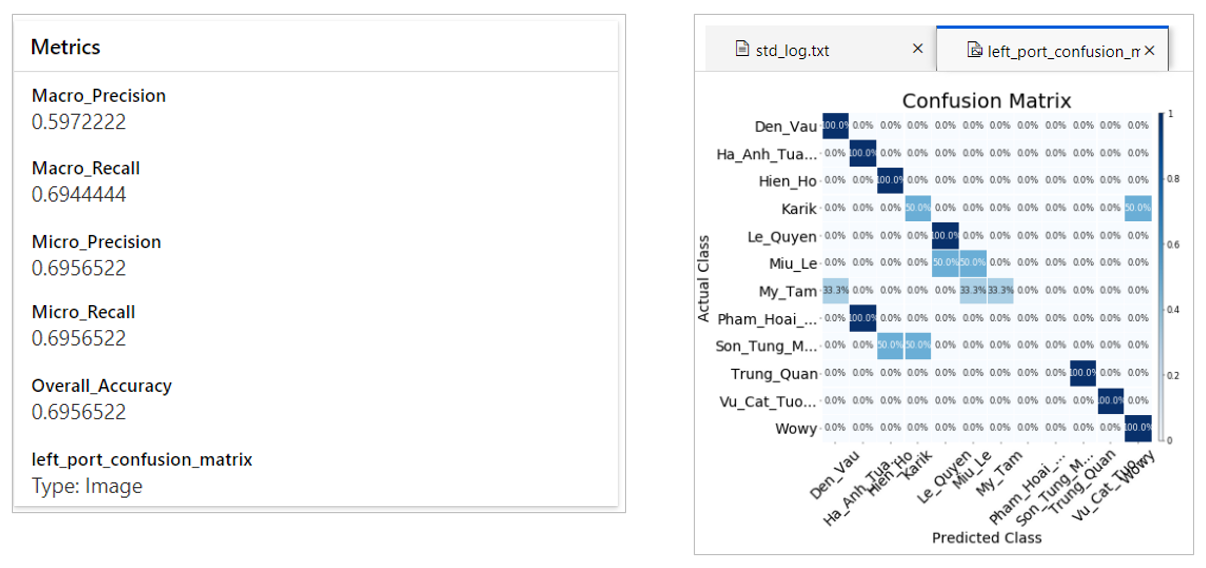
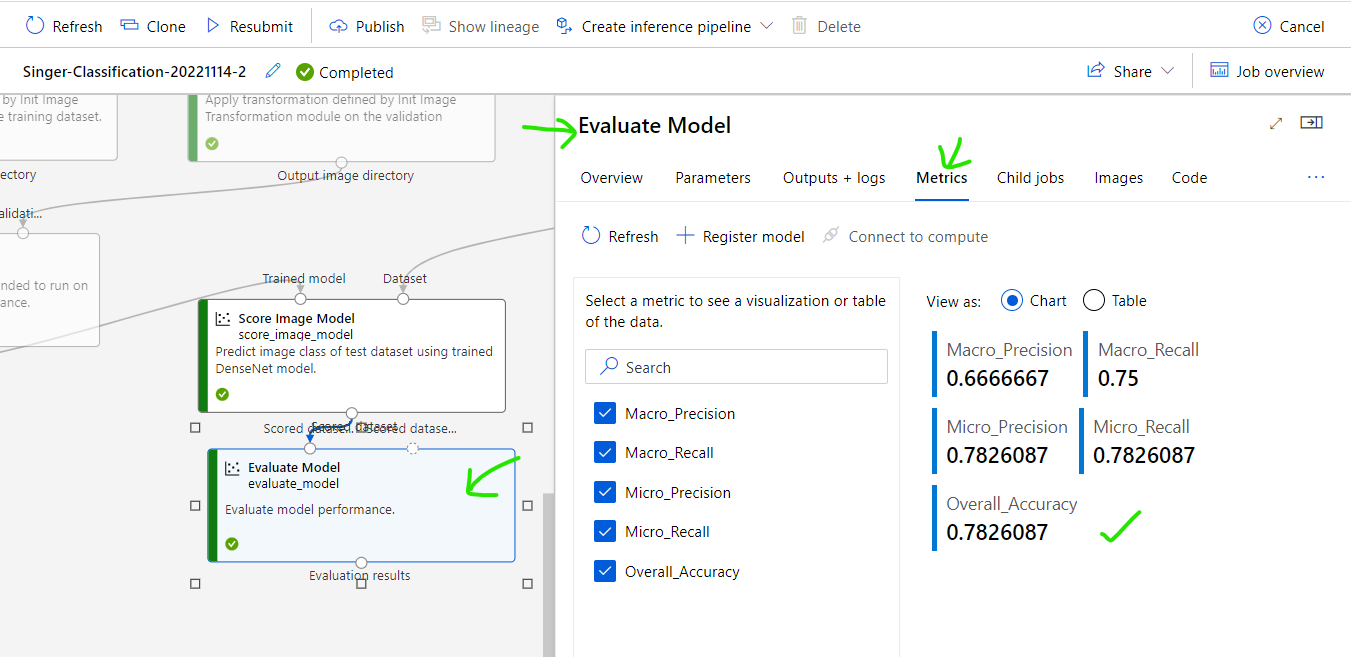
Confirm Evaluated result by click [Evaluate Model] step. As you can see the accuracy of the trained model is ~78%.
For image classification, ~80% is an acceptable result. NOTE: because inputted image is Singer photo with difference make-up style, inconsistency between images affect a little bit to the final accuracy.
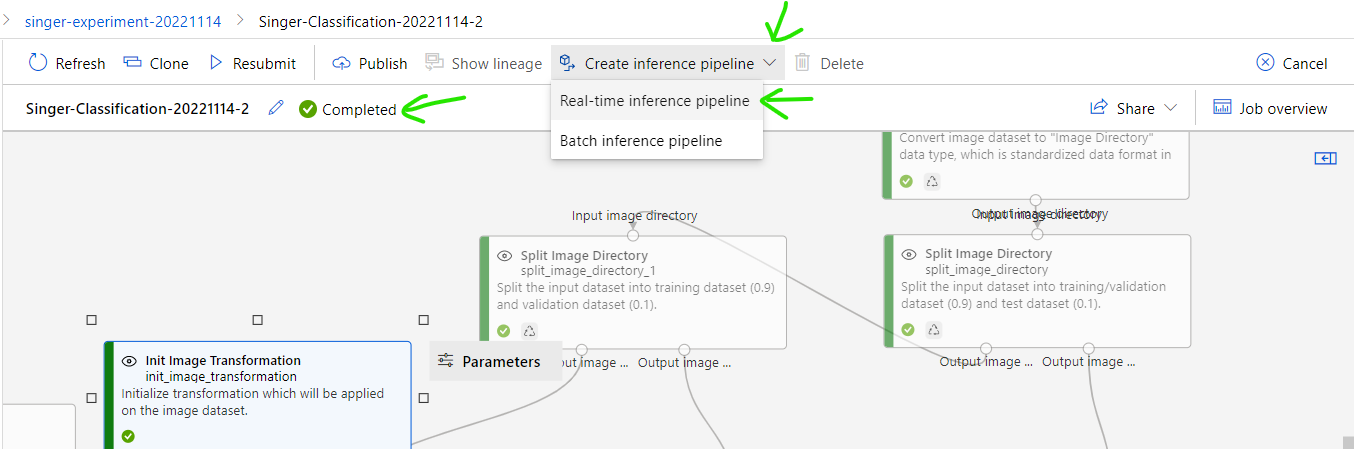
Step 6: Convert trained model into "Real time pipeline"
After training job is Completed, you can convert it into realtime pipeline by clicking: [Create inference pipeline] then select [Real-time pipeline]
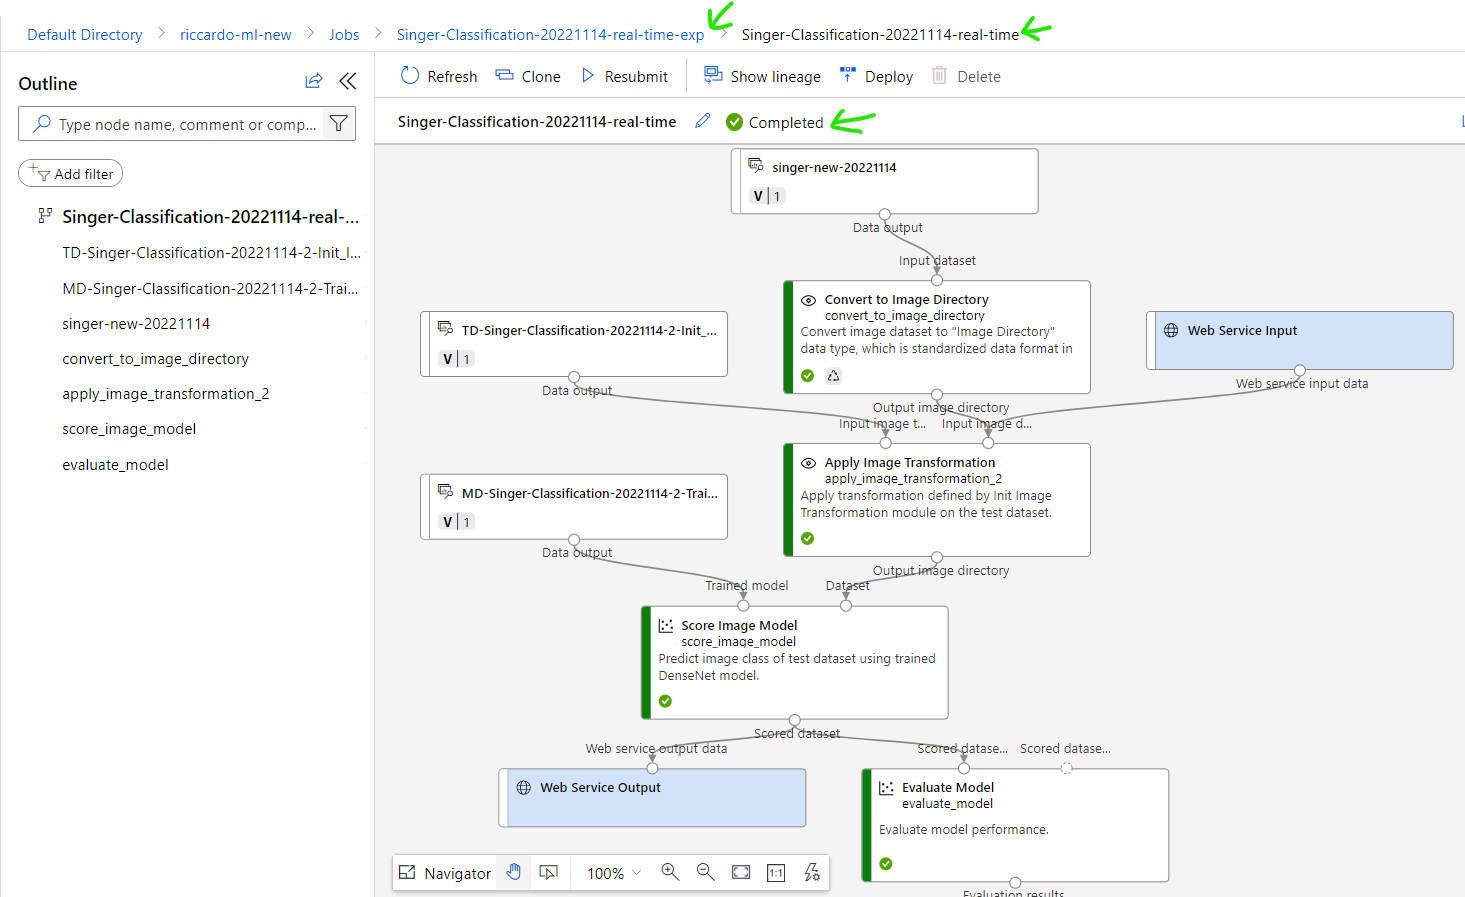
It will automatically convert to new real-time pipeline.
Re name it to some thing like [Singer-Classification-20221114-real-time]
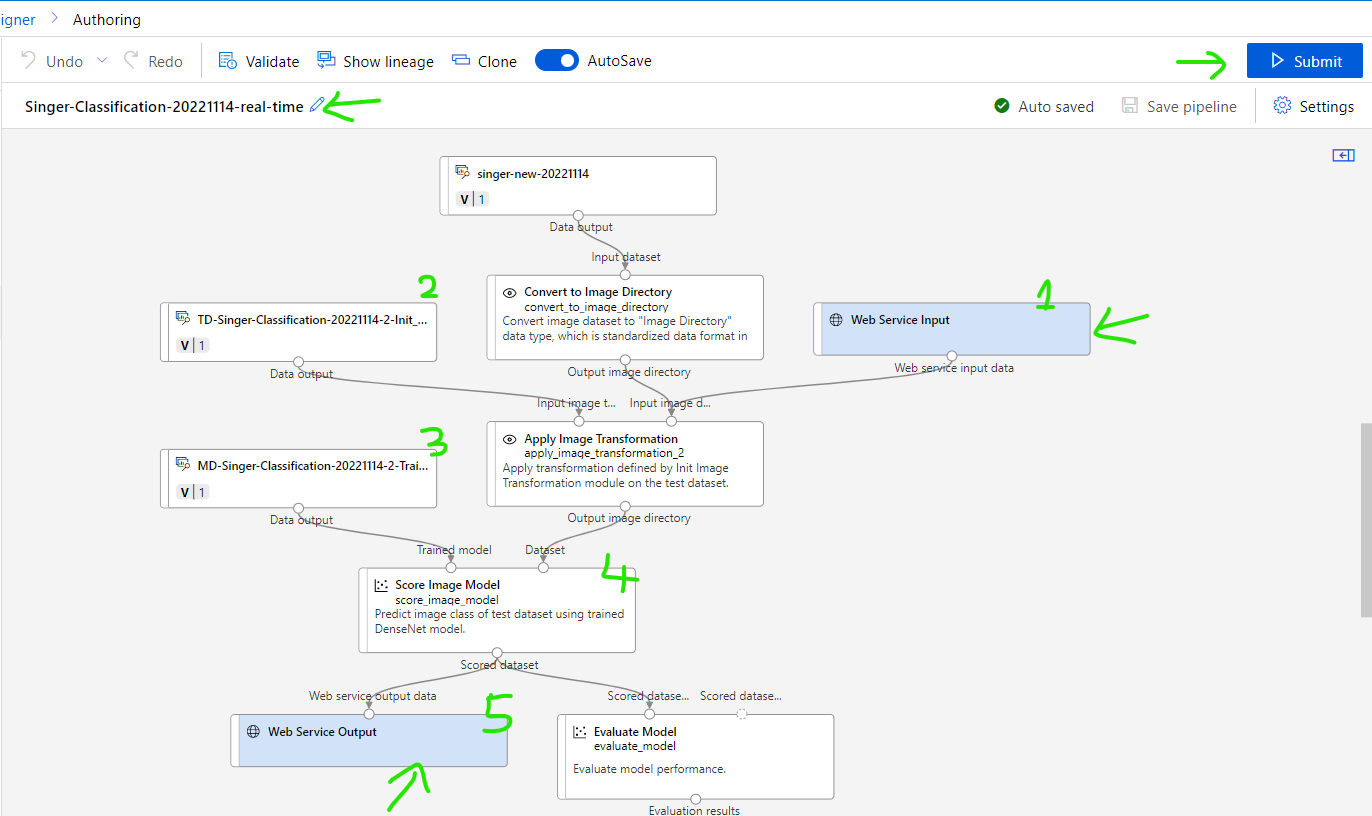
Explanation for new realtime pipeline
(1) Endpoint to receive user input data. In this case is image to evaluate.
(2) Re-use Image transformation setting from training pipeline.
(3) Re-use trained model from training pipeline
(4) Score Image Model, this step will give scores predictions for an inputted image using trained model. Result is probability of matching, example: 0.8 is Den_Vau, 0.05 is Ha_Anh_Tuan,...
(5) Output endpoint to return result to client.
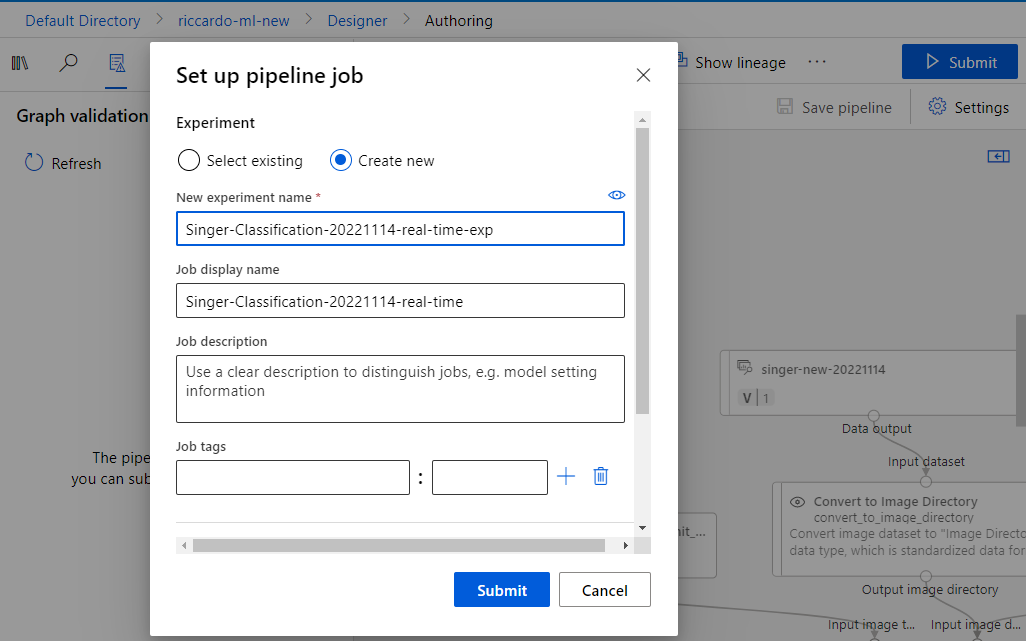
In fact, you do not need to change anything, just click [Submit] button, enter name for new Experiment and new job.
Confirm new Realtime job execution result
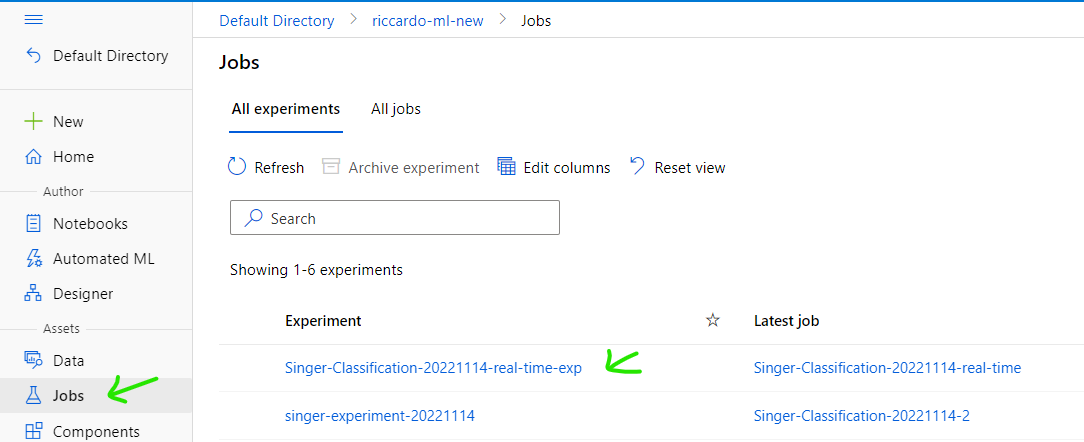
Wait until the job completed successfully
Step 7: Deploy Real time pipeline to Real Time Endpoint
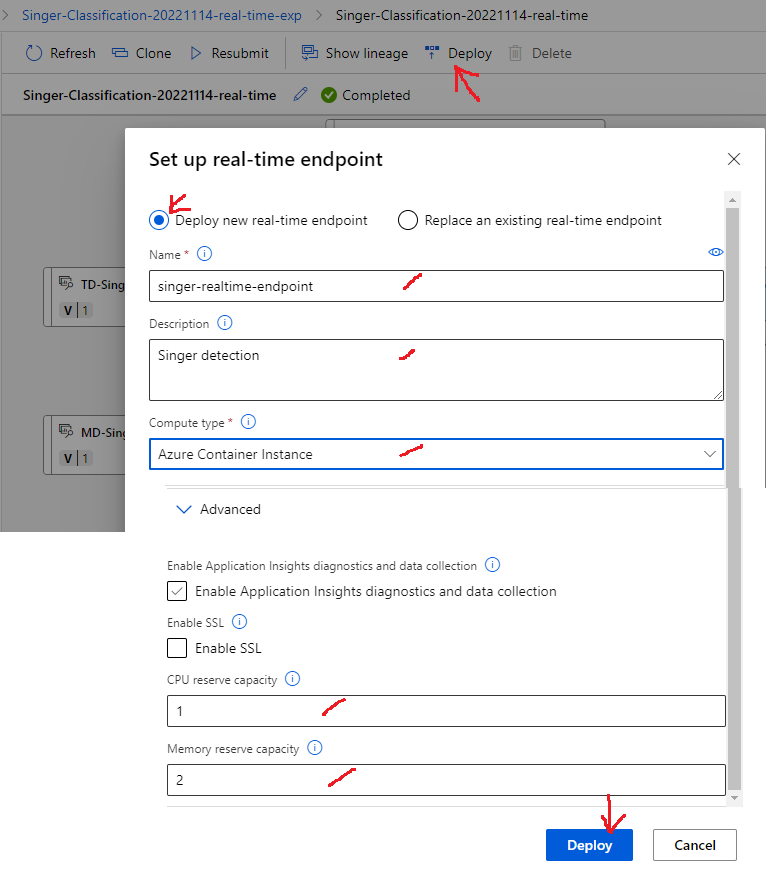
In the Completed real-time job, click [Deploy] button.
Select [Deploy new real-time endpoint].
Input name for endpoint, ex: singer-realtime-endpoint
Compute type: select [Azure Container Instance]
Click [Advanced], select CPU capacity and Memory reserve capacity (example 1 core and 2 GB memory).
Click [Deploy] button
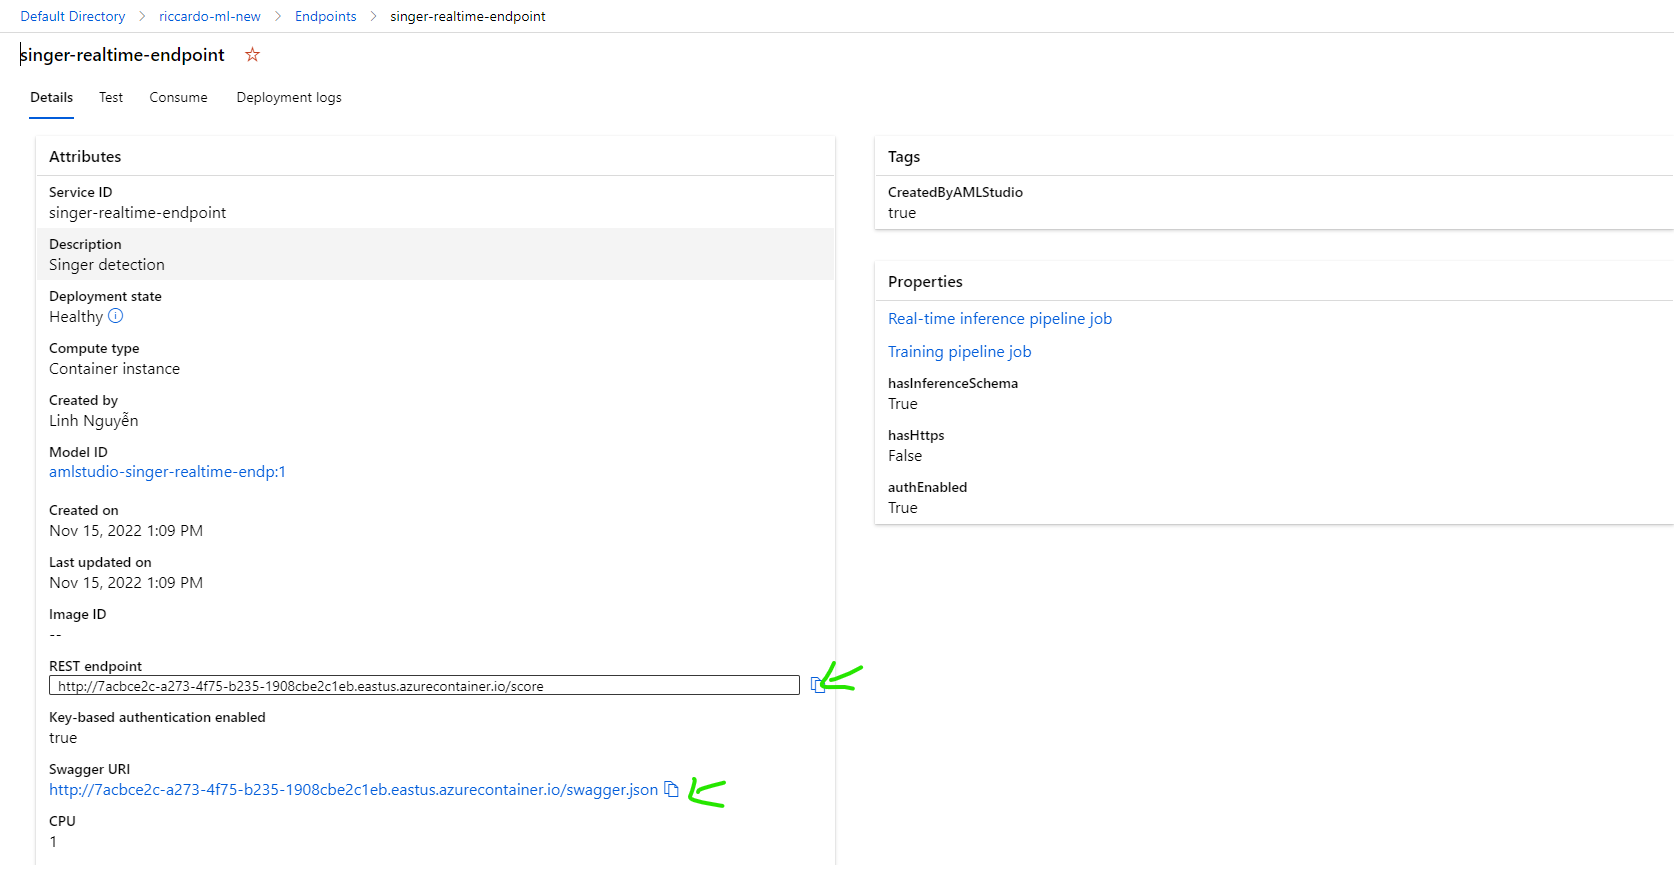
Confirm new endpoint has been deployed successfully

REST endpoint: the endpoint use to call API for evaluation
Swagger URI: API Specification as Swagger format.
Step 8: Test the Machine Learning deployed endpoint
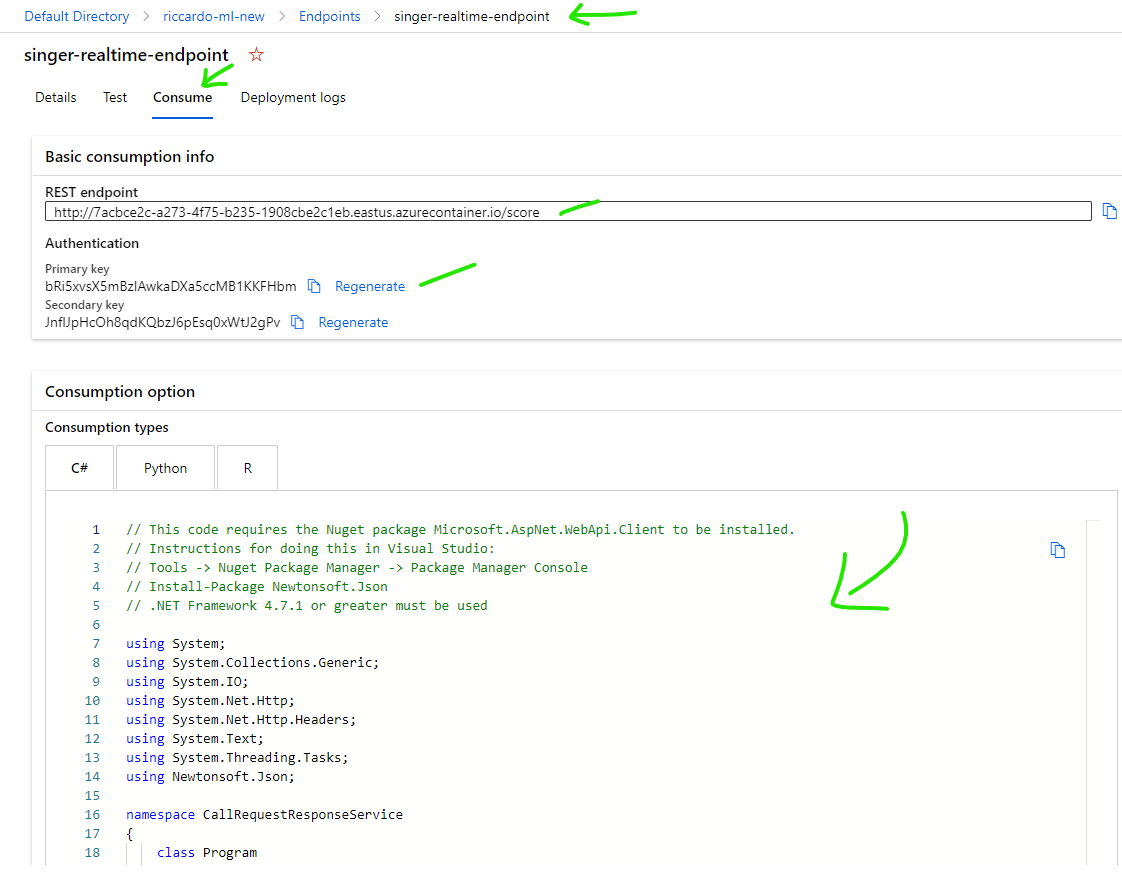
Go to [Swagger URI] for API specification.
Click [Consume] tab to get API Key in Authentication -> Primary key.
You can also get sample code for C#, Python or R.
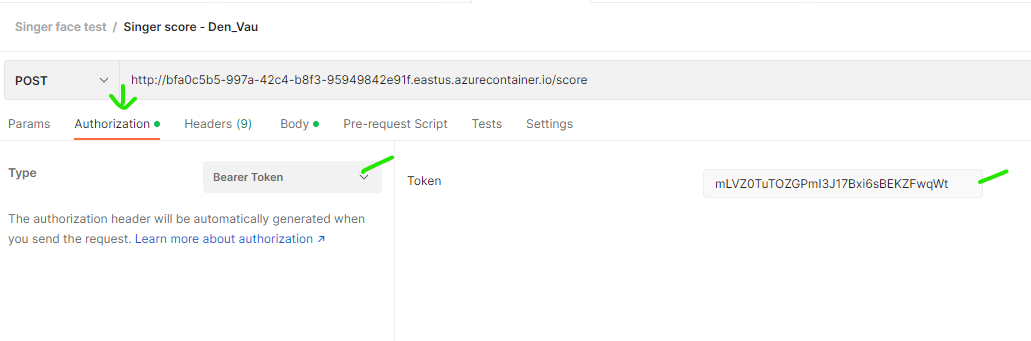
To test by Postman, create a request like below:
Request URL: REST Endpoint. Ex: http://7acbce2c-a273-4f75-b235-1908cbe2c1eb.eastus.azurecontainer.io/score
Method: POST
Authorization: Bearer token, value: Primary Key get from above step
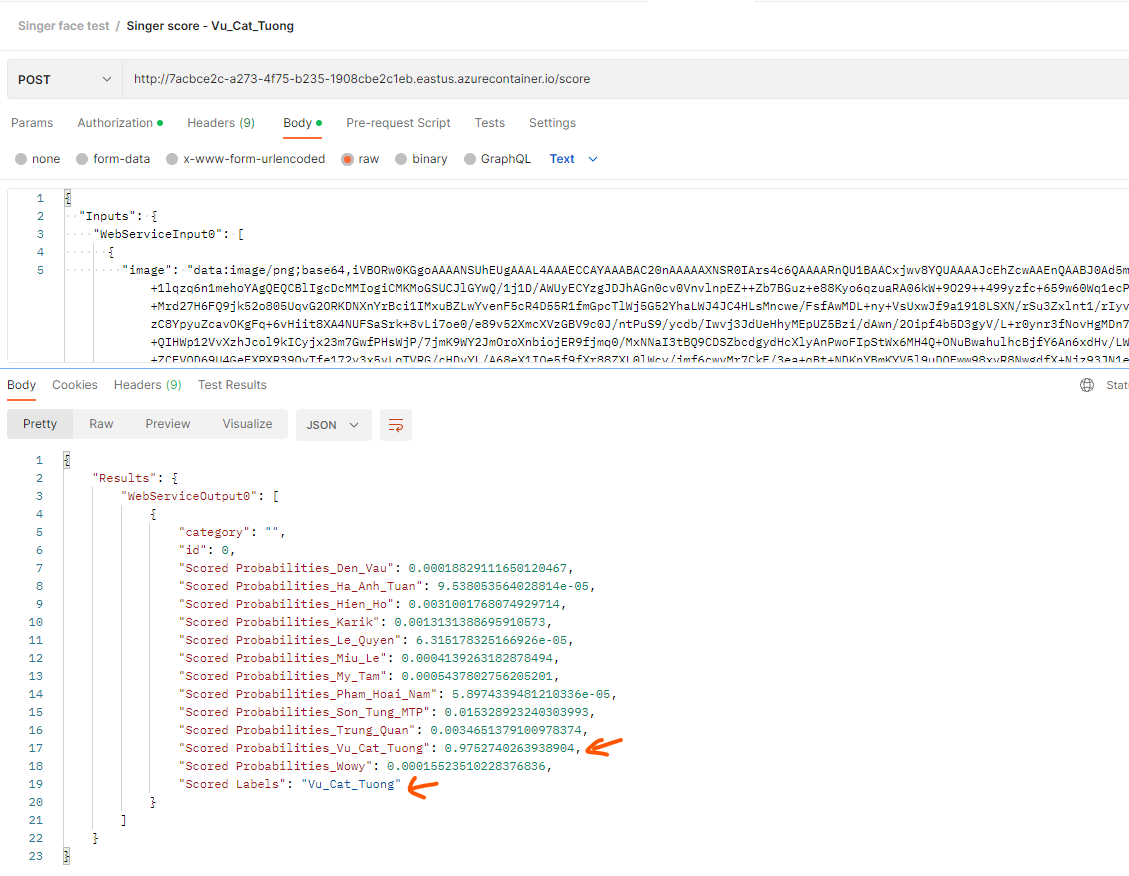
Body
-image: base64 of a test image. You can use below Website to convert a image to Base64: https://www.base64-image.de/
NOTE: You must use the image that has not been used for train.
-id: ID of image, not required.
-category: specify category for this image, example: "Den_Vau", not required.
{
  "Inputs": {
    "WebServiceInput0": [
      {
        "image": "data:image/png;base64,xxxxxxxxxxxxxxxxxx",
        "id": 0,
        "category": ""
      }
    ]
  },
  "GlobalParameters": {}
}
Evaluation result
Example below evaluation give score of 97% is Vu_Cat_Tuong, and the highest score will be use to label it.
Clear resources
When you finished, to save your money, you can delete below resources
For Training Compute resource, select [Compute] tab on the left, select machine then [Stop] for future use or you can [Delete] completely.

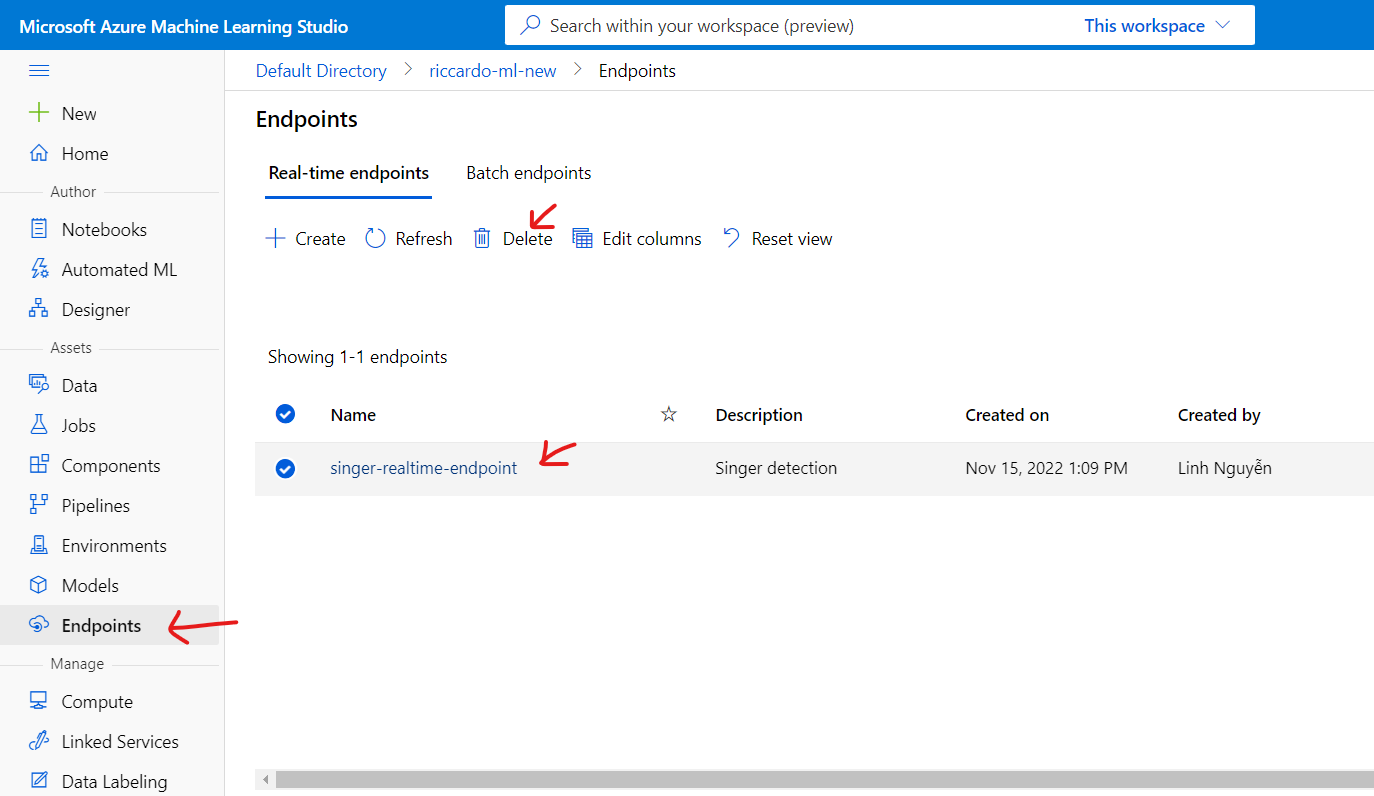
For Endpoint, select [Endpoints] tab on the left, select machine then [Delete].
Other resource like Pipeline, Data, Job can be kept remain for future use.
Conclusion
In this article, I have introduced to you about Azure Machine Learning service and a quick demonstration using no-code method.
If you need to implement more training model and processing logic as your requirement, Note Book or VS Code will be better.
Machine Learning Studio is good for someone who has not much knowledge about ML or has just get start to study it. Using built-in model from Machine Learning Studio can help you quick evaluate input data set (may be received from your customer) then give a quick evaluation whether those data can be used or not.
Thanks you!