
![[Azure IoT] How to create a simple solution to make your home safer with IoT](/content/images/2023/02/00-01-1.jpg)
1. Introduction
Before coming to this blog, you should read the "Introduction to Azure IoT for Beginners" blog first to understand the basic knowledges about Azure IoT, as well as how to communicate between IoT devices and Azure IoT services.
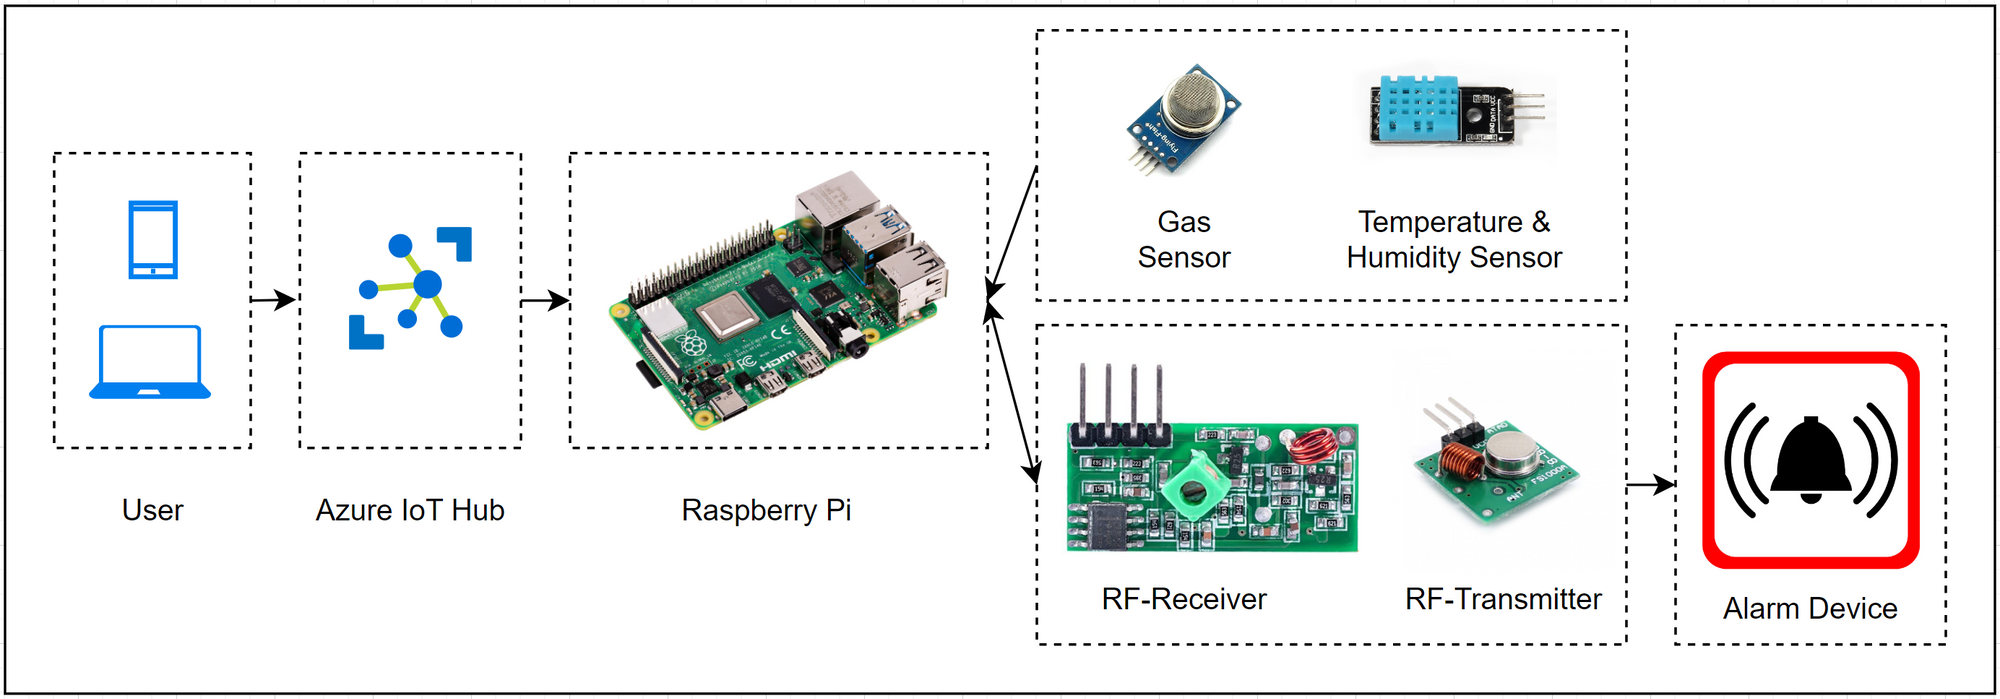
This blog will demonstrate a simple solution to make your home safer by using IoT devices such as gas sensor, temperature sensor, RF-433 MHz modules for alarming when there are any dangers from gas leak or fire occurs.
Below is a diagram showing the basic process flow in this solution.
2. Demonstration Content
Create a user interface (UI) where the user can customize the gas density and temperature parameters, as well as activate or deactivate the alarm function when a gas leak or fire occurs.
How to work: Through sensors, parameters such as gas density and temperature will be continuously sent to the main processing function, here based on the parameters set on the UI, the program will compare and determine when the gas density or temperature or both have exceeded the value set on the UI, then an alarm will be sent to the alarm device using the RF module. In this demonstration scope, to demonstrate with the available equipment, the program will control the roll-up door to open instead of using the actual alarm device.
3. Preparation
3.1. Azure subscription
- Create an Azure IoT Hub used to send and receive messages from/to devices.
- Creating Azure Function App specifically uses HttpTrigger to receive requests from users.
3.2. Hardware
Raspberry Pi x 01
Breadboard x 01
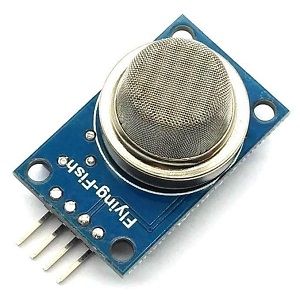
Gas sensor LPG MQ2 x 01
- TTL logic level converter x 01

- MCP3008 x 01

- Temperature sensor DHT11 x 01

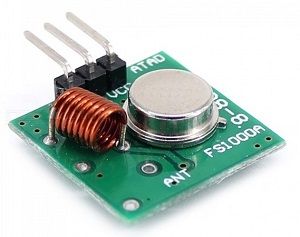
- RF-Receiver 433 MHz MX-05V x 01
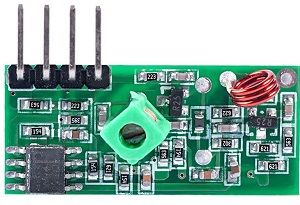
- RF-Transmitter 433 MHz MX-FS-03 x 01
- Roll-up door (Optional)
- Several jumper wires
- T-Extension Board with 40-Pin Cable (Optional) x 01
4. Implementation
4.1. Create Azure IoT Hub
- Enter Azure Portal Site
- Create Azure IoT Hub (
lioneldemo-iot) and add a new device (lioneldemo-raspberry-pi)
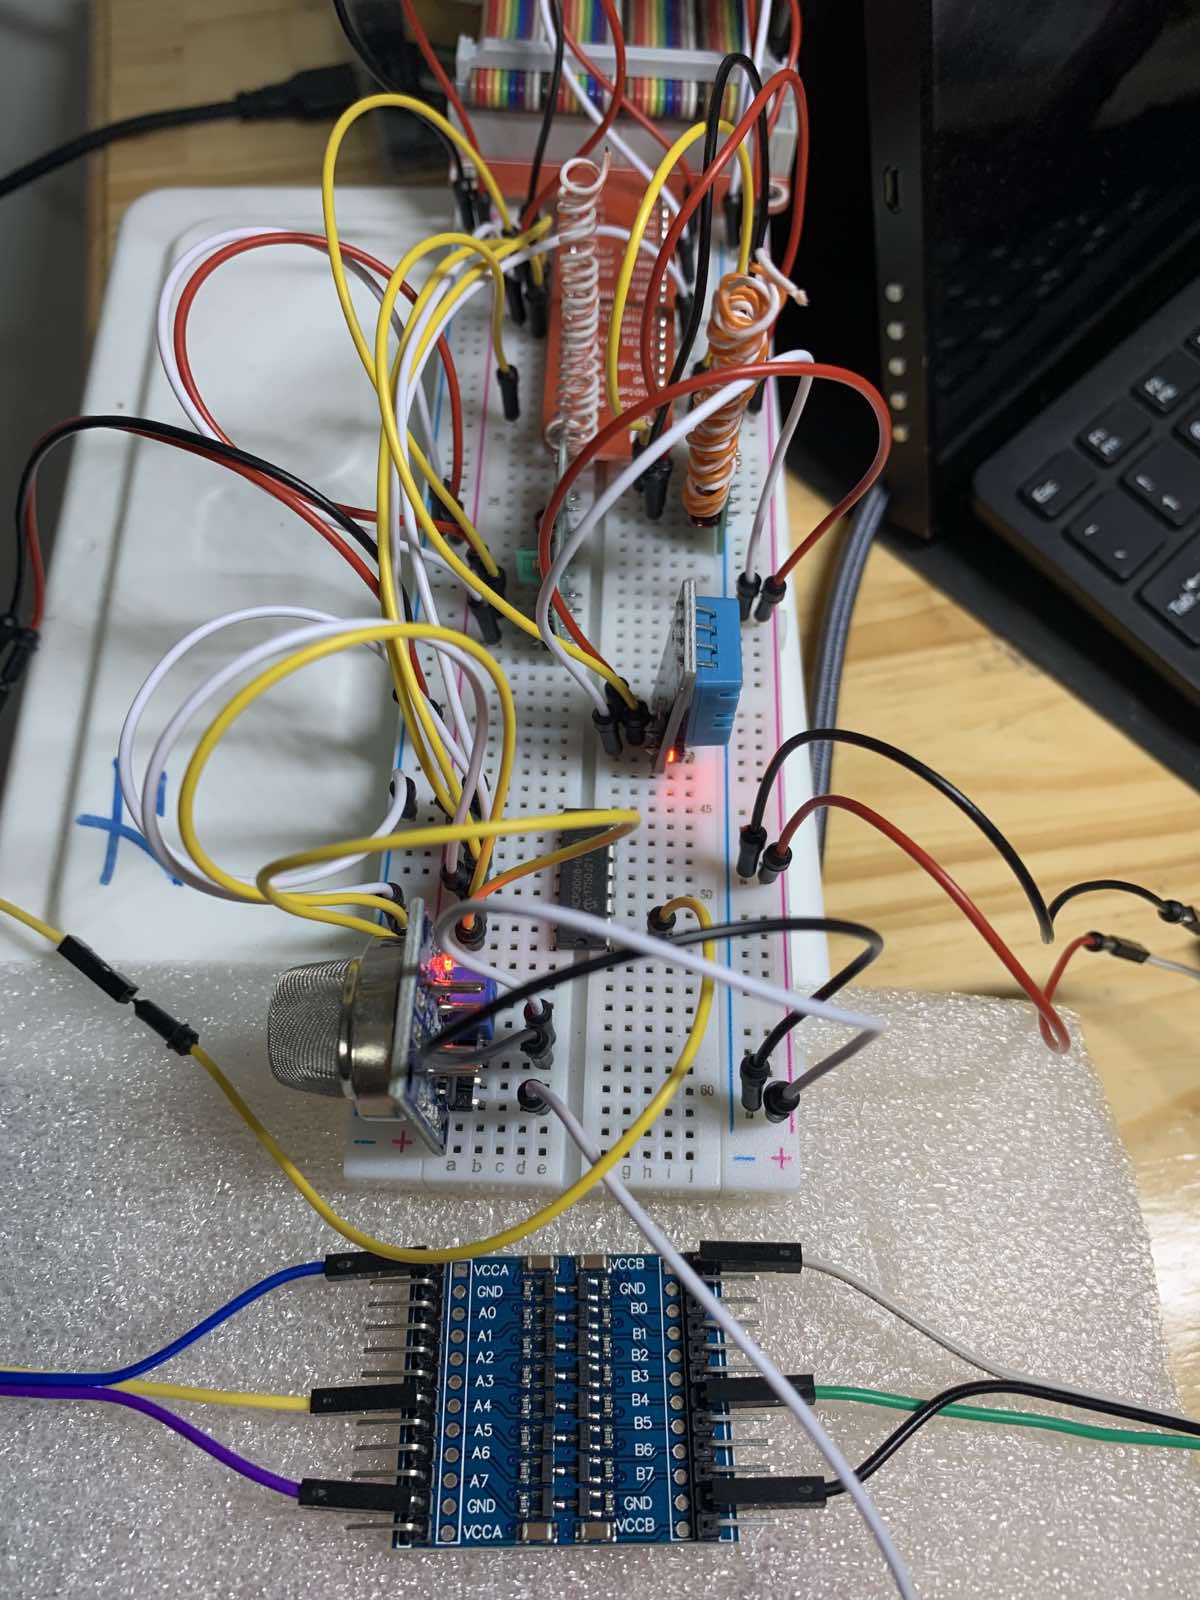
4.2. Setting up the control circuit
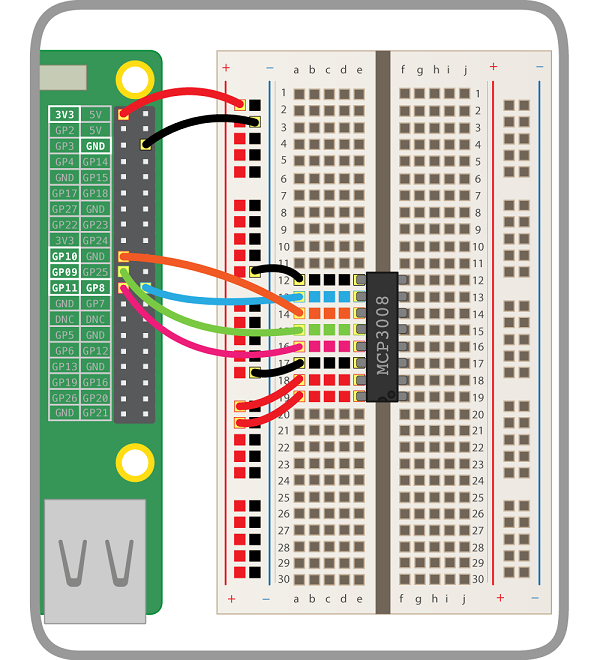
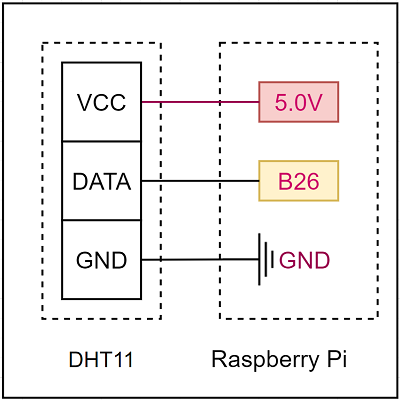
Schematic diagram of Gas sensor (supported modules TTL, MCP3008), Temperature sensor, RF-Receiver and RF-Transmitter with Raspberry Pi:
- Gas sensor:
Reading data from the gas sensor is relatively complicated, so we need 2 steps as the following.
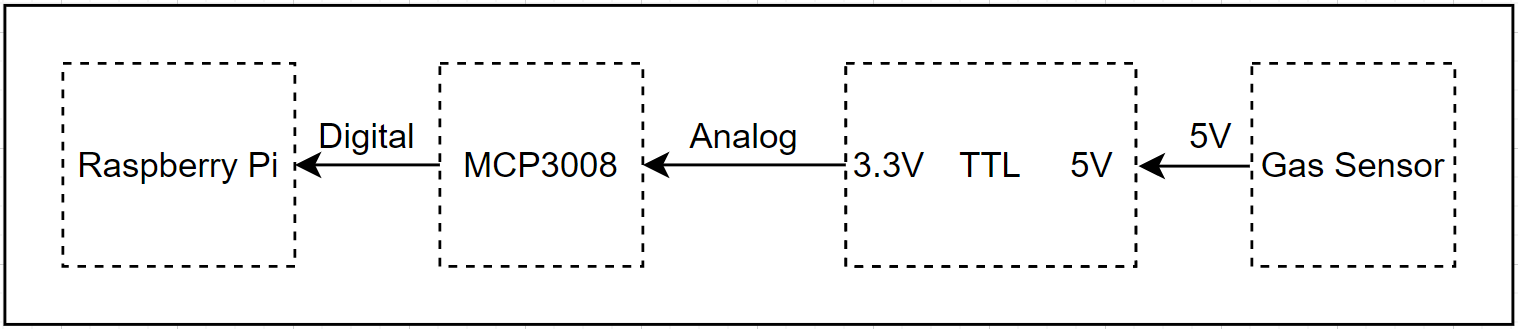
・ Step 1: Because the output of the gas sensor is 5V, so we must convert it to 3.3V by using TTL converter.
・Step 2: Because the output of the gas sensor is Analog signals, so we must convert them into Digital signals with the MCP3008 module.
The basic processing flow shown in the diagram below.
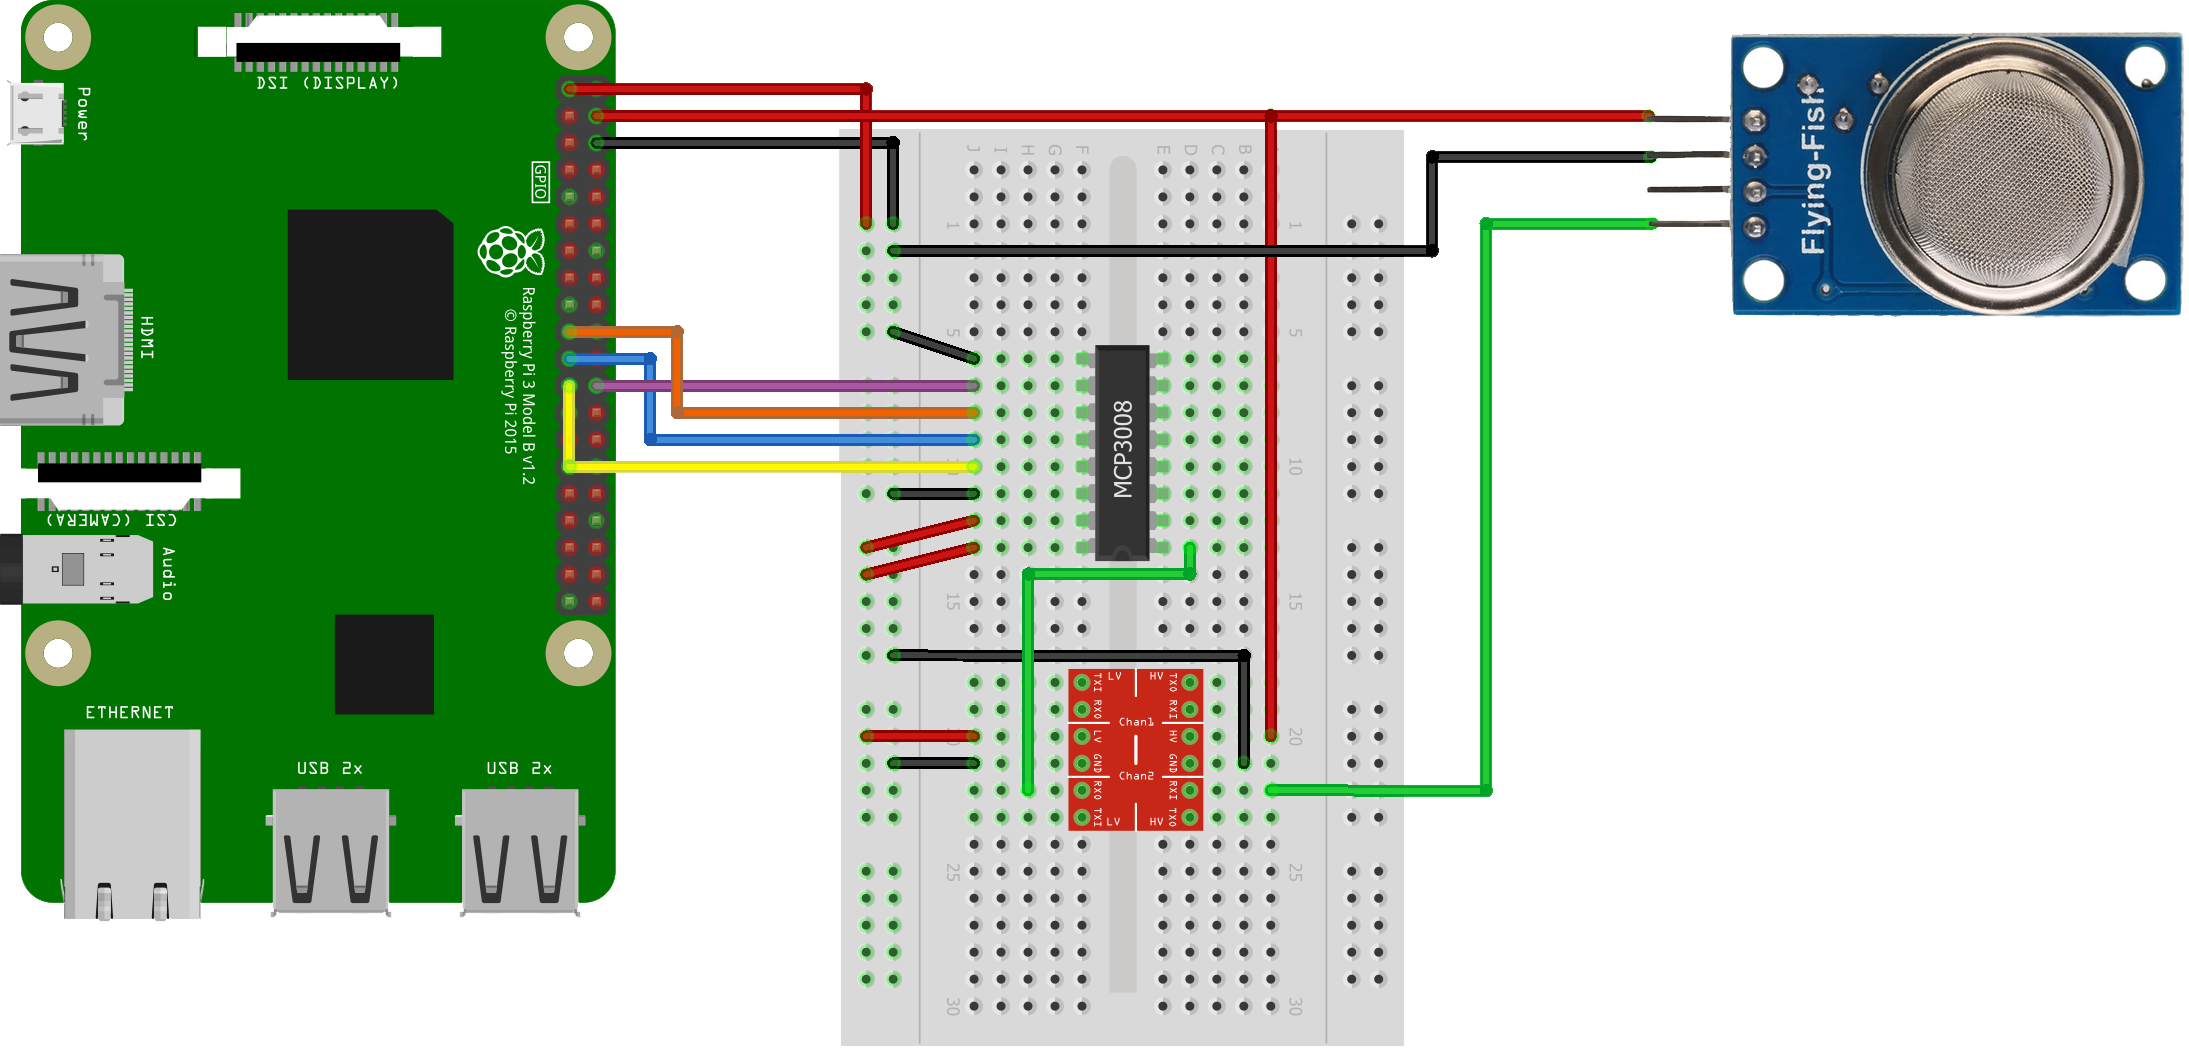
※ Detail how to wire MCP3008 to Raspberry Pi
- Temperature sensor:
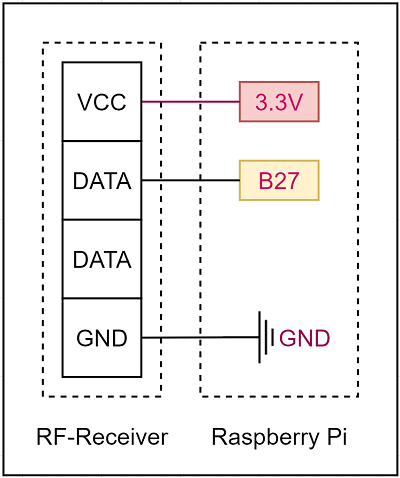
- RF-Receiver:
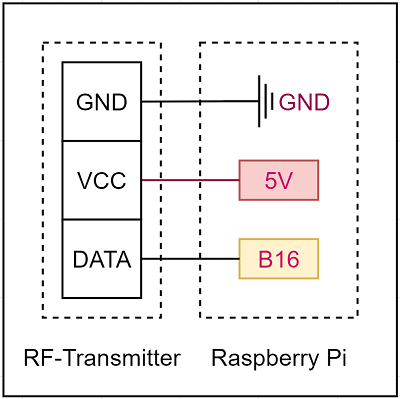
- RF-Transmitter:
- In reality:
4.3. Ideas of implementation
- On the user side, we will implement the following functions:
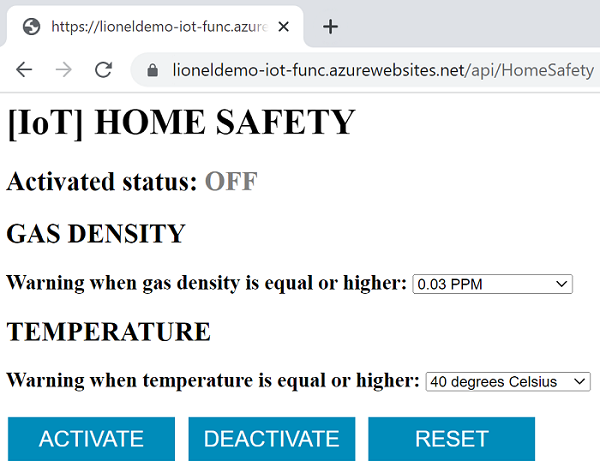
(1) Create a UI so that the user can interact with the program. Parameters such as gas density and temperature will be customized here, the user can Activate or Deactivate the alarm function, as well as Reset the customizations to default values.
(2) Data of parameters on the UI will be stored in a database (CosmosDB).
(3) Send a message request to Azure IoT Hub to ask IoT devices to make a request such as: Activate, Deactivate, Reset.
※ These source codes include Python, HTML, CSS and Javascript. They are implemented using Azure Function App with trigger type is HttpTrigger.
- On the IoT devices side (Raspberry Pi + sensors and modules), we will implement the following functions:
(1) Receive message requests from Azure IoT Hub and handle them. When handling a request the program will link to the functionality of gas & temperature sensor and RF module.
(2) Implement functionality of these sensors and modules.
4.4. Coding
4.4.1. User Side
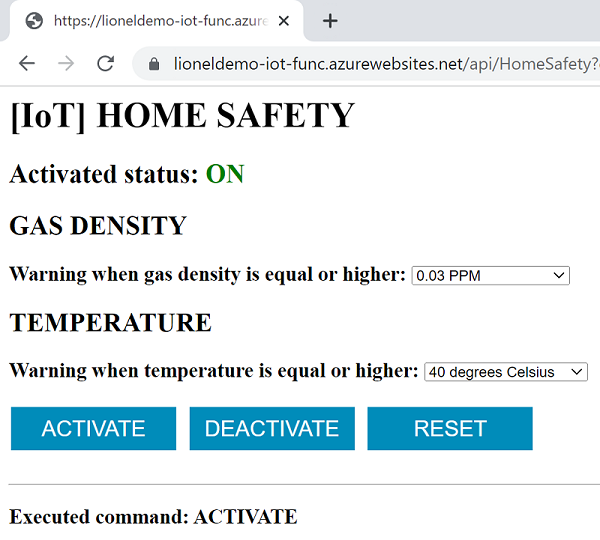
To be able to control our home safety functions over the Internet, we need a simple Web UI where show command buttons and settings as below.
So, we'll use the Azure Function App with HttpTrigger type to implement that requirement.
Create Azure Function App in Azure Portal (e.g., lioneldemo-iot-func)
We also need to create Azure Cosmos DB account to store settings on Web UI as below.
See the blog "[Azure IoT] How to control your Air Conditioner by using Azure IoT Hub" for more details.
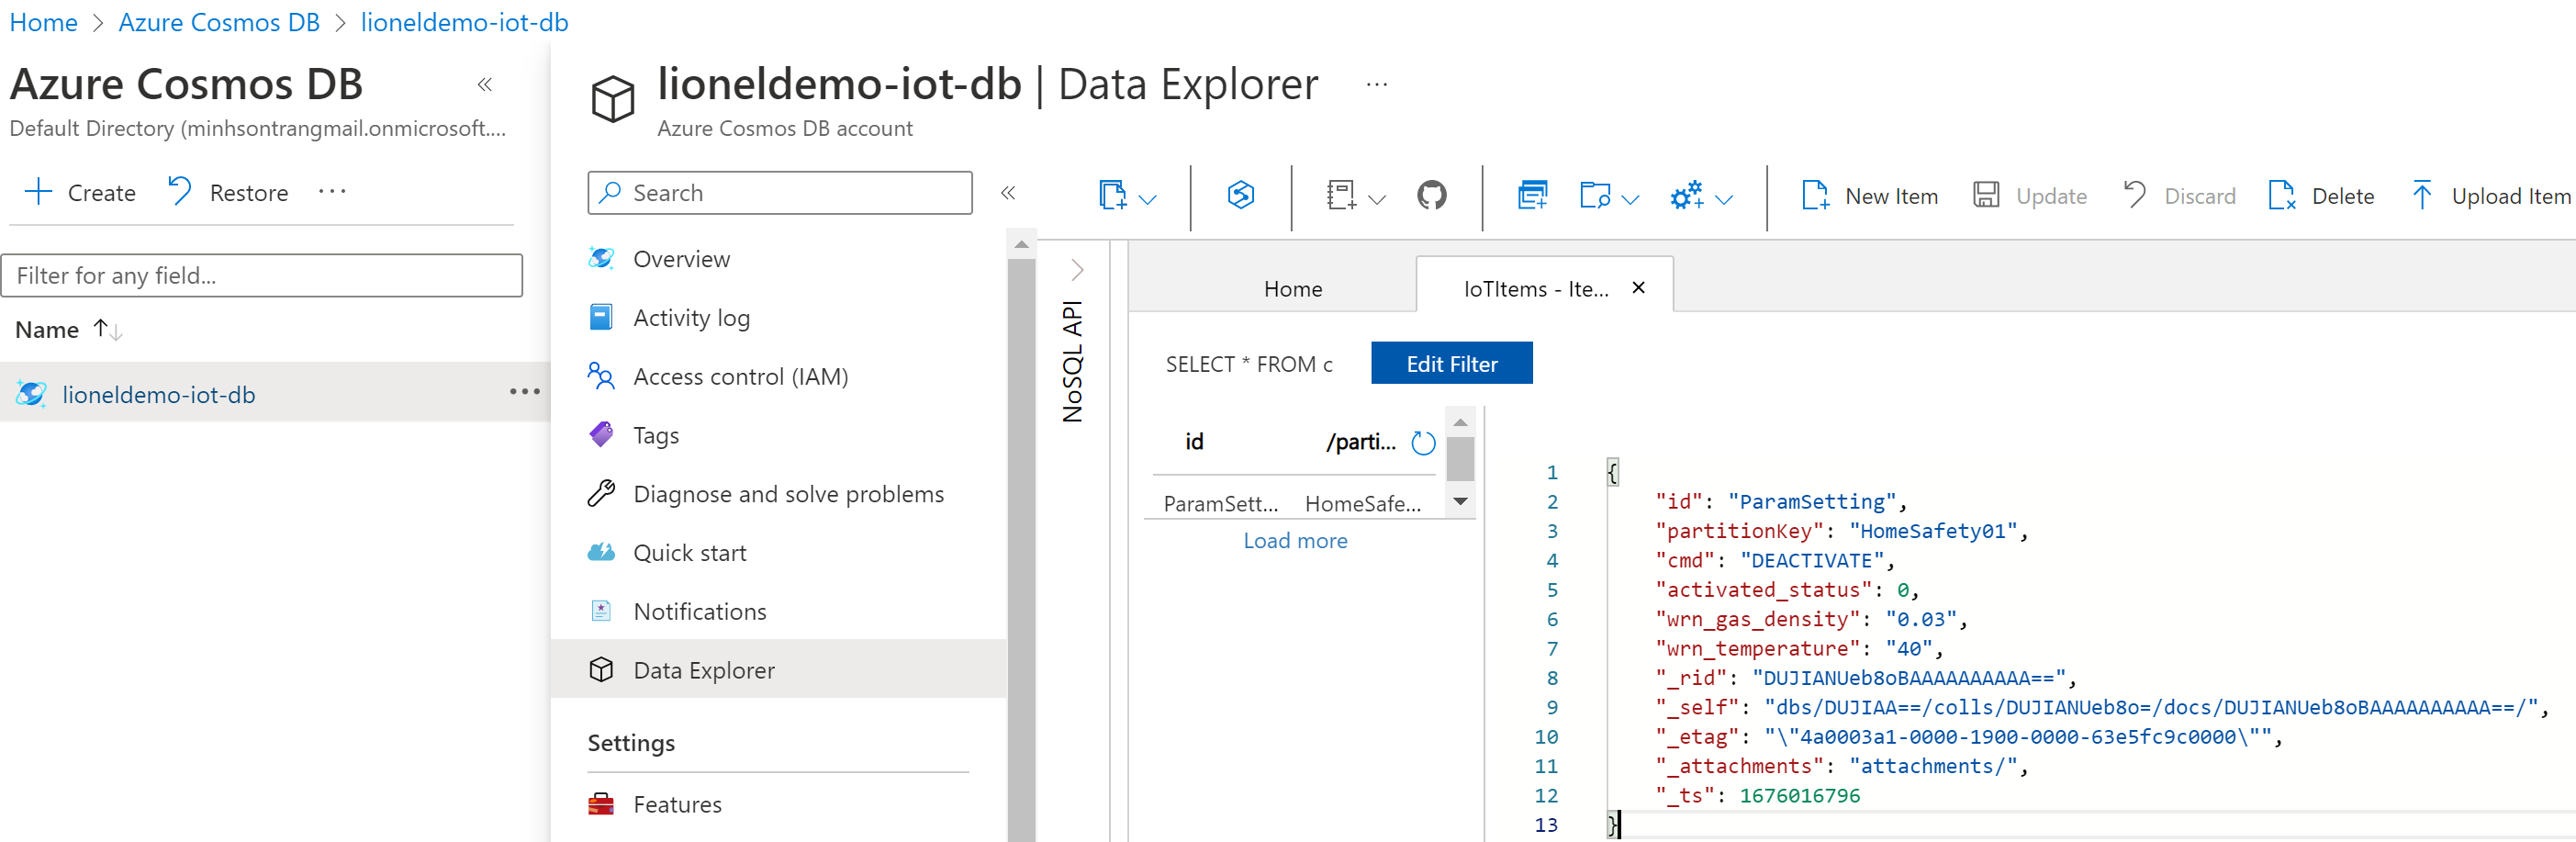
- Data structure

- Next, we'll create some source files (Function App and Cosmos DB) in python for UI and DB to sending requests from Azure IoT Hub to Raspberry Pi.
Source code folder structure
api
  │  ...
  │  requirements.txt
  │
  └─HomeSafety
          function.json
          __init__.py
The __init__.py file
- Create UI.
- Store settings on UI into Cosmos DB.
- Send requests from Azure IoT Hub to Raspberry Pi.
# __init__.py
import logging
import azure.functions as func
from azure.iot.hub import IoTHubRegistryManager
# ...

# Create UI (html source code).
def body_html():
    title = '<h1>[IoT] HOME SAFETY</h1>'

    # Create CSS for button
    css = '<style>'\
        '.button {'\
        '  background-color: #008CBA;'\
        '  border: none;'\
        '  color: white;'\
        '  padding: 8px 2px;'\
        '  text-align: center;'\
        '  text-decoration: none;'\
        '  display: inline-block;'\
        '  margin: 4px 2px;'\
        '  cursor: pointer;'\
        '}'\
        '.button_size {font-size: 20px; width: 150px}'\
        '</style>'

    # Create Javascript
    javascript = '<script>'\
        'function exeCmd(cmd) {'\
        '  var tmpObj = document.getElementById("temperature_id");'\
        '  var gasObj = document.getElementById("gas_id");'\
        '  var tmpValue = tmpObj.value;'\
        '  var gasValue = gasObj.value;'\
        '  var queryStr = "&temp=" + tmpValue + "&gas=" + gasValue;'\
        '  if (cmd == "RESET") {'\
        '    queryStr = ""'\
        '  }'\
        '  document.location = "HomeSafety?cmd=" + cmd + queryStr'\
        '}'\
        '</script>'

    # Set content with Javascript, CSS and Title
    content = javascript + css + title

    # Activate status
    content += render_activate_status(g_status)

    # Gas density option list
    WRN_GAS_DENSITY_LIST = [0.01, 0.02, 0.03, 0.04, 0.05]
    list = []
    for item in WRN_GAS_DENSITY_LIST:
        list.append({f"{item}":f"{item} PPM"})
    content += render_gas_density_list("GAS DENSITY", list, selected_value=g_gas)

    # Warning temperature option list
    WRN_TEMPERATURE_LIST = [30, 31, 32, 33, 34, 36, 37, 38, 39, 40, 41, 42, 43, 44, 45, 50, 60, 70, 80]
    list = []
    for item in WRN_TEMPERATURE_LIST:
        list.append({f"{item}":f"{item} degrees Celsius"})
    content += render_temperature_list("TEMPERATURE", list, selected_value=g_temp)

    # Command buttons
    content += render_cmd_btn("", [ACTIVATE, DEACTIVATE, RESET])
    return content

def main(req: func.HttpRequest) -> func.HttpResponse:
    logging.info('Python HTTP trigger function processed a request.')
    cmd = req.params.get('cmd')
    gas = req.params.get('gas')
    temp = req.params.get('temp')
    try: gas
    except NameError: gas = ""
    try: temp
    except NameError: temp = ""
    global g_gas, g_temp, g_container, g_status
    try: g_gas
    except NameError: g_gas = ""
    try: g_temp
    except NameError: g_temp = ""
    try: g_container
    except NameError: g_container = connect_db()
    try: g_status
    except NameError: g_status = 0

    db_respone = None
    # Init DB just for the first time only!
    if cmd == RESET:
        g_container = None
        g_gas = ""
        g_temp = ""
        g_status = ""
        db_respone = init()
    elif cmd == ACTIVATE or cmd == DEACTIVATE:
        activated_status = 0
        if cmd == ACTIVATE:
            activated_status = 1
        if gas == None:
            gas == ""
        if temp == None:
            temp == ""
        # Codes for updating state
        setting_data_list = [
            {CMD: cmd},
            {ACTIVATED_STATUS.lower(): activated_status},
            {WRN_GAS_DENSITY.lower(): gas},
            {WRN_TEMPERATURE.lower(): temp}
        ]
        db_respone = update_db(g_container, setting_data_list)
    else:
        if g_container:
            db_respone = read_db_item(g_container)
        else:
            db_respone = read_db_item(None)

    if db_respone:
        g_status = db_respone[ACTIVATED_STATUS.lower()]
        g_gas = db_respone[WRN_GAS_DENSITY.lower()]
        g_temp = db_respone[WRN_TEMPERATURE.lower()]

    content = body_html()

    # If there is a command is set, we will execute the command and update UI with the command is executed
    if cmd == RESET or cmd == ACTIVATE or cmd == DEACTIVATE:
        text = f"<h3> Executed command: <strong>{cmd}</strong></h3>"
        content += f"<hr><p>{text}</p>"
        # Prepare data and send a C2D message
        props = {
            'device_key' : DEVICE_KEY,
            'status': g_status,
            'gas' : g_gas,
            'temp' : g_temp
        }
        send_cmd(cmd, props)

    # Return the html page
    return func.HttpResponse(
        body=content,
        status_code=200,
        headers=None,
        mimetype='html'
    )
The requirements.txt file
- Add dependent libraries.
azure-functions
azure-iot-hub
azure-cosmos
The function.json file
- Setting of the function app
{
  "scriptFile": "__init__.py",
  "bindings": [
    {
      "authLevel": "anonymous",
      "type": "httpTrigger",
      "direction": "in",
      "name": "req",
      "methods": [
        "get",
        "post"
      ]
    },
    {
      "type": "http",
      "direction": "out",
      "name": "$return"
    }
  ]
}
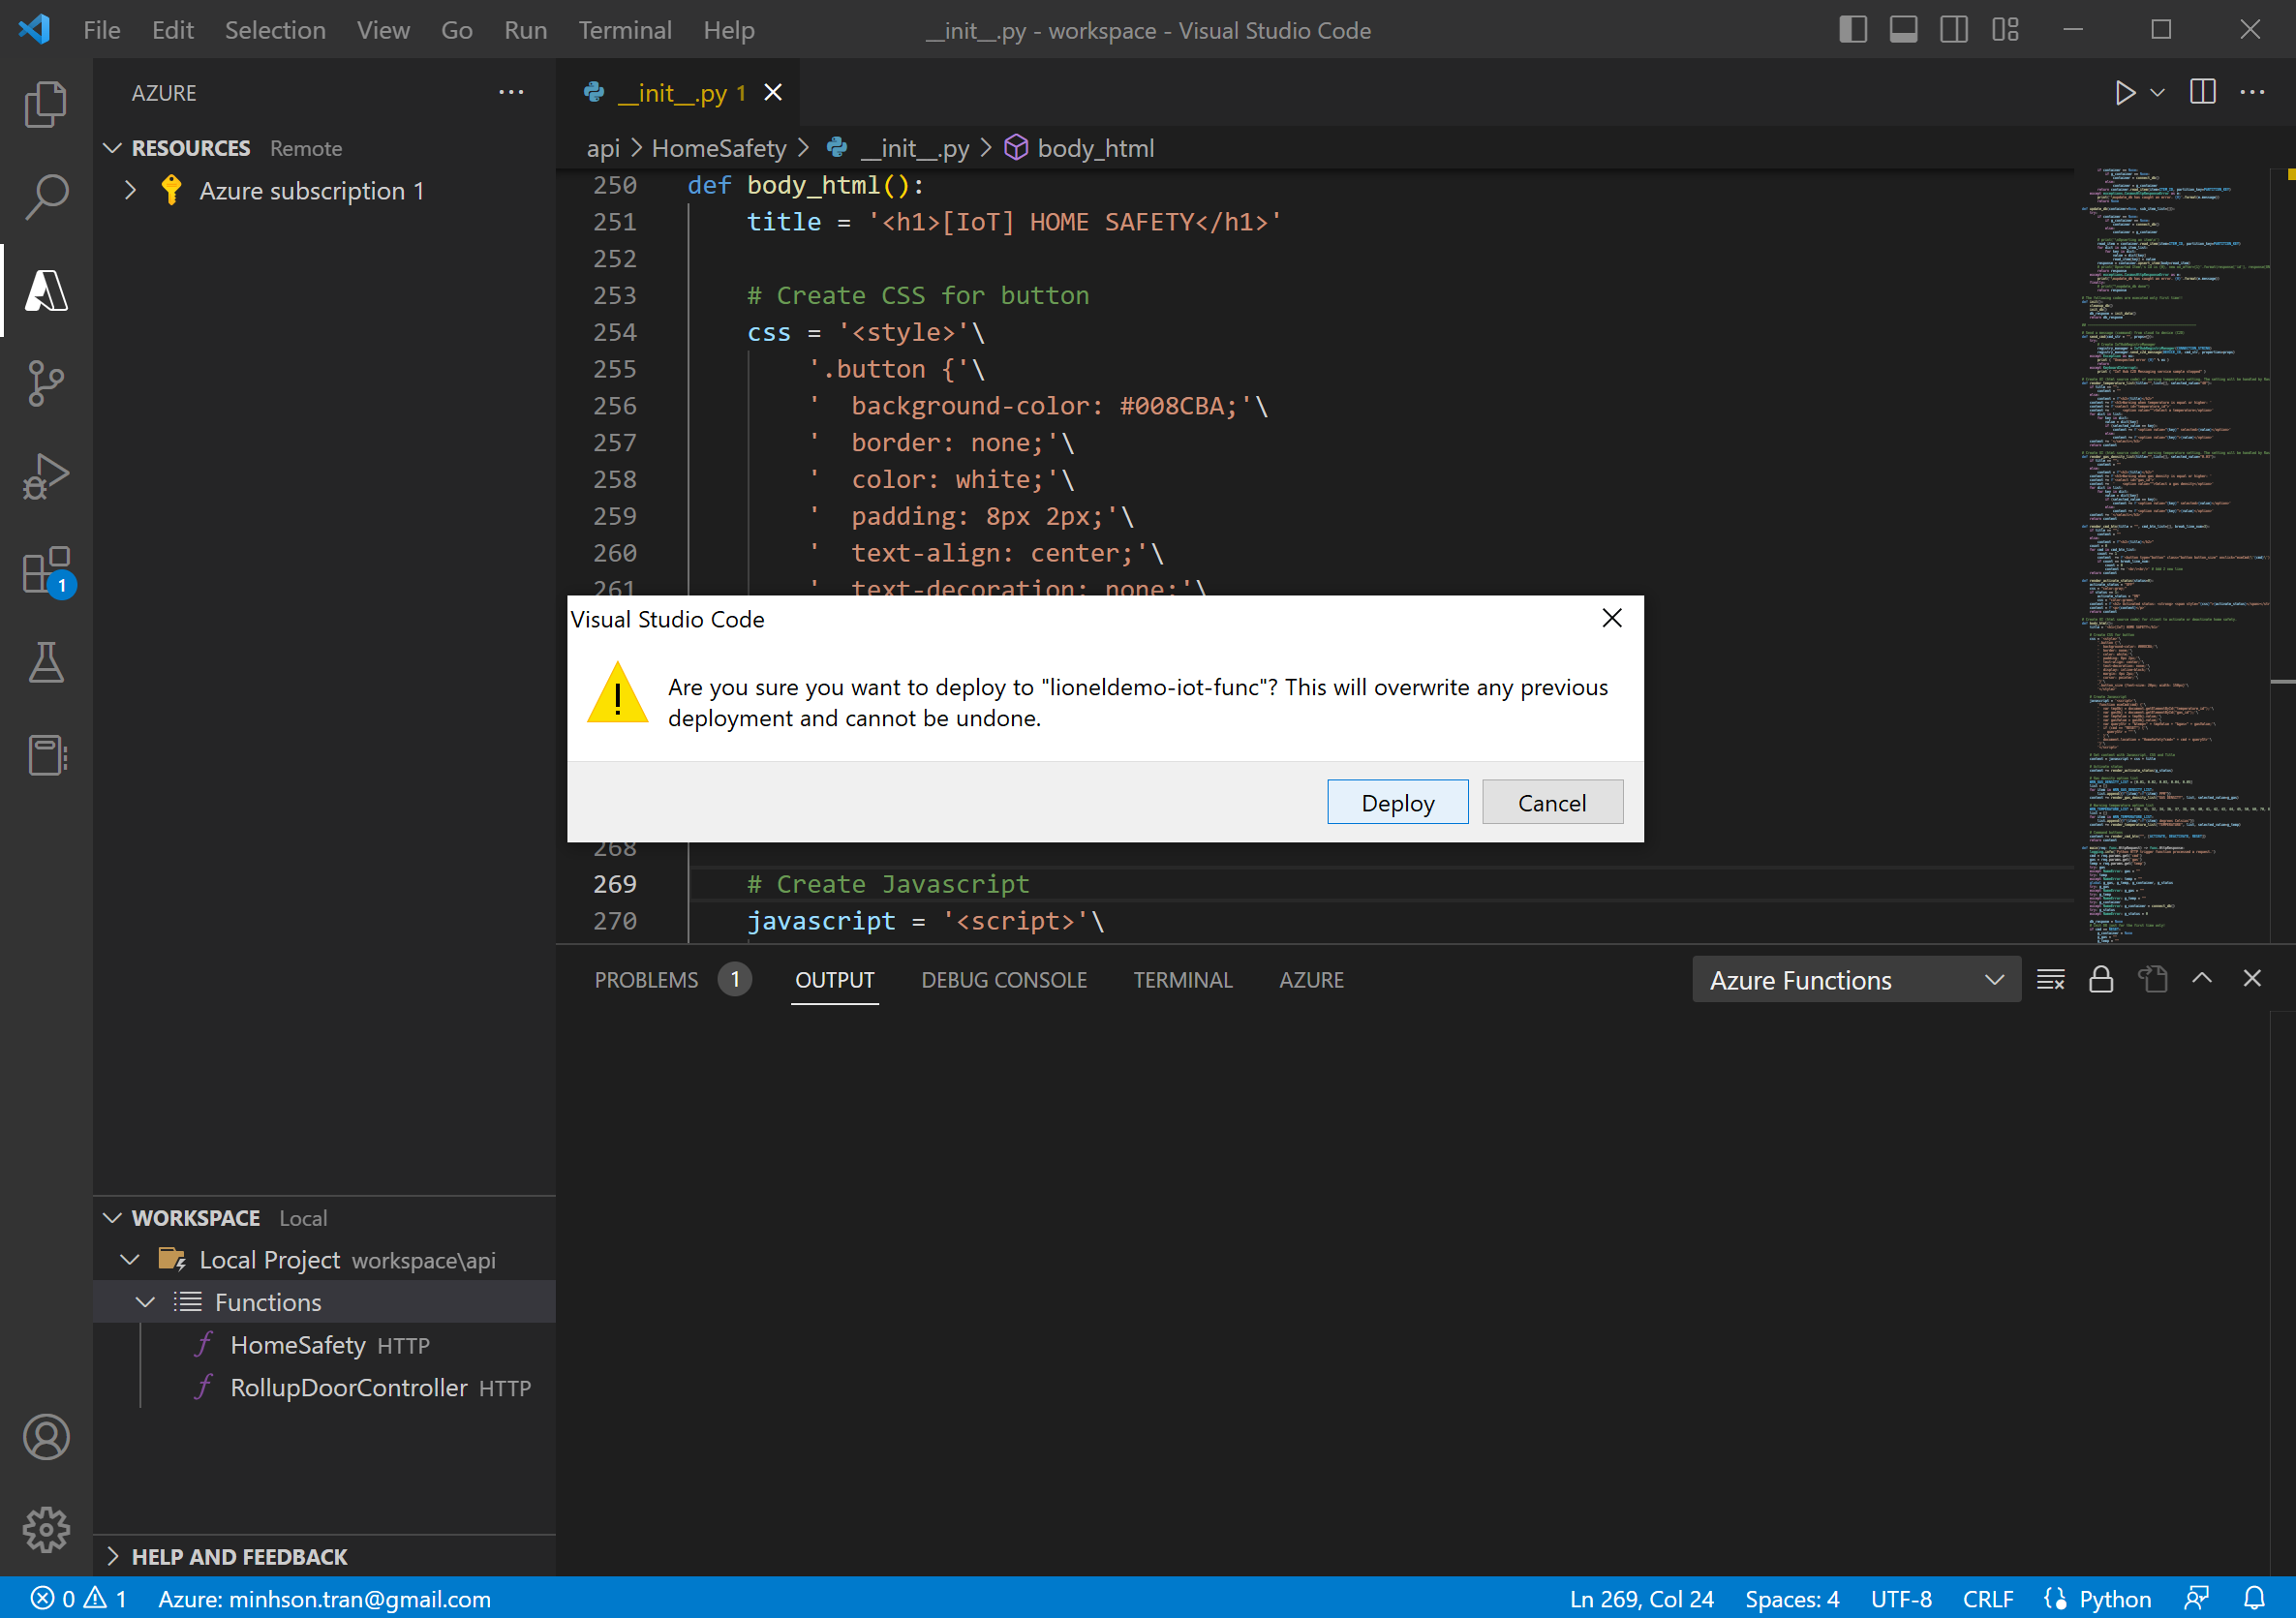
Now, we'll deploy the Azure function HomeSafety to Azure cloud, then we can control our home safety functions over the Internet by using a browser on PC or Smartphone.
4.4.2. Raspberry Pi Side
We'll create some source code files in python to process receiving requests from Azure IoT Hub on Raspberry Pi and controlling our home safety functions.
Source code folder structure
~/iot/iotdemo
├── dht11.py
├── gas_sensor.py
├── ...
├── mydevice.py
├── receivec2d.py
└── rf
    ├── ...
    └── scripts
        ├── ...
        ├── receive_rf.py
        ├── send_rf.py
        └── up
The receivec2d.py file
- Receive requests from Azure IoT Hub (Cloud-To-Device - (C2D)).
In order to able to receive requested messages from Azure IoT Hub, firstly we need to install theazure-iot-devicelibrary on Raspberry Pi.
sudo pip3 install azure-iot-device
# receivec2d.py
from azure.iot.device import IoTHubDeviceClient
import mydevice

# ...

def message_handler(message):
    device_key = message.custom_properties.get('device_key')
    cmd_str = message.data.decode('utf-8')
    if (mydevice.DEVICE_KEY3):
        props = {
            'device_key' : device_key
        }
        print(f"Received command '{cmd_str}'")
        print(f"  Properties: {props}")
        mydevice.exe_cmd(cmd_str, props)
    elif(device_key == mydevice.DEVICE_KEY4):
        mydevice.exe_cmd_for_homesafety(cmd_str, message.custom_properties)

def main():
    print ("Starting the Python IoT Hub C2D Messaging device sample...")

    # Instantiate the client
    client = IoTHubDeviceClient.create_from_connection_string(CONNECTION_STRING)

    # print ("Waiting for C2D messages, press Ctrl-C to exit")
    try:
        # Attach the handler to the client
        client.on_message_received = message_handler
        while True:
            selection = input("Press Q to quit\n")
            if selection == "Q" or selection == "q":
                print("Quitting...")
                break
    except KeyboardInterrupt:
        print("IoT Hub C2D Messaging device sample stopped")
    finally:
        # Graceful exit
        print("Shutting down IoT Hub Client")
        mydevice.exe_cmd(RESET)
        client.shutdown()

if __name__ == '__main__':
    main()
Execute receivec2d.py as a service:
python receivec2d.py
The mydevice.py file
- Control devices based on requested messages.
- Send RF signals to the roll-up door.
# mydevice.py
from time import sleep
import dht11
import gas_sensor

# ...

DEVICE_KEY3 = "myrollupdoor"
DEVICE_KEY4 = "home_safety-01"

ACTIVATE = "ACTIVATE"
DEACTIVATE = "DEACTIVATE"
WRN_DELAY_MINS = 0.1 # minute(s)

# Roll-up Door command list
DOOR_CMD_LIST = ["UP", "DOWN", "PAUSE/UNLOCK", "LOCK"]
DOOR_CMD_LIST_MAP = {
    "UP"    : "./up",
    "DOWN"  : "./down",
    "PAUSE/UNLOCK" : "./pause_unlock",
    "LOCK"  : "./lock"
}

# Execute commands of RF 433 MHz devices (Roll-up door, ect.)
def exe_cmd_rf(cmd_str = "PAUSE/UNLOCK"):
    cmd = DOOR_CMD_LIST_MAP.get(cmd_str)
    os.system(f"cd ./rf/scripts && {cmd} && cd ../../")
    print(f"Executed command: {cmd_str}")

# Execute commands of RF devices
def exe_cmd(cmd_str = "", props={}):
    device_key = props.get('device_key')
    cmd_str = cmd_str.upper()
    if (device_key == DEVICE_KEY3): # RF signals (433MHz / 315MHz)
        if cmd_str in DOOR_CMD_LIST:
            exe_cmd_rf(cmd_str)
        else:
            print(f"The command '{cmd_str}' not supported! ")
    else:
        print(f"The command '{cmd_str}' not supported! ")

def exe_cmd_for_homesafety(cmd_str = "", props={}):
    print(f"[Homesafety] Executed '{cmd_str}'")
    gas = props.get('gas')
    temp = props.get('temp')
    if cmd_str == ACTIVATE:
        # Temperature
        if temp == "" or temp == None:
            dht11.async_exe_wrn_cmd(RESET)
        else:
            print("Auto detect temperature and execute a warning action (e.g., open roll-up door by using RF-433 MHz).")
            dht11.async_exe_wrn_cmd("UP", int(temp))
        # Gas density
        if gas == "" or gas == None:
            gas_sensor.async_exe_wrn_cmd(RESET)
        else:
            print("Auto detect gas density and execute a warning action (e.g., open roll-up door by using RF-433 MHz).")
            gas_sensor.async_exe_wrn_cmd("UP", float(gas))
    elif cmd_str == DEACTIVATE or cmd_str == RESET:
        dht11.async_exe_wrn_cmd(RESET)
        gas_sensor.async_exe_wrn_cmd(RESET)
The gas_sensor.py file
- Detect the current gas density in your house.
- If it's activated, it'll auto execute an alarm action (e.g., open your house roll-up door) when your house gas density is equal or higher than the setting gas density.
# gas_sensor.py
import multiprocessing, time, signal
from mq import *
import sys
import mydevice

# ...

# Auto detect gas density and execute an alarm action if the current gas density is equal or higher than the setting gas density.
def exe_wrn_cmd(cmd_str = "", gas_density=0.03):
    try:
        mq = MQ()
        while True and is_stop == False:
            perc = mq.MQPercentage()
            sys.stdout.write("\r")
            sys.stdout.write("\033[K")
            current_gas_density = perc["GAS_LPG"]
            sys.stdout.write("Gas LPG: %g ppm" % (current_gas_density))
            sys.stdout.flush()
            if current_gas_density >= gas_density:
                print("  --> Gas was detected!")
                # TODO: This is just a demo code to demonstrate how to send an warning using RF-433 MHz.
                mydevice.exe_cmd_rf(cmd_str)
                print(f"Open the roll-up door when the current gas density is equal or higher than {gas_density} PPM! Sleep {mydevice.WRN_DELAY_MINS} minute(s)!")
                time.sleep(60 * mydevice.WRN_DELAY_MINS)
            time.sleep(0.5) # 0.1
    except:
        mq = None
        print("\nAbort by user")

def async_exe_wrn_cmd(cmd_str="UP", gas_density=0.03):
    global p, is_stop
    try: p
    except NameError: p = None

    try: is_stop
    except NameError: is_stop = None

    if p == None:
        if cmd_str == mydevice.RESET:
            print(f"The command {cmd_str} was executed")
            return None
        print(f"The command '{cmd_str}' is executed in a new process")
        # print(f"--- Params: {gas_density}")
        is_stop = False
        p = multiprocessing.Process(target=exe_wrn_cmd, args=(cmd_str,gas_density))
        p.start()
        return p
    elif p.is_alive() == True:
        is_stop = True
        time.sleep(0.1)
        print("The previous command was cancelled!")
        # Kill the current process
        p.terminate()
        time.sleep(0.1)
        p.exitcode == -signal.SIGTERM
        p = None
    else:
        is_stop = True
        p = None

    if cmd_str == mydevice.RESET:
        print(f"The command {cmd_str} was executed")
        return None

    # Create new process
    print(f"The command '{cmd_str}' is executed in a new process")
    # print(f"--- Params: {gas_density}")
    is_stop = False
    p = multiprocessing.Process(target=exe_wrn_cmd, args=(cmd_str,gas_density))
    p.start()
    return p
The dht11.py file
- Detect the current temperature in your house.
- If it’s activated, it'll auto execute an alarm action when your house temperature is equal or higher than the setting temperature.
# dht11.py
import multiprocessing, time, signal
import mydevice

# ...

# Auto detect temperature and execute an alarm action if the current temperature is equal or higher than the setting temperature.
def exe_wrn_cmd(cmd_str = "", wrn_temp = ""):
    try:
        while True and is_stop == False:
            result = read_dht11_dat()
            if result:
                humidity, temperature = result
                # print("humidity: %s %%,  Temperature: %s C" % (humidity, temperature))
                sys.stdout.write("\r")
                sys.stdout.write("\033[K")
                sys.stdout.write("Temperature: %g C" % (temperature))
                sys.stdout.flush()
                if temperature >= wrn_temp:
                    # TODO: This is just a demo code to demonstrate how to send an warning using RF-433 MHz.
                    mydevice.exe_cmd_rf(cmd_str)
                    print(f"Open the roll-up door when the current temperature is equal or higher than {wrn_temp} C! Sleep {mydevice.WRN_DELAY_MINS} minute(s)!")
                    time.sleep(60 * mydevice.WRN_DELAY_MINS)
            time.sleep(2)
    except KeyboardInterrupt:
        destroy()

def async_exe_wrn_cmd(cmd_str="UP", wrn_temp=40):
    global p, is_stop
    try: p
    except NameError: p = None

    try: is_stop
    except NameError: is_stop = None

    if p == None:
        if cmd_str == mydevice.RESET:
            print(f"The command {cmd_str} was executed")
            return None
        print(f"The command '{cmd_str}' is executed in a new process")
        # print(f"--- Params: {wrn_temp}")
        is_stop = False
        p = multiprocessing.Process(target=exe_wrn_cmd, args=(cmd_str,wrn_temp))
        p.start()
        return p
    elif p.is_alive() == True:
        is_stop = True
        time.sleep(0.1)
        print("The previous command was cancelled!")
        # Kill the current process
        p.terminate()
        time.sleep(0.1)
        p.exitcode == -signal.SIGTERM
        p = None
    else:
        is_stop = True
        p = None

    if cmd_str == mydevice.RESET:
        print(f"The command {cmd_str} was executed")
        return None

    # Create new process
    print(f"The command '{cmd_str}' is executed in a new process")
    # print(f"--- Params: {wrn_temp}")
    is_stop = False
    p = multiprocessing.Process(target=exe_wrn_cmd, args=(cmd_str,wrn_temp))
    p.start()
    return p
The send_rf.py file (for RF-433 MHz Transmitter module)
- Send RF signals.
# send_rf.py
import argparse
import RFDevice

# ...

parser = argparse.ArgumentParser(description='Sends a decimal code via a 433 MHz GPIO device')
args = parser.parse_args()

rfdevice = RFDevice(args.gpio)
rfdevice.enable_tx()
rfdevice.tx_repeat = args.repeat

if args.protocol:
    protocol = args.protocol
else:
    protocol = "default"
if args.pulselength:
    pulselength = args.pulselength
else:
    pulselength = "default"
if args.length:
    length = args.length
else:
    length = "default"

rfdevice.tx_code(args.code, args.protocol, args.pulselength, args.length)
rfdevice.cleanup()
The receive_rf.py file (for RF-433 MHz Receiver module)
- Receive RF signals.
# send_rf.py
import argparse, signal, sys, time, logging
import RFDevice

# ...

def exithandler(signal, frame):
    rfdevice.cleanup()
    sys.exit(0)

parser = argparse.ArgumentParser(description='Receives a decimal code via a 433/315MHz GPIO device')
args = parser.parse_args()

signal.signal(signal.SIGINT, exithandler)
rfdevice = RFDevice(args.gpio)
rfdevice.enable_rx()
timestamp = None
logging.info("Listening for codes on GPIO " + str(args.gpio))
while True:
    if rfdevice.rx_code_timestamp != timestamp:
        timestamp = rfdevice.rx_code_timestamp
        logging.info(str(rfdevice.rx_code) +
                     " [pulselength " + str(rfdevice.rx_pulselength) +
                     ", protocol " + str(rfdevice.rx_proto) + "]")
    time.sleep(0.01)
rfdevice.cleanup()
The up file (for RF-433 MHz Transmitter module)
- A shell script file for opening your home roll-up door by using a code you got from
receive_rf.pyfile.
#!/bin/sh
python send_rf.py -g <GPIO number> -p <Pulse length> -t <Protocol> <Code>

# Example: python send_rf.py -g 16 -p 123 -t 1 12345678
Demonstration Video
![[IoT] AIR CONDITIONER REMOTE CONTROL BOARD](https://blog.shiftasia.com/content/images/2023/02/04-04-05.PNG)
5. Summary
With the use of Azure IoT services, you can implement IoT applications more easily, quickly, and conveniently.
The demonstration above is just a very simple solution to help beginners understand the basic way to control, combine some IoT devices together by using Azure IoT services. You can completely extend the solution by combining more different utility services or IoT devices to improve your own IoT solutions.
6. References
- Azure IoT documentation
- Get started with device development on Azure IoT
- Configure and read out the Raspberry Pi gas sensor (MQ-X)
- MQ-2 Smoke Sensor Circuit Built with a Raspberry Pi
- Super Simple Raspberry Pi 433MHz Home Automation