
![[Azure IoT] How to control your Air Conditioner by using Azure IoT Hub](/content/images/2023/01/00-01-1.jpg)
1. Introduction
Before coming to this blog, you should read the "Introduction to Azure IoT for Beginners" blog first to understand the basic knowledges about Azure IoT, as well as how to communicate between IoT devices and Azure IoT services.
This blog will demonstrate a few practical functions commonly used with Air Conditioner (AC) in your home.
Below is a diagram showing the basic process flow in controlling the AC in your home.

2. Demonstration Content
2.1. Controlling AC by copying the infrared signal of the AC remote device
- Switch on the AC to a certain temperature.
- The timer switches off the AC at a temperature of 29°C.
You can change the temperature by recording an infrared signal from the AC's remote at a desired temperature.
2.2. Controlling AC by programming on Raspberry Pi
- Auto switch on the AC by detecting automatically the temperature in your room.
When your room temperature is equal or higher than a certain temperature set from the Web UI, the AC will be automatically switched on.
This function requires the use of the temperature and humidity sensor (DHT11). - Create a timer to switch on or switch off in a certain period of time set from the Web UI.
3. Preparation
3.1. Azure subscription
- Create an Azure IoT Hub used to send and receive messages from/to devices.
- Creating Azure Function App specifically uses HttpTrigger to receive requests from users.
3.2. Hardware
- Raspberry Pi x 01
- Breadboard x 01
- IR Receiver (VS1838B) x 01
- IR Sender x 02
- Transistor NPN 2N3904 x 01
- Air Conditioner (AC) with Infrared Remote Controller x 01
- DHT11 x 01
- Several jumper wires
- T-Extension Board with 40-Pin Cable (Optional) x 01
4. Implementation
4.1. Create Azure IoT Hub
- Enter Azure Portal Site
- Create Azure IoT Hub (
lioneldemo-iot) and add a new device (lioneldemo-raspberry-pi)
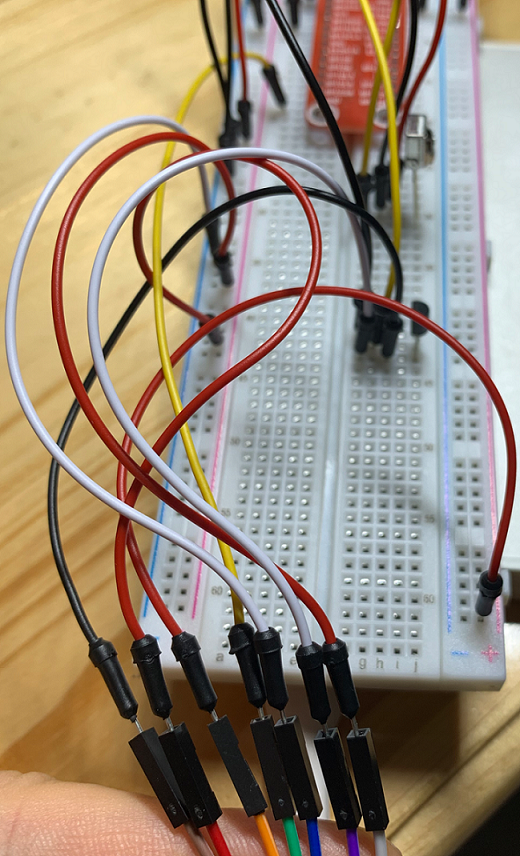
4.2. Setting up the control circuit
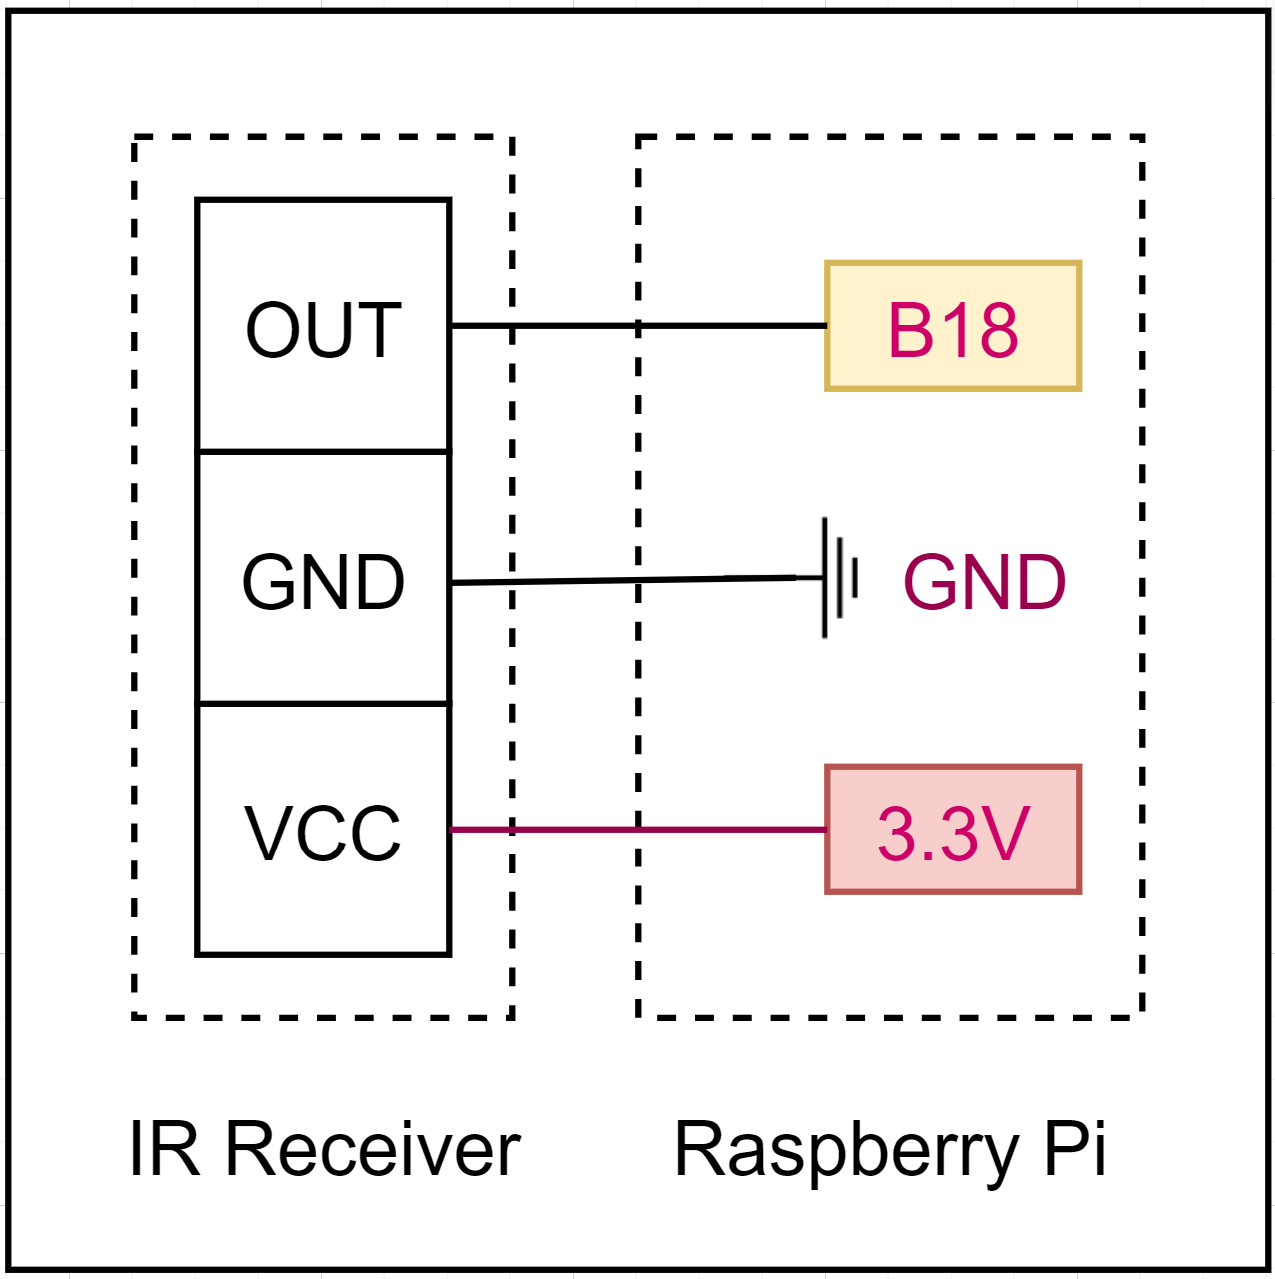
Schematic diagram of IR Receiver, IR Sender and DHT11 with Raspberry Pi:
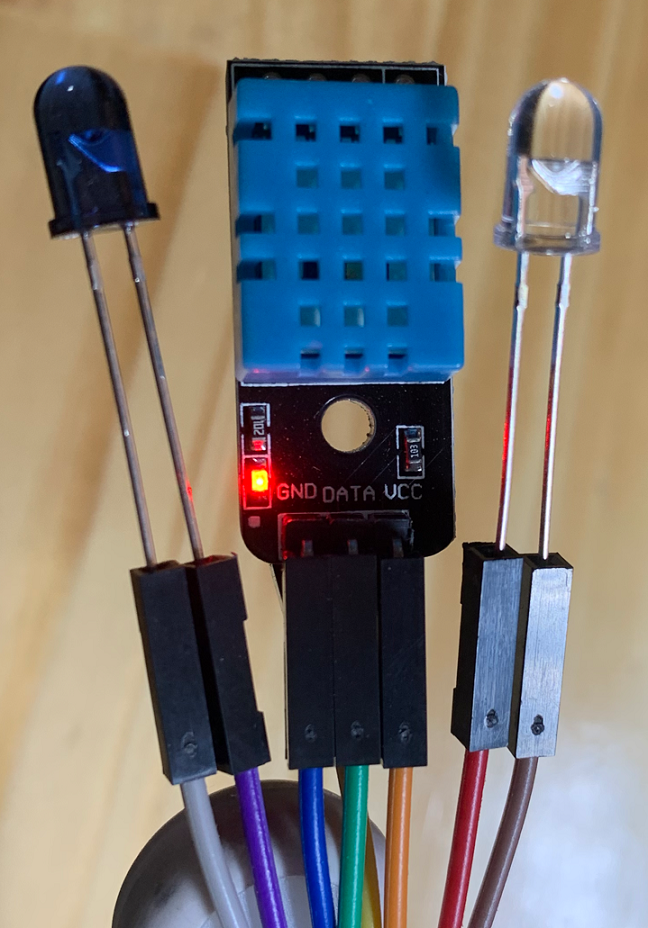
- IR Receiver
- IR Sender
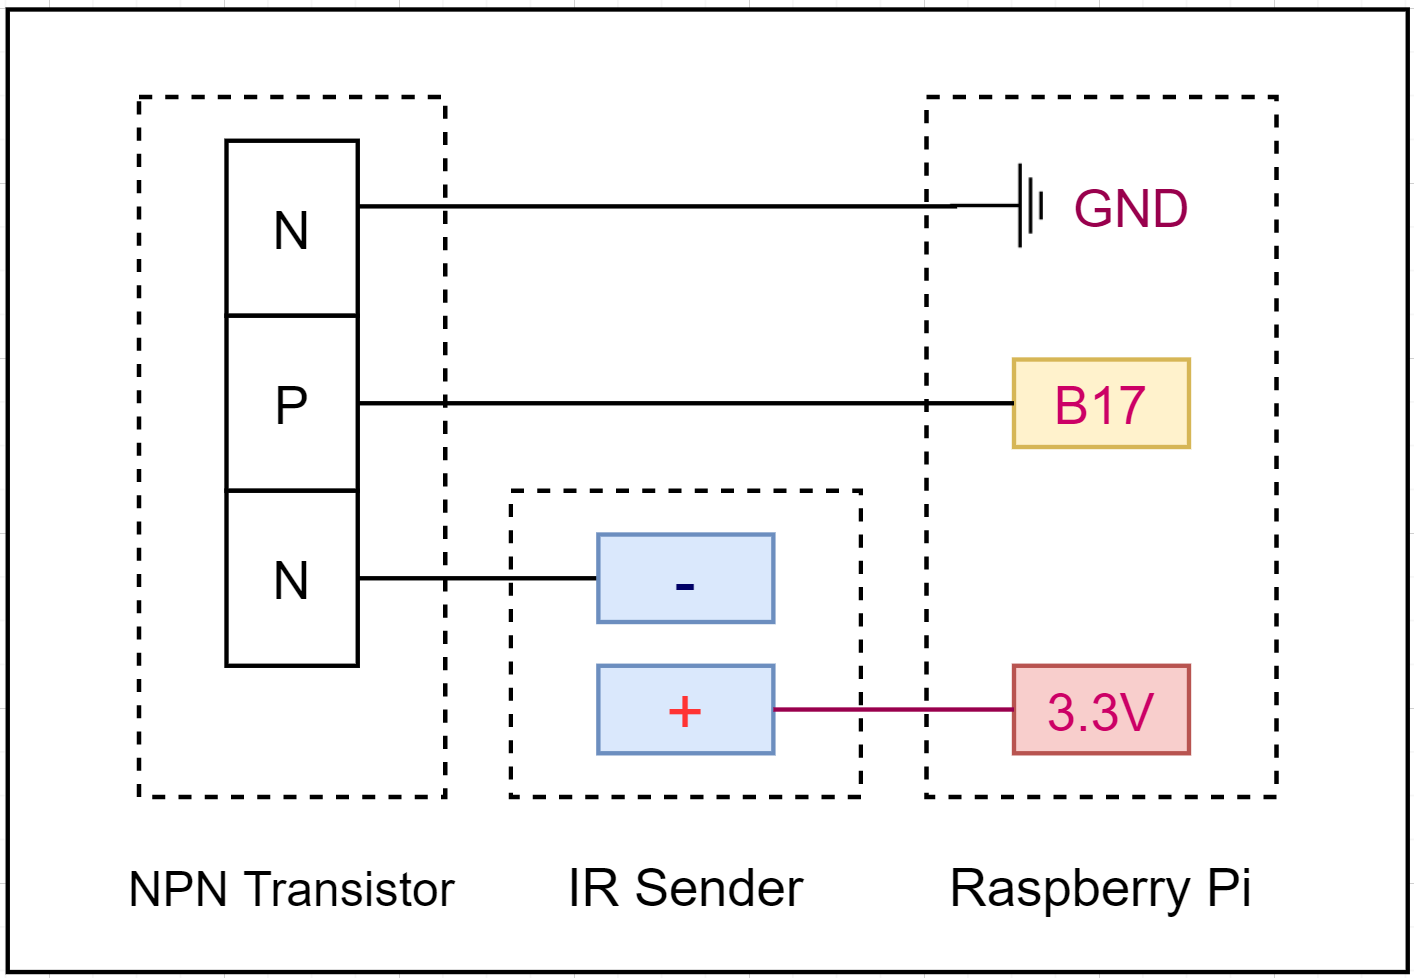
※Note: Because the IR signal of the AC is more complex than the signal of the Fan, so to make the infrared signal better, we need to add an NPN Transistor connected to the IR sender diode to enhance the IR signals. Without this NPN Transistor you will not be able to control AC, because the IR sender signal is very weak, even if you try to bring the IR sender diode close to AC, it will also not work.
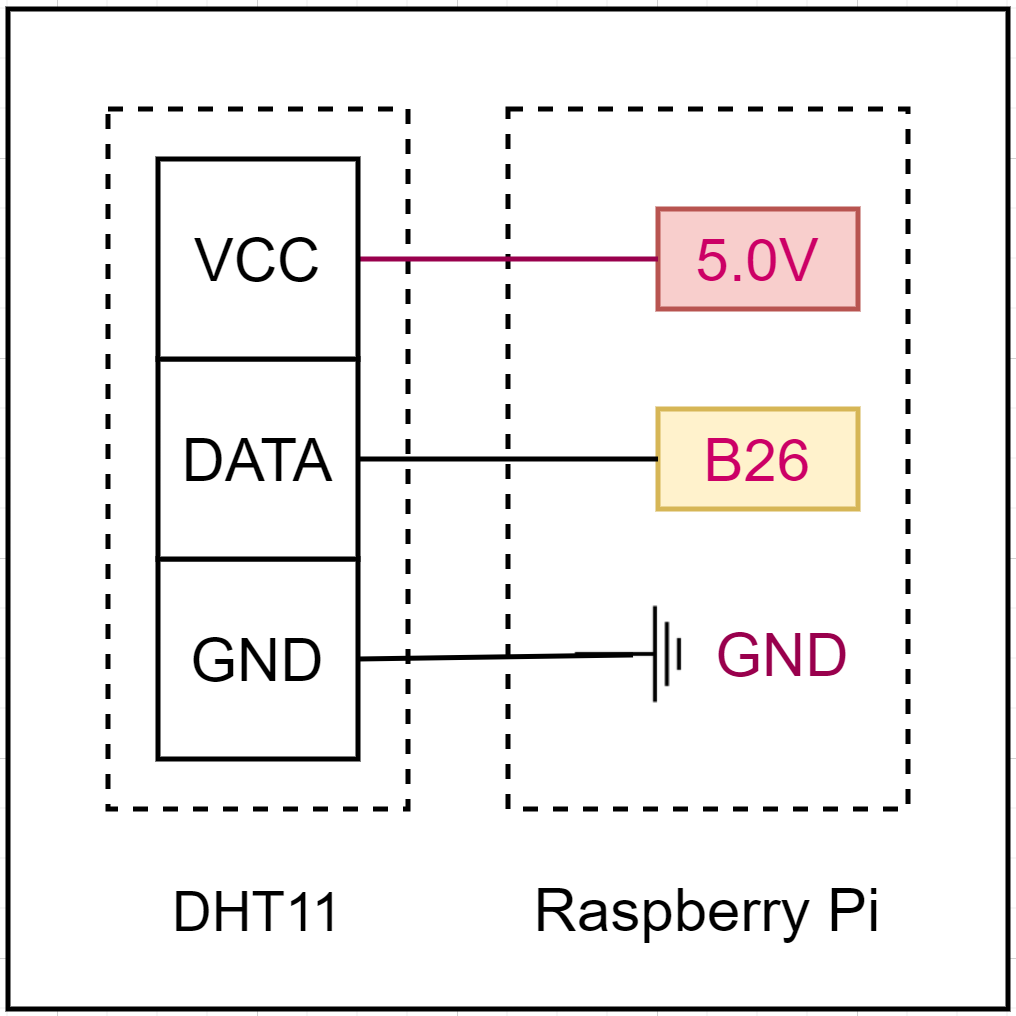
- DHT11
In reality:
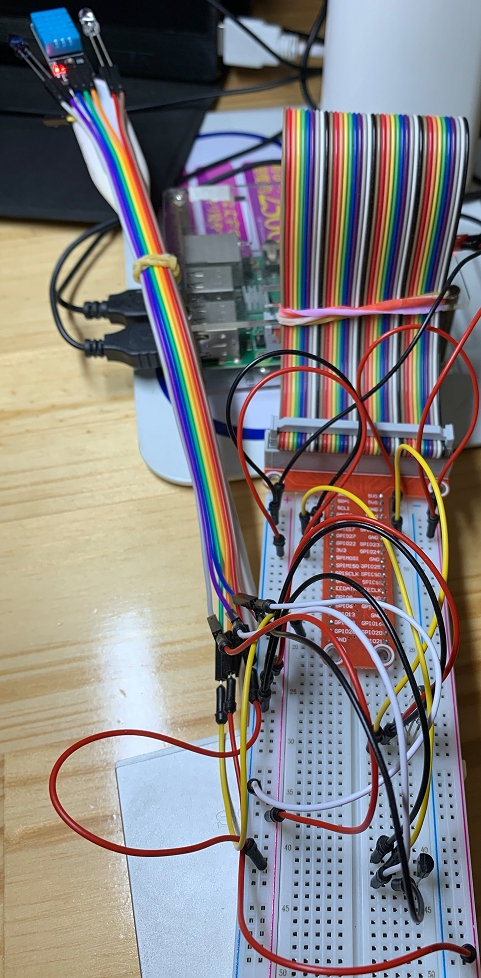
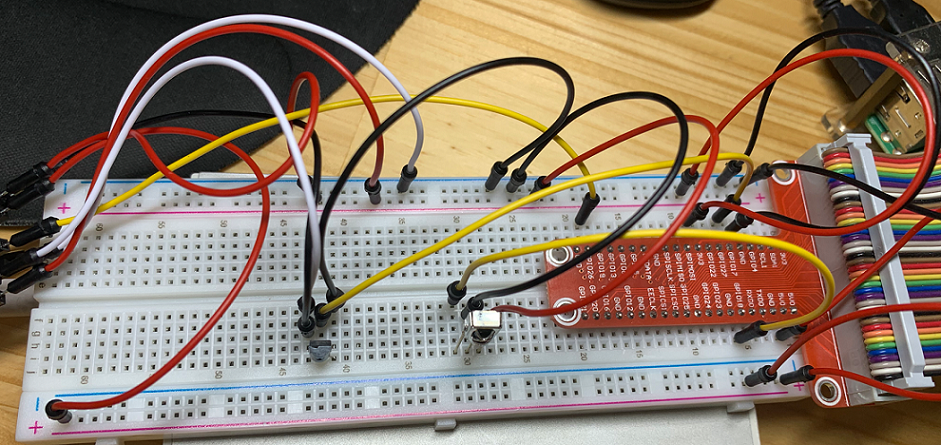
※ I used 2 IR Sender to enhance IR signal.
4.3. Setting up the remote controller for my AC on Raspberry Pi
LIRC module installation
Let's refer the blog "Introduction to Azure IoT for Beginners" for more detail.
Manual registration for remote controller
We need to create a configuration file to make a remote controller for our AC.
Open the bootloader and disable the sender part.
sudo vim /boot/config.txt
We used to have both gpio-ir and gpio-ir-tx activated. As we don't need the sender part for now, update the file like below (line #5-6).
# Uncomment this to enable infrared communication.
#dtoverlay=gpio-ir,gpio_pin=17
#dtoverlay=gpio-ir-tx,gpio_pin=18

dtoverlay=gpio-ir,gpio_pin=18
#dtoverlay=gpio-ir-tx,gpio_pin=17
Once completed, reboot Raspberry PI using the command, sudo reboot. Once it's restarted, stop the LIRC server (sudo /etc/init.d/lircd stop).
Then, run the following command so that you can confirm it works.
sudo mode2 -m -d /dev/lirc0
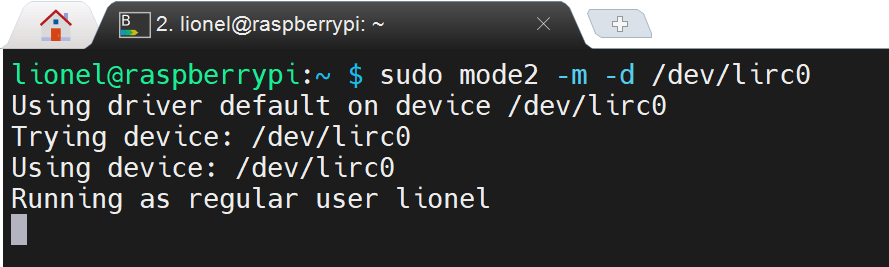
Now it's waiting for your IR signal input. Locate your remote controller close to Raspberry PI and press some buttons such as ON, OFF, etc. You'll find out the remote controller buttons are captured.
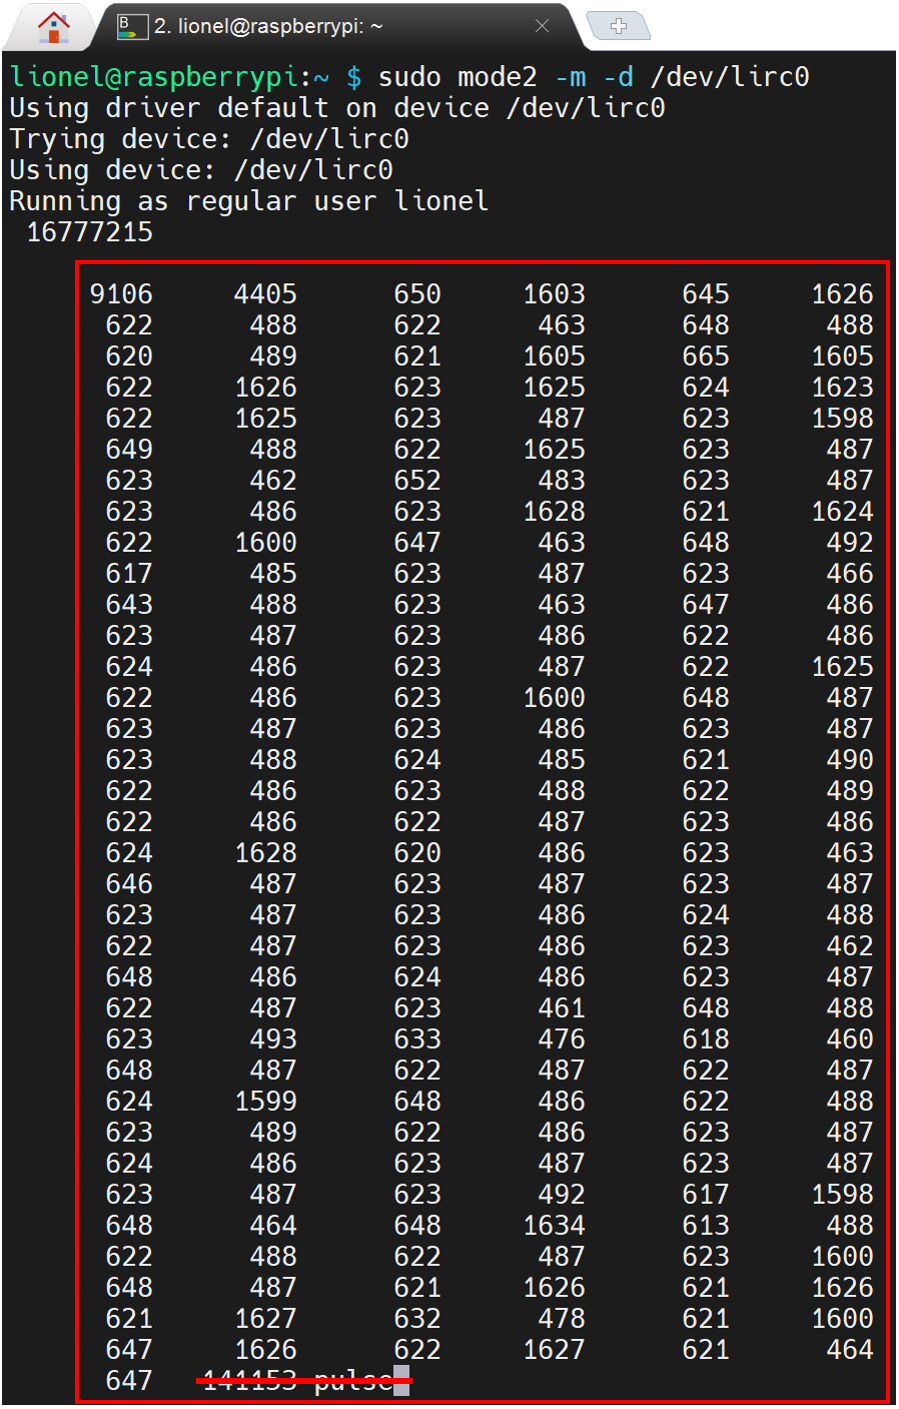
The number blocks in the red rectangle are the set of the controller button (ON button). As the last value of the box is an outlier, delete it.
Then, save your captured signals into a config file (e.g., myaircon.lircd.conf) as below:
begin remote

  name   myaircon
  flags RAW_CODES
  eps            25
  aeps          100

  ptrail          0
  repeat     0     0
  gap    50000
  frequency    38000

  begin raw_codes

    name ON
     9086     4396      652     1623      624     1626
      622      485      625      461      649      460
      650      485      624     1623      625     1623
      625     1600      649     1622      625     1622
      626     1597      651      485      624     1603
      646      484      625     1598      650      459
      650      486      624      485      625      460
      650      487      623     1598      650     1623
      625     1599      649      486      624      486
      625      461      649      460      650      463
      646      485      626      485      623      485
      625      486      624      459      650      485
      625      489      621      486      624     1599
      649      485      624     1623      625      485
      624      486      624      486      625      485
      624      484      625      485      624      485
      624      485      624      485      625      485
      625      484      625      485      625      486
      623     1599      649      492      618      484
      626      485      623      463      647      484
      625      493      617      460      649      486
      624      486      625      485      625      484
      627      483      624      492      620      484
      624      489      621      485      625      485
      624      460      650      460      650      485
      625      461      648      485      625      484
      626     1625      624      461      648      462
      647      486      624      485      624      498
      613      460      648      486      624      489
      621      485      625      485      624     1601
      647      459      650     1623      625      485
      629      455      650      461      649     1598
      649      486      625     1622      626     1624
      624     1597      650      485      625     1598
      649     1624      623     1624      625      487
      622

    name OFF
     9082     4399      651     1599      652     1621
      624      485      625      459      650      485
      624      485      625     1623      625     1601
      648     1598      649     1598      652     1625
      623     1623      625      485      624     1599
      650      485      625     1622      625      485
      625      485      624      486      628      482
      624      460      649     1624      624     1624
      625     1599      647      486      625      485
      620      490      624      459      650      485
      624      485      625      485      625      460
      649      459      651      485      629      482
      624      486      623      486      623     1624
      625      485      625     1623      625      460
      652      482      625      463      648      461
      649      485      625      484      624      460
      650      485      624      485      624      485
      625      485      625      485      625      485
      624     1623      624      486      624      484
      625      485      625      485      627      482
      624      485      625      485      624      462
      648      486      624      485      625      484
      625      485      624      485      628      482
      624      485      624      486      624      486
      624      486      624      484      625      485
      624      487      624      484      625      485
      625      486      624      486      624      484
      626      485      625      485      624      485
      624      486      624      485      627      483
      624      485      624      486      624     1623
      625      486      623     1624      624      486
      626      483      624      486      624     1623
      624      487      623     1623      624     1624
      624     1623      625      486      623     1624
      625      485      624     1598      650      488
      621

    ...

  end raw_codes
end remote
After this update, copy this file to the LIRC directory.
sudo cp myaircon.lircd.conf /etc/lirc/lircd.conf.d/
Remote controllers have been registered. Open the bootloader for the update.
sudo vim /boot/config.txt
Reactivate the IR sender part by uncommenting the line (line #5-6).
# Uncomment this to enable infrared communication.
#dtoverlay=gpio-ir,gpio_pin=17
#dtoverlay=gpio-ir-tx,gpio_pin=18

dtoverlay=gpio-ir,gpio_pin=18
dtoverlay=gpio-ir-tx,gpio_pin=17
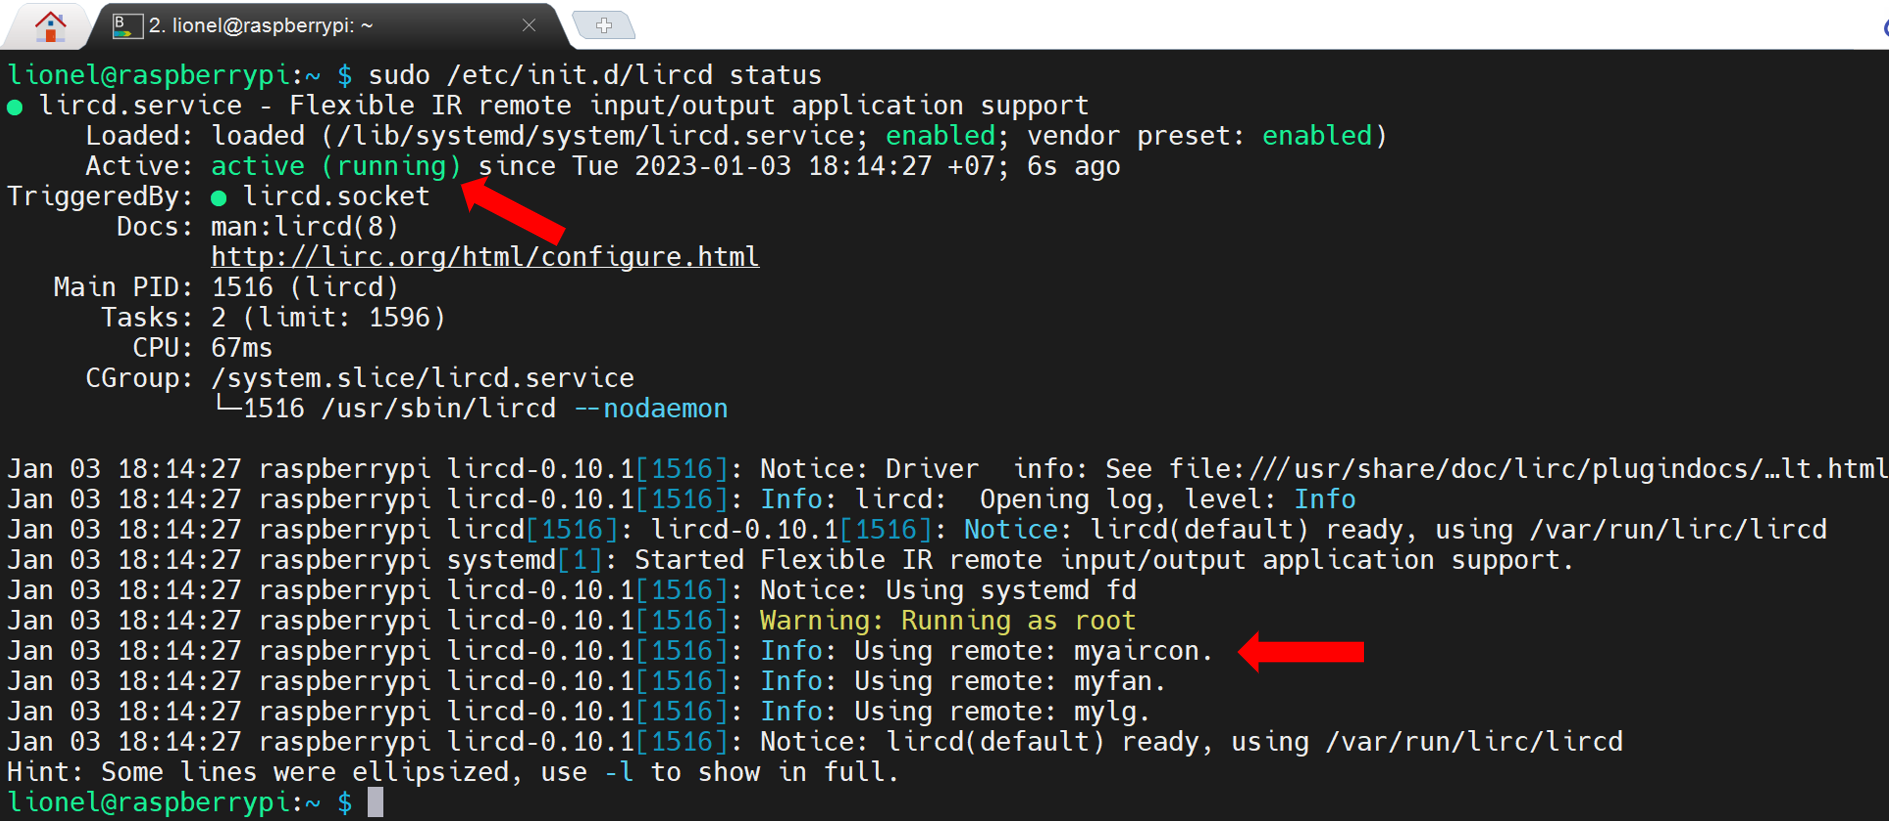
Run sudo reboot to reboot Raspberry PI. Check whether the LIRC module is working or not.
sudo /etc/init.d/lircd status
4.3.1. Controlling my AC on Raspberry Pi
Let's check which commands the remote controller on Raspberry PI have. Enter the following command to see the list of names that I can execute.
irsend LIST myaircon ""

OK. Let's run the command.
irsend SEND_ONCE myaircon ON
Although the terminal shows nothing, I actually turn on my AC.
4.3.2. Controlling my AC on Raspberry Pi by python source code
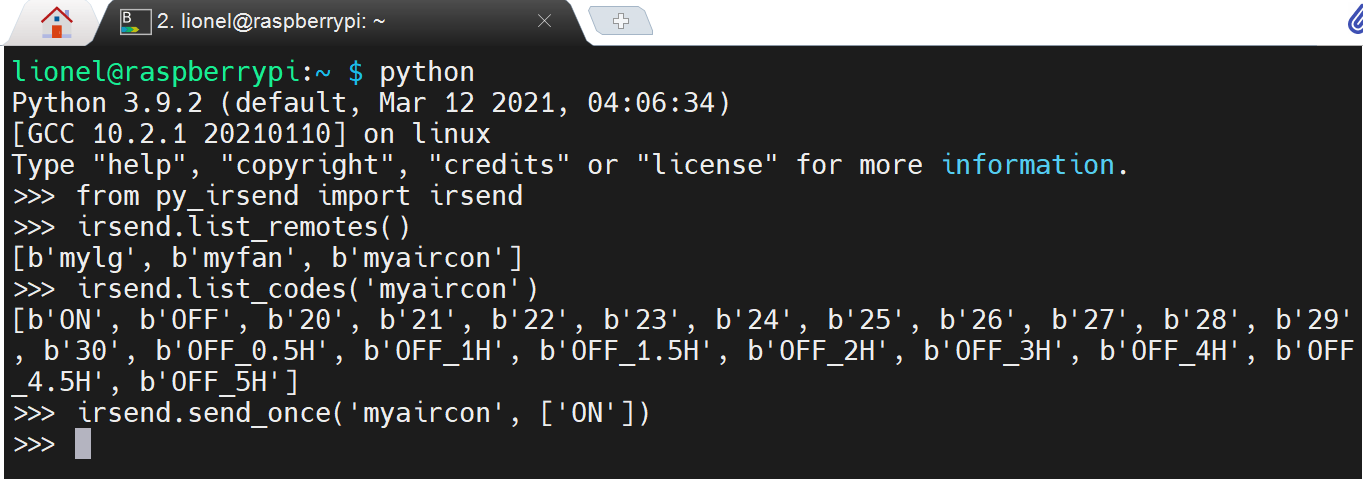
There is a wrapper of irsend command in python (also known as py_irsend), so, I will use it for coding.
- Install
py_irsend:
pip install py_irsend
- Let's try
py_irsend:
python
>>> from py_irsend import irsend
>>> irsend.list_remotes()
>>> irsend.list_codes('myaircon')
>>> irsend.send_once('myaircon', ['ON'])
4.4. Coding
4.4.1. Azure IoT Hub Side
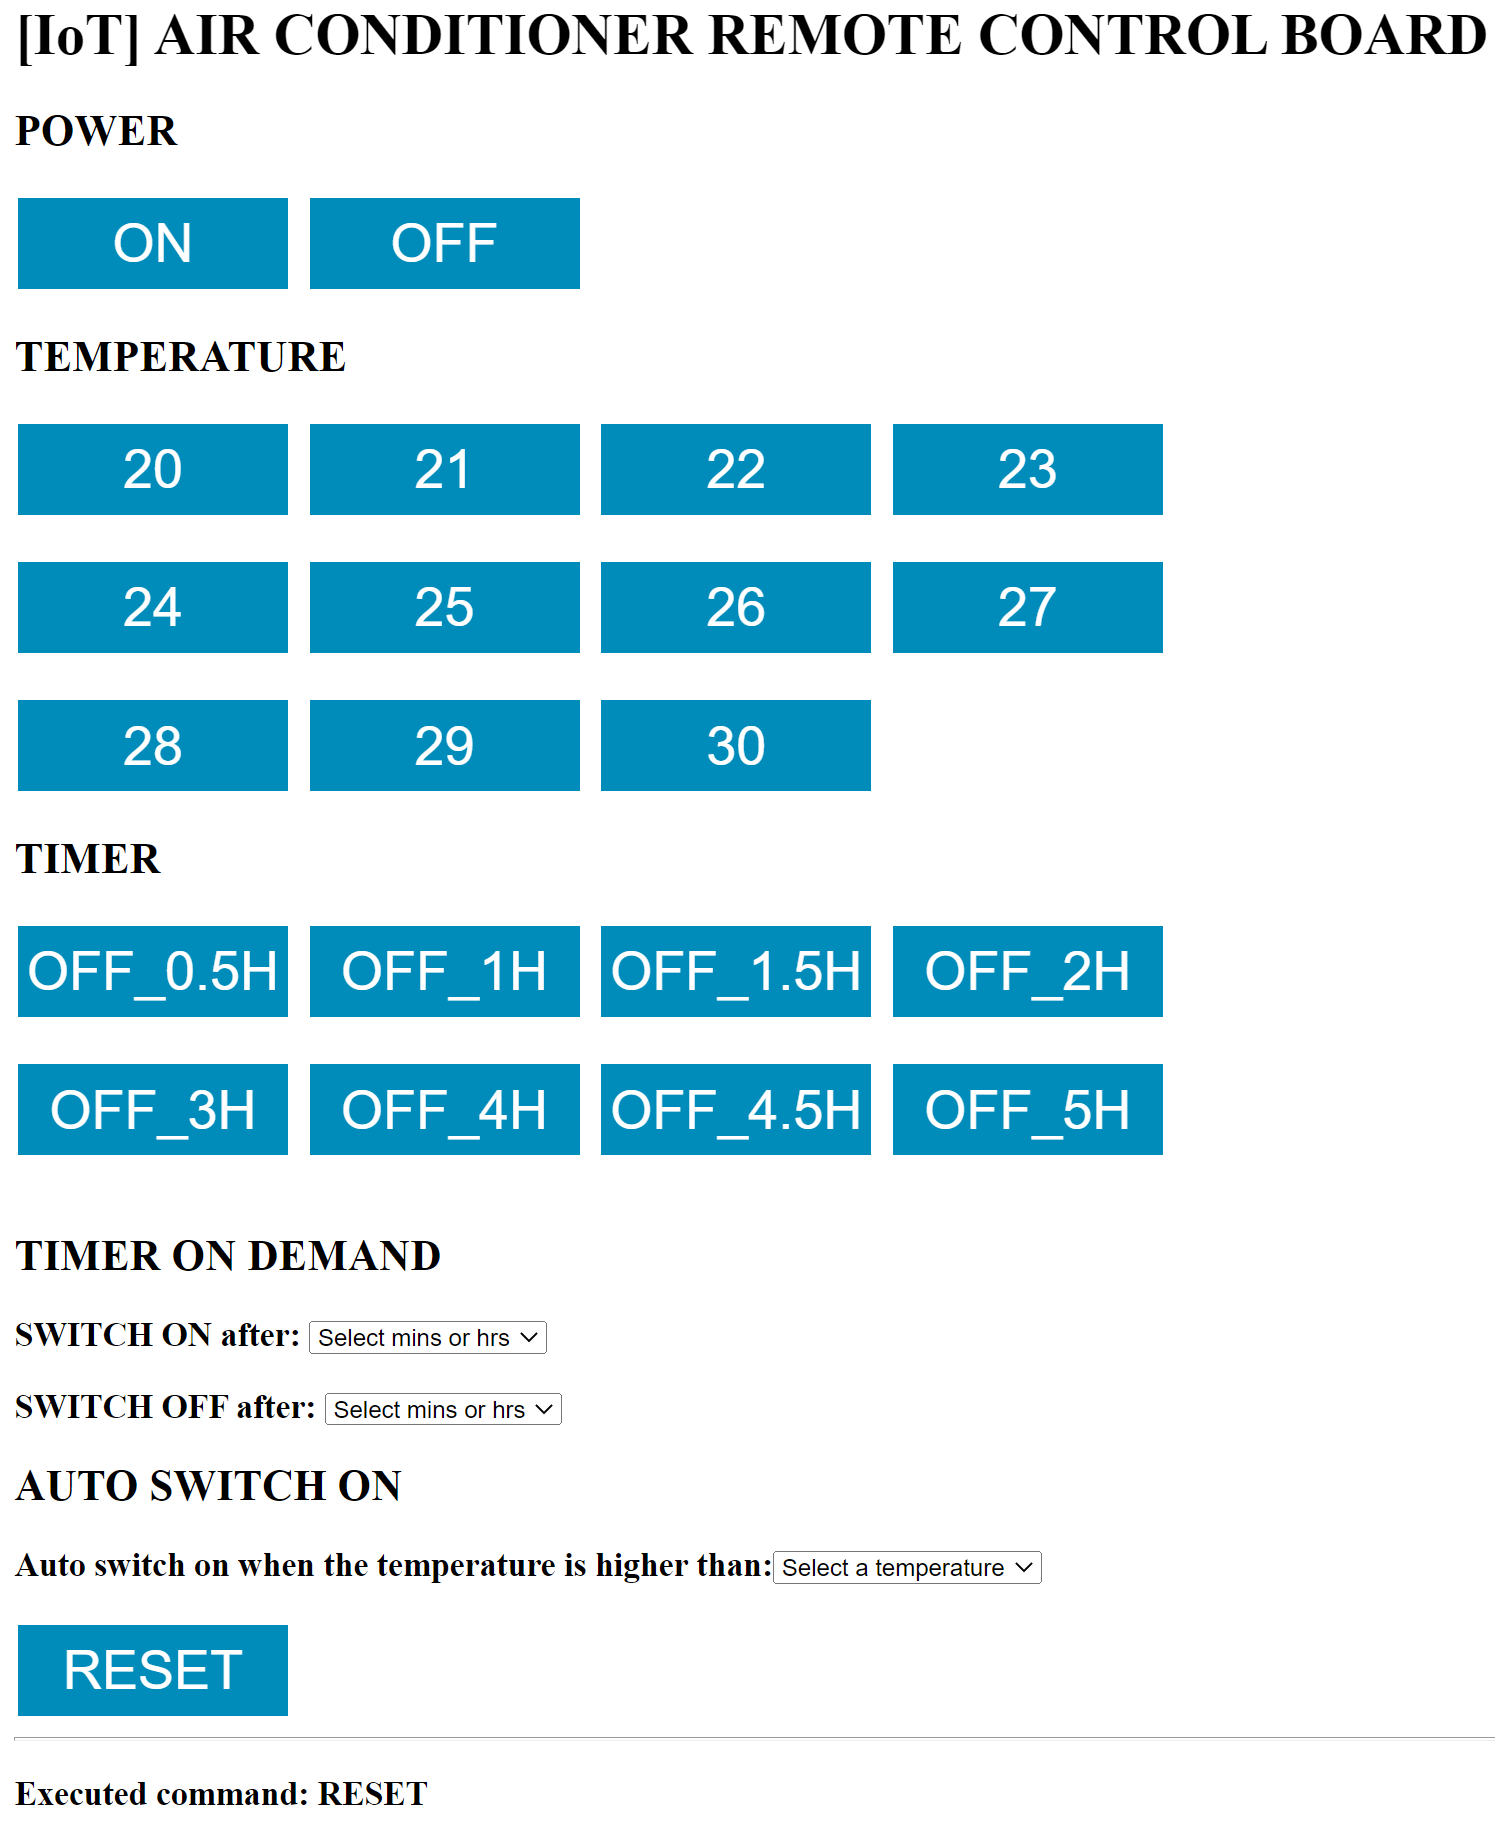
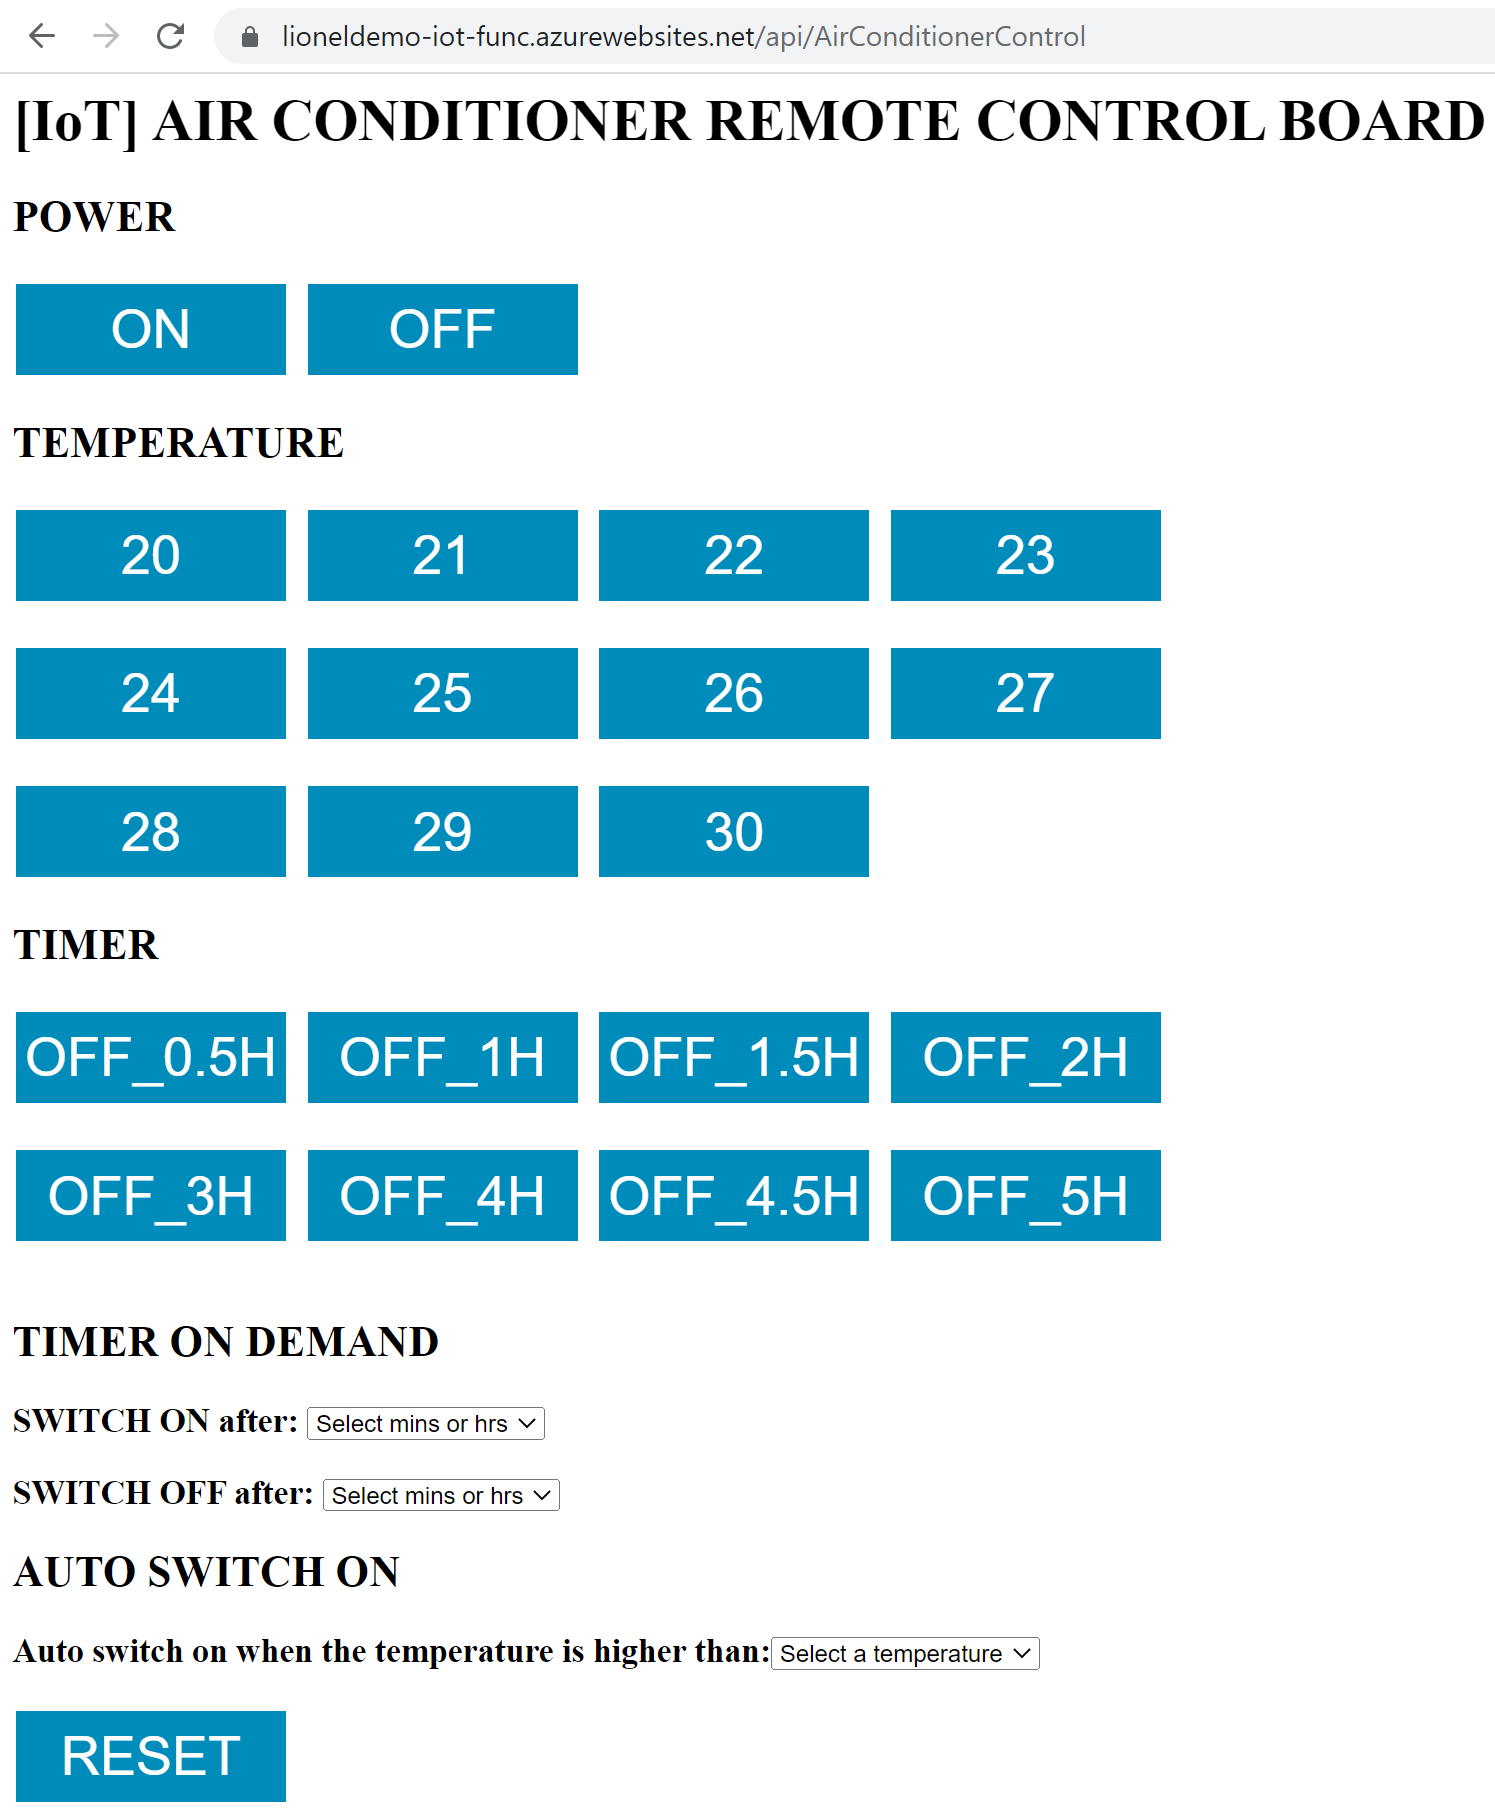
To be able to control AC over the internet, we need a simple Web UI where show command buttons and settings as below.
So, we'll use the Azure Function App with HttpTrigger type to implement that requirement.
Create Azure Function App in Azure Portal (e.g., lioneldemo-iot-func)
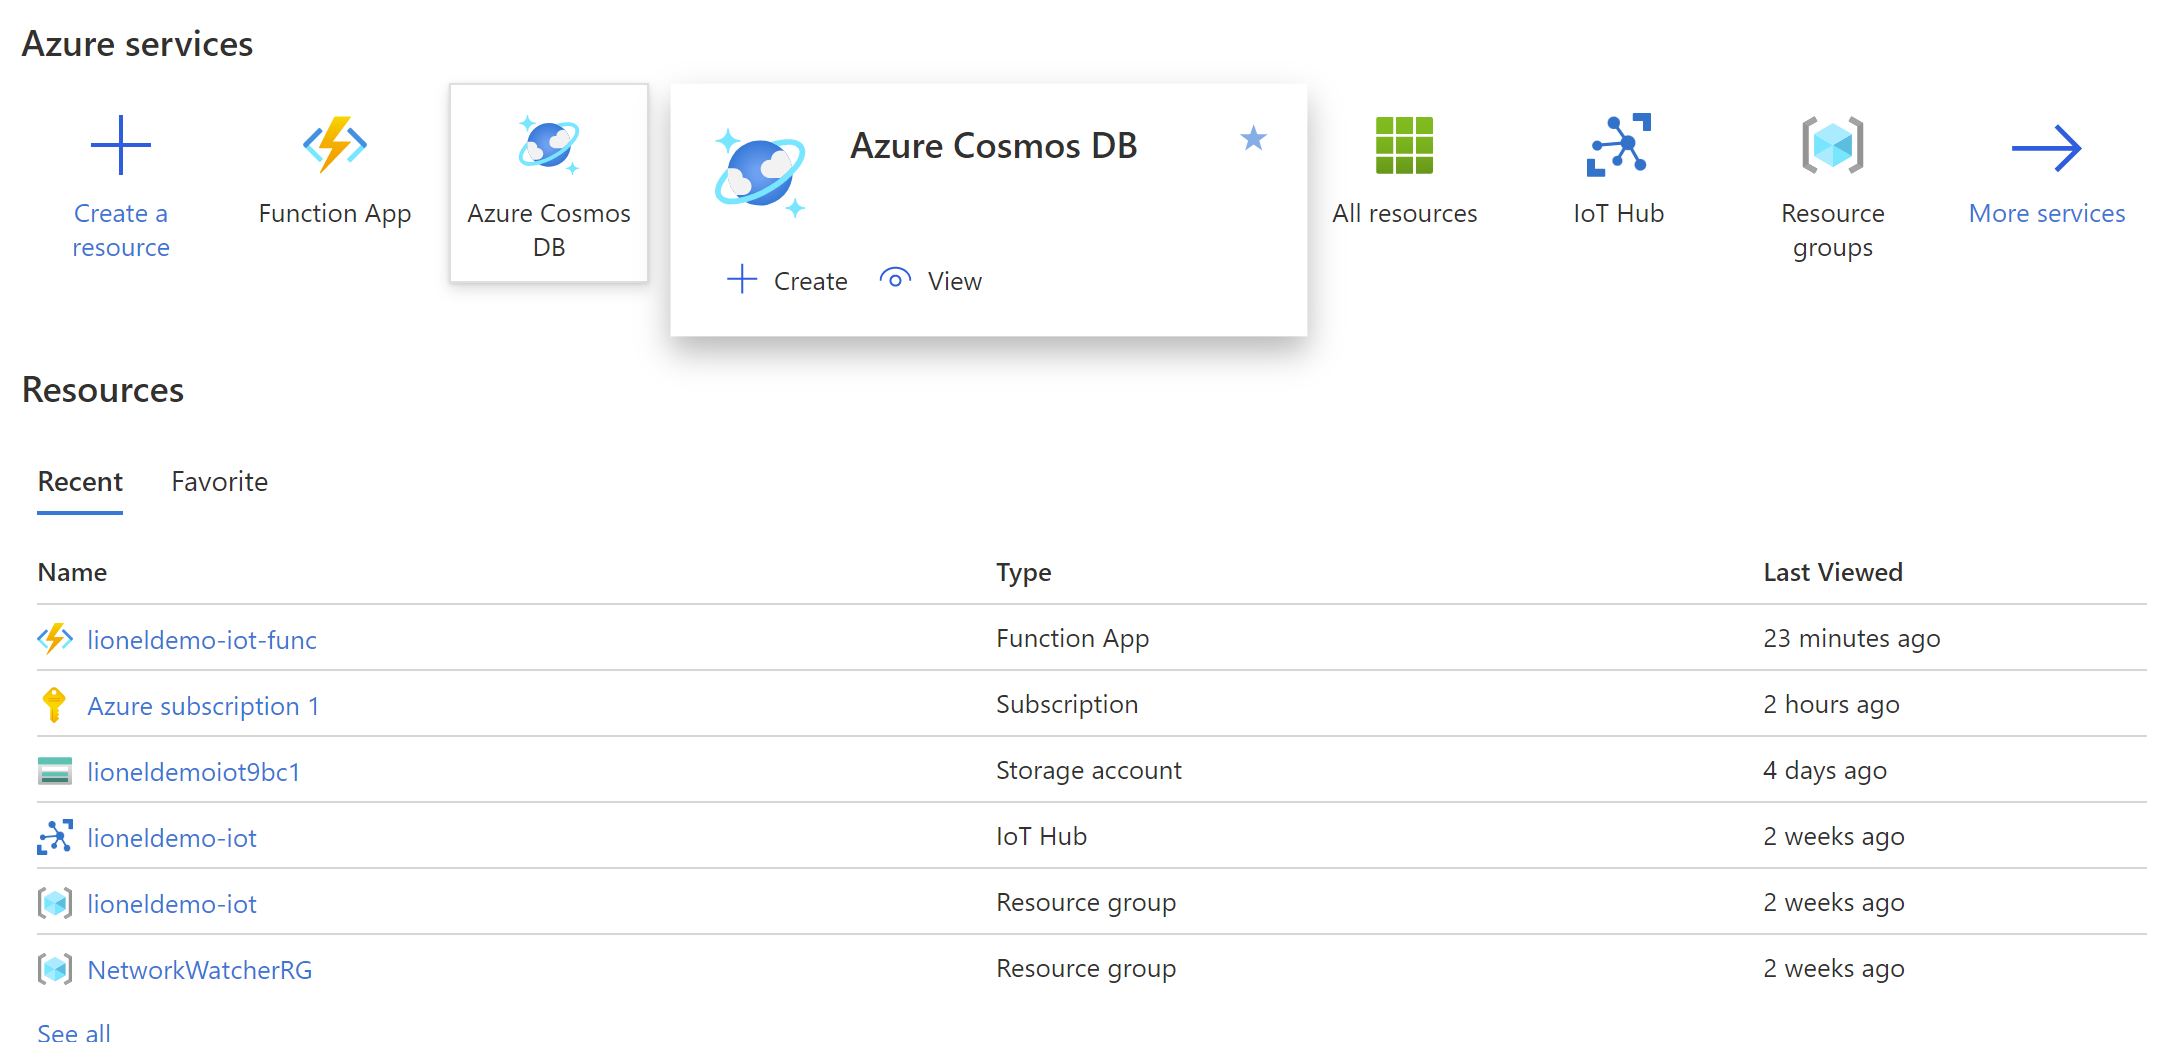
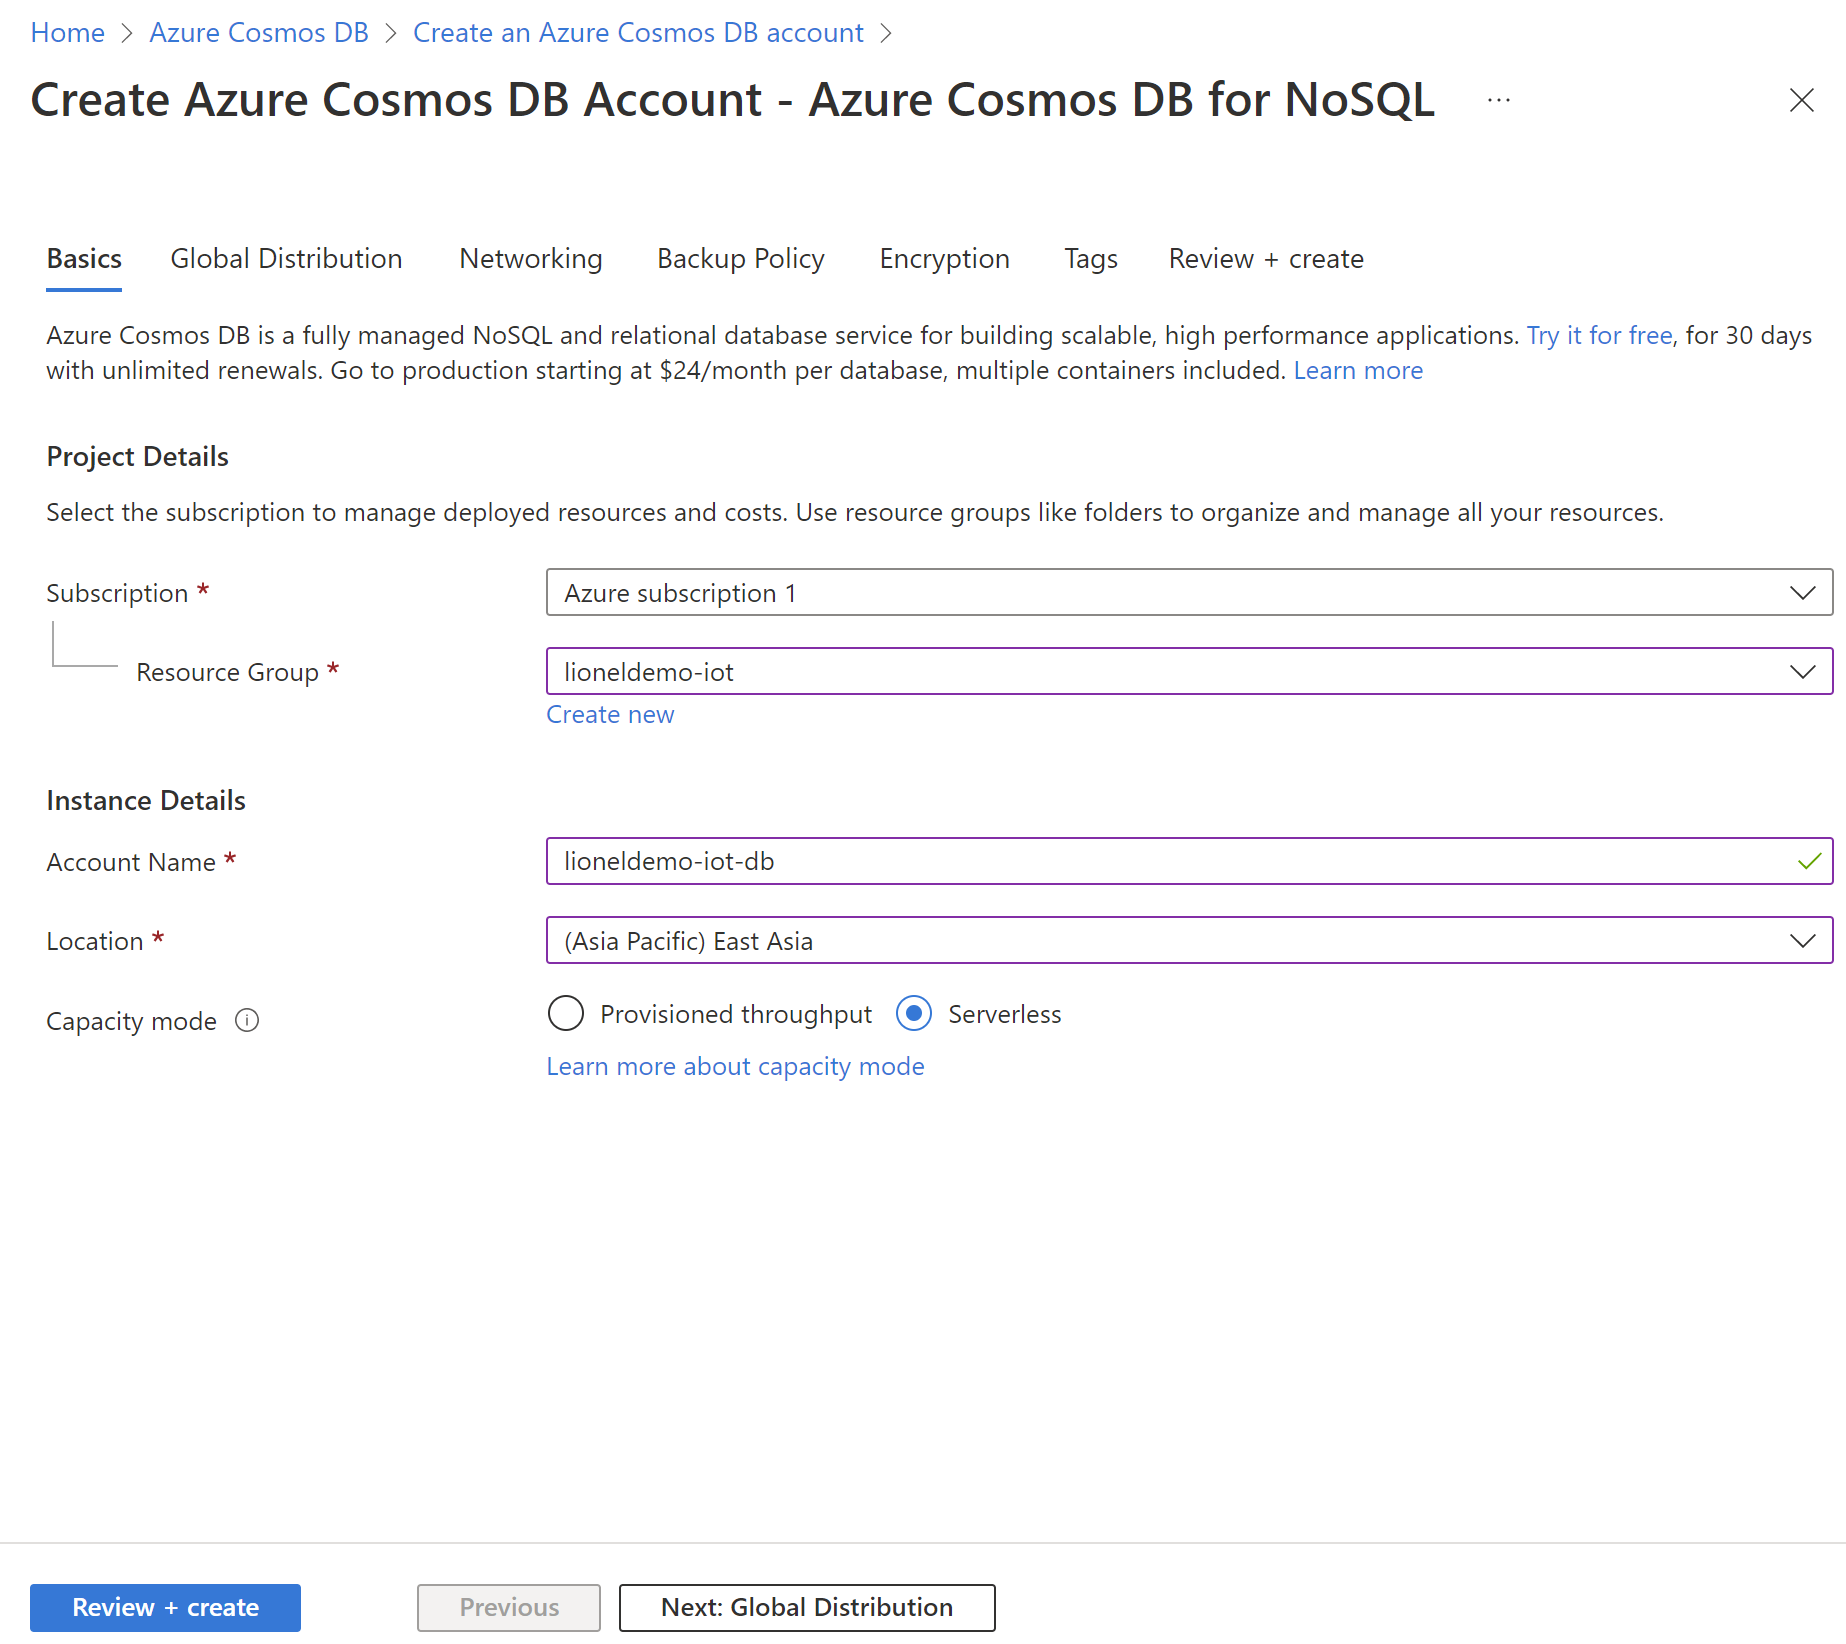
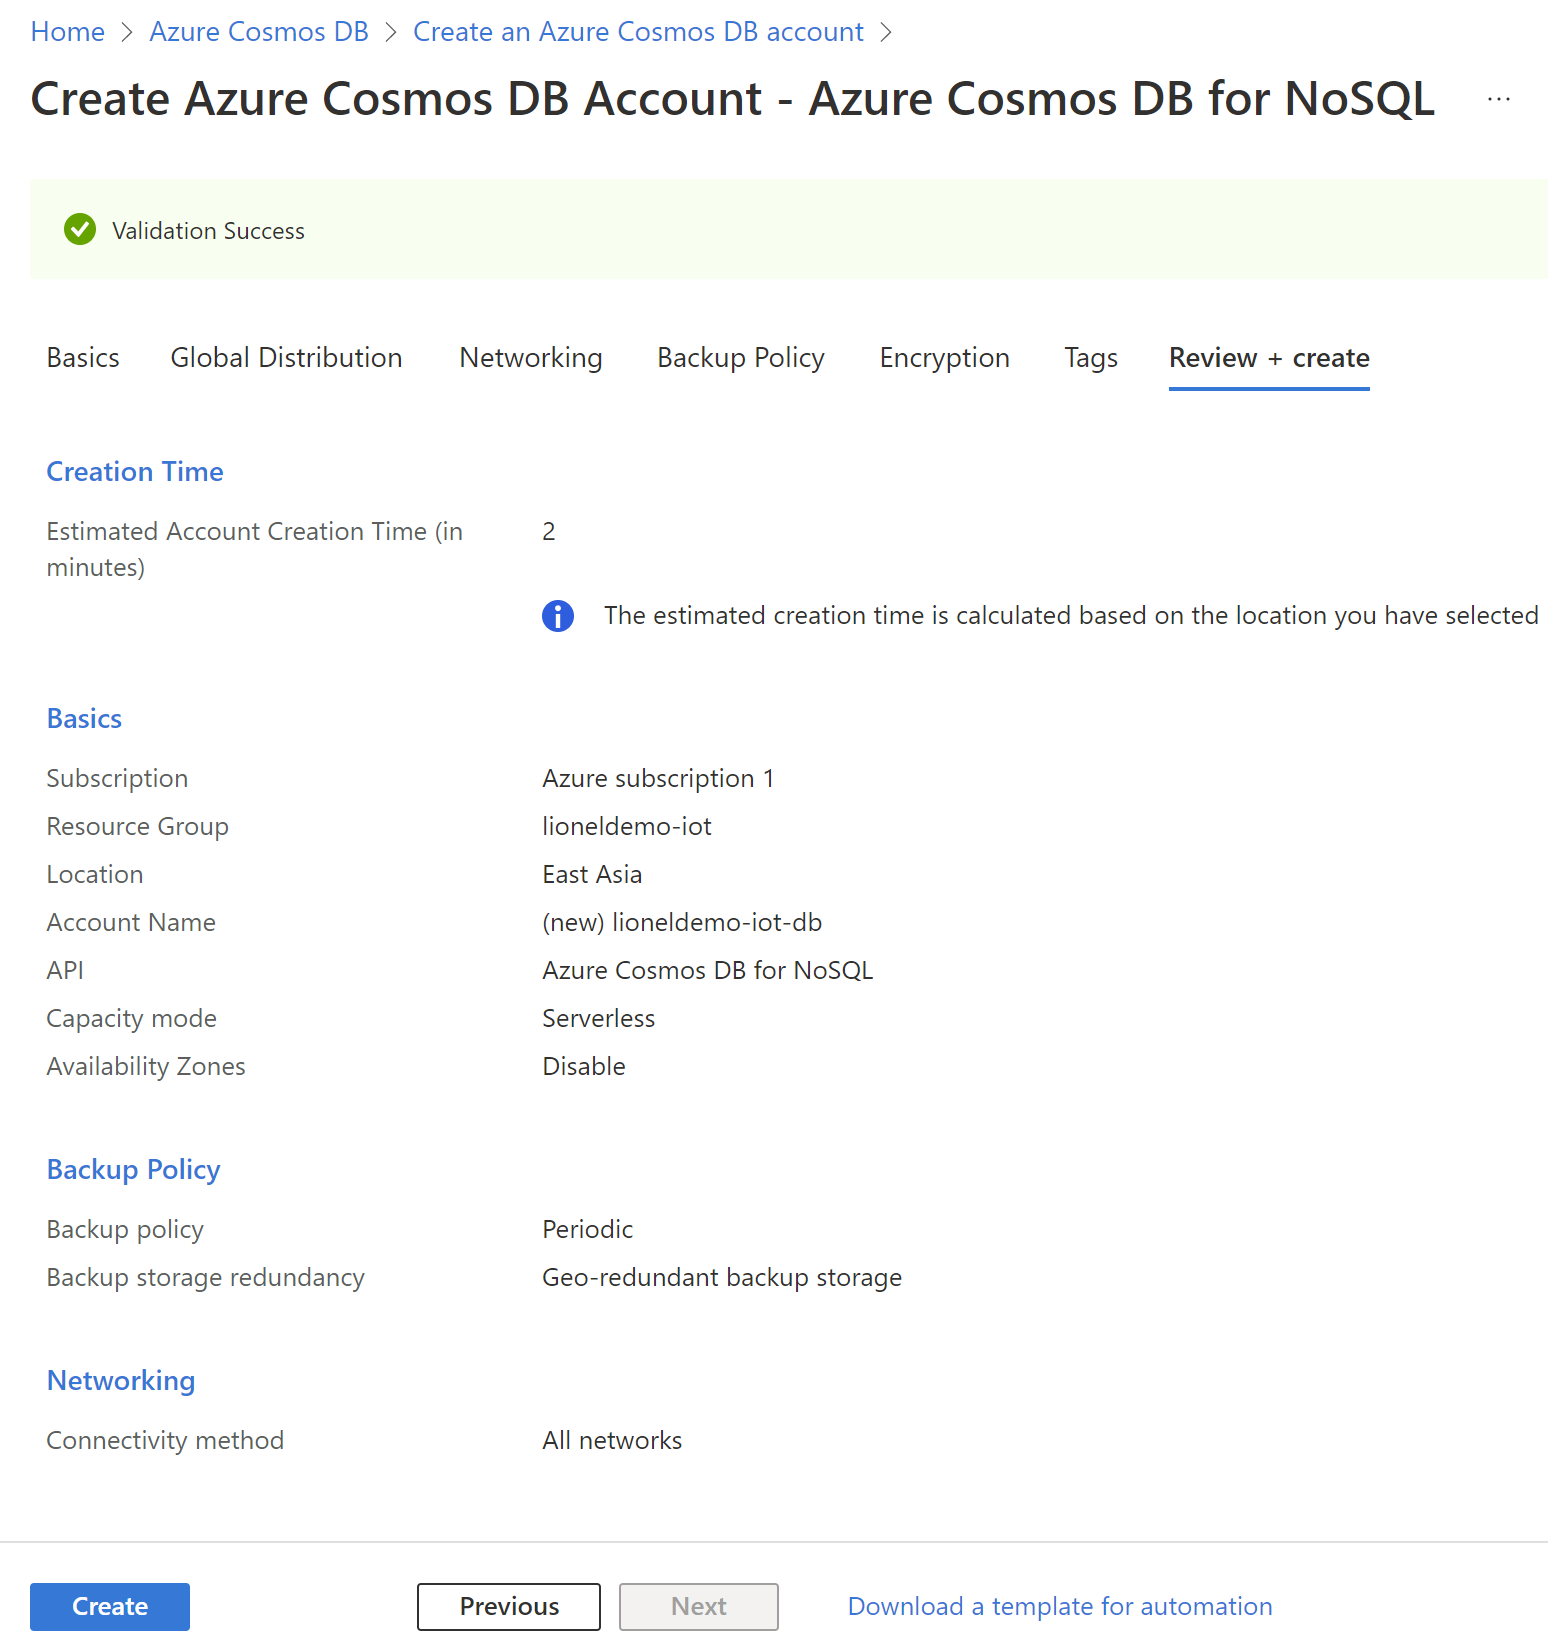
We also need to create Azure Cosmos DB account to store settings on Web UI as below.

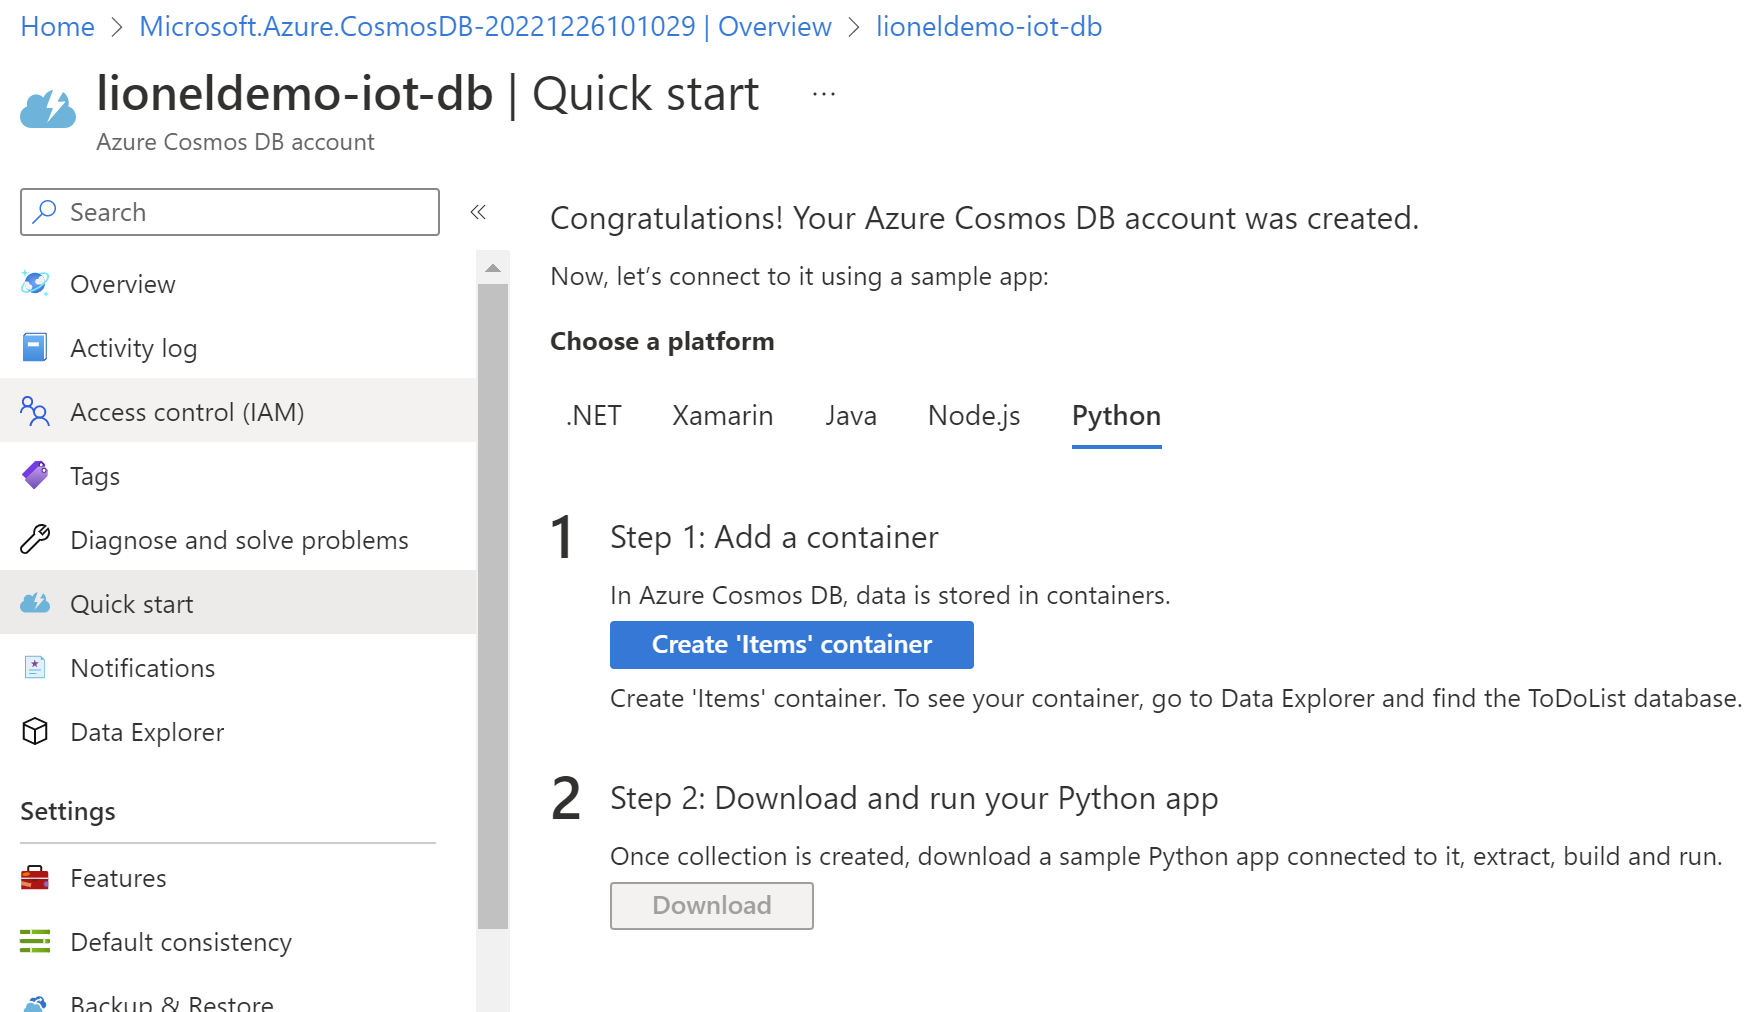
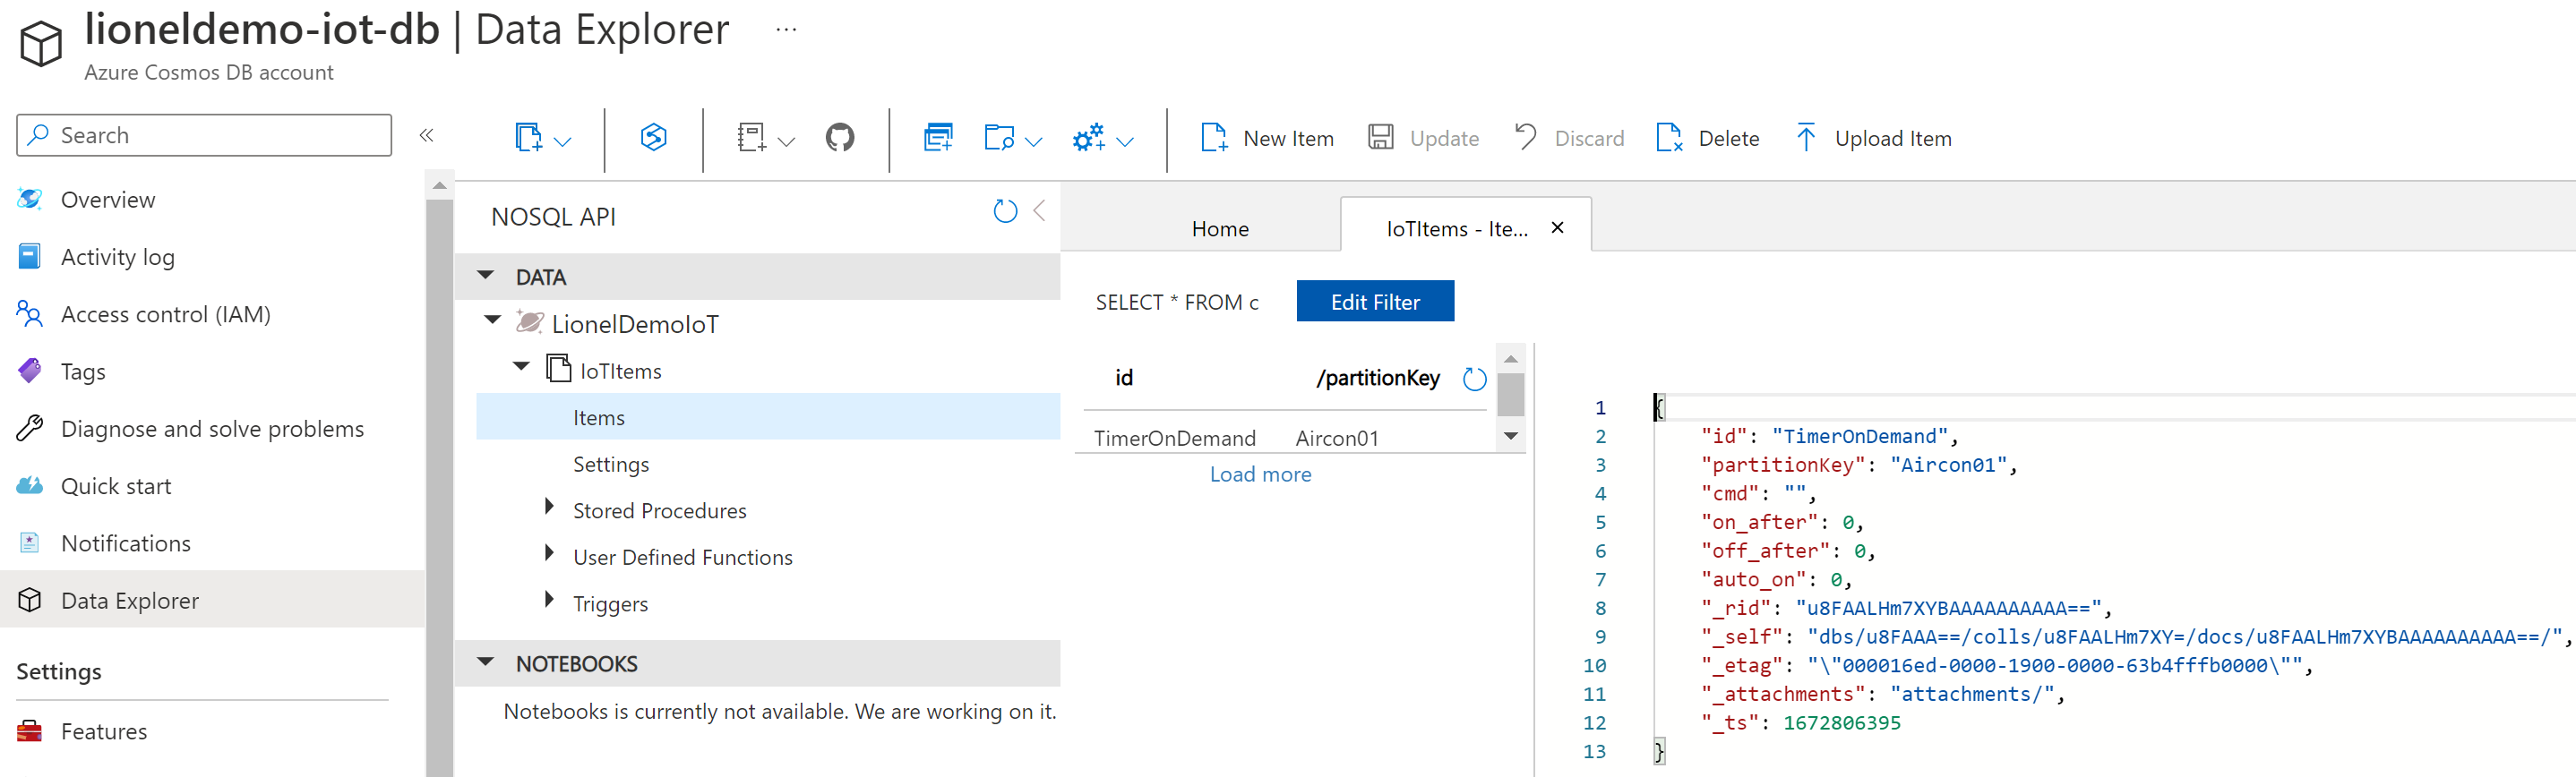
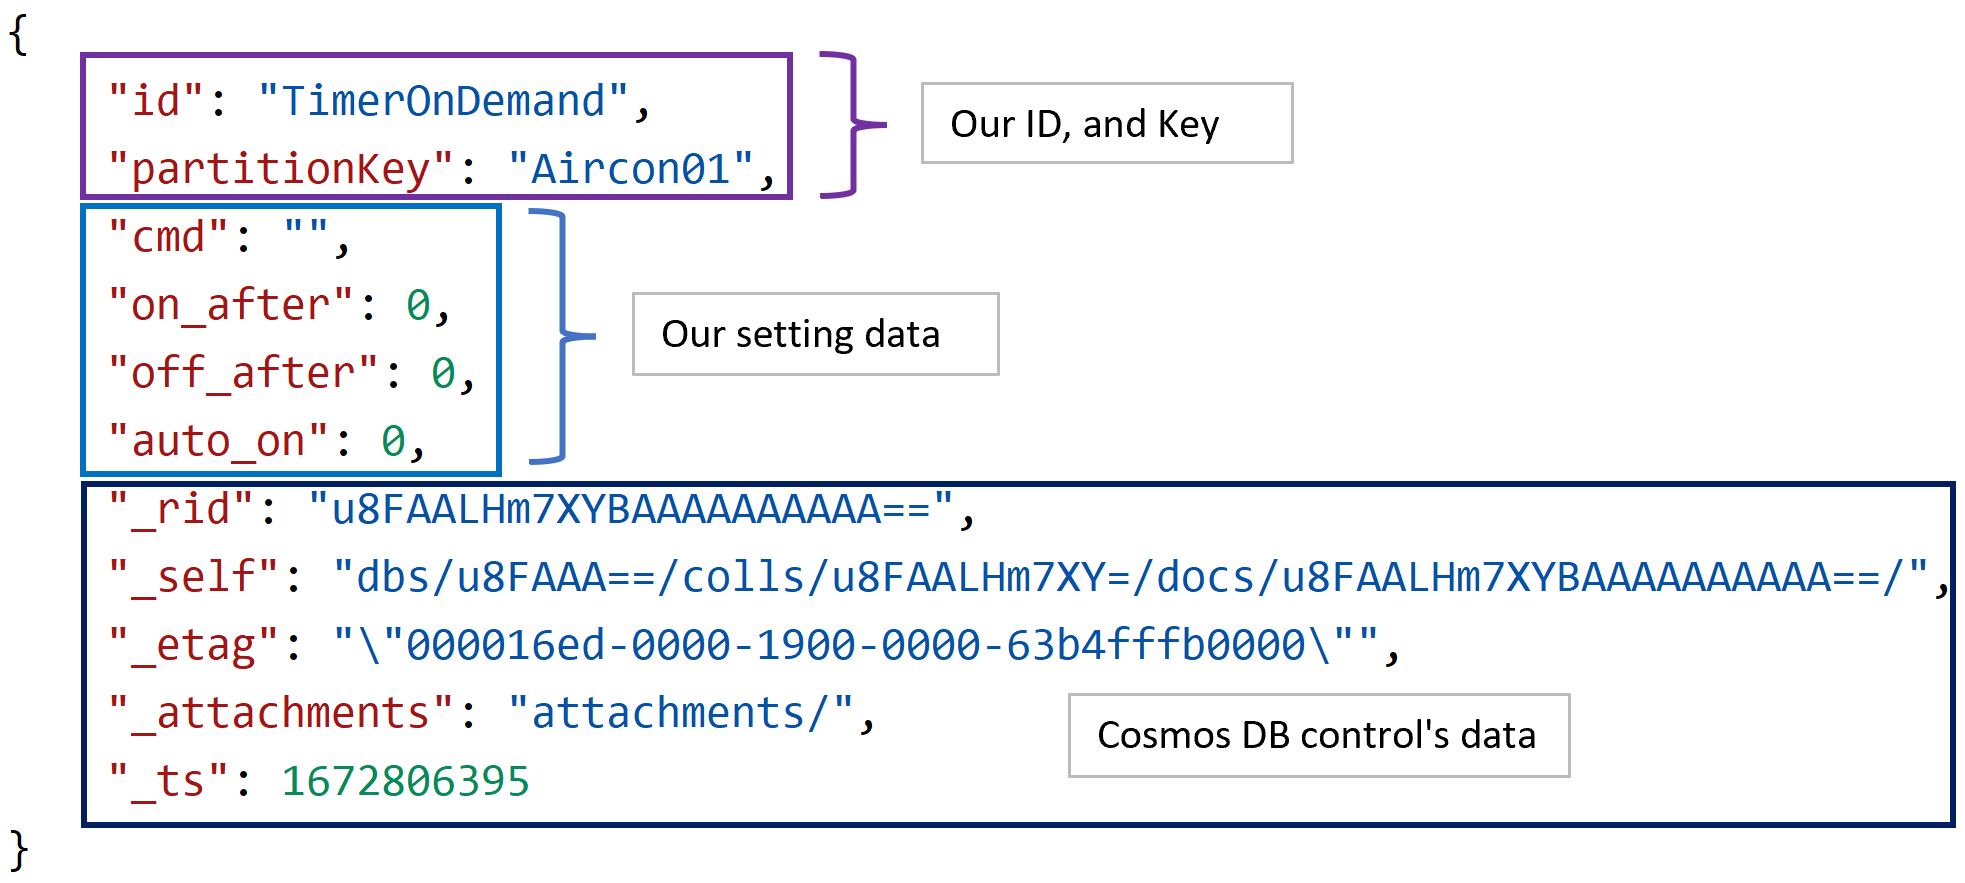
Data structure
- Next, we'll create some source files (Function App and Cosmos DB) in python for UI and DB to sending requests from Azure IoT Hub to Raspberry Pi.
Source code folder structure
api
  │  ...
  │  requirements.txt
  │
  └─AirConditionerControl
          function.json
          __init__.py
The __init__.py file
- Create UI.
- Store settings on UI into Cosmos DB.
- Send requests from Azure IoT Hub to Raspberry Pi.
# __init__.py
# ...
## --------------------------------------------------------
## Cosmos DB
## --------------------------------------------------------
# ...
def init_data(container=None, cmd='', on_after=0, off_after=0, auto_on=0):
    if container == None:
        container = connect_db()
    timer_on_demand_data = {
        'id' : ITEM_ID,
        'partitionKey' : PARTITION_KEY,
        CMD : cmd,
		ON_AFTER.lower() : on_after,
		OFF_AFTER.lower() : off_after,
        AUTO_ON.lower() : auto_on
    }
    return container.create_item(body=timer_on_demand_data)
# ...
# Create UI (html source code) for client to control a device (Air Conditioner)
def body_html():
    title = '<h1>[IoT] AIR CONDITIONER REMOTE CONTROL BOARD</h1>'

    # Create CSS for button
    css = '<style>'\
        '.button {'\
        '  background-color: #008CBA;'\
        '  border: none;'\
        '  color: white;'\
        '  padding: 8px 2px;'\
        '  text-align: center;'\
        '  text-decoration: none;'\
        '  display: inline-block;'\
        '  margin: 4px 2px;'\
        '  cursor: pointer;'\
        '}'\
        '.button_size {font-size: 30px; width: 150px}'\
        '</style>'

    # Set content with CSS and Title
    content = css + title

    # An air conditioner control button list

    # POWER
    PWR_CMD_LIST = ["ON", "OFF"]
    content += render_cmd_btn("POWER", PWR_CMD_LIST)

    # TEMPERATURE
    TMP_CMD_LIST = ["20", "21", "22", "23", "24", "25", "26", "27", "28", "29", "30"]
    content += render_cmd_btn("TEMPERATURE", TMP_CMD_LIST)

    # TIMER
    TIMER_CMD_LIST = ["OFF_0.5H", "OFF_1H", "OFF_1.5H", "OFF_2H", "OFF_3H", "OFF_4H", "OFF_4.5H", "OFF_5H"]
    content += render_cmd_btn("TIMER", TIMER_CMD_LIST)

    # TIMER ON DEMAND
    MINUTES_LIST = [
        {"10":"10 minutes"}, {"30":"30 minutes"}, {"45":"45 minutes"}, {"60":"1 hour"}, {"90":"1.5 hours"},
        {"120":"2 hours"}, {"150":"2.5 hours"}, {"180":"3 hours"}, {"210":"3.5 hours"}, {"240":"4 hours"}, {"270":"4.5 hours"},
        {"300":"5 hours"}, {"330":"5.5 hours"}, {"360":"6 hours"}, {"390":"6.5 hours"}, {"420":"7 hours"}, {"450":"7.5 hours"},
        {"480":"8 hours"}
    ]
    # Switch ON after minutes or hours
    content += render_timer("TIMER ON DEMAND", MINUTES_LIST, is_on=True, selected_value=g_on_after_mins)
    # Switch OFF after minutes or hours
    content += render_timer("", MINUTES_LIST, is_on=False, selected_value=g_off_after_mins)

    # AUTO ON
    TEMP_LIST = [
        {"25":"25 degrees Celsius"}, {"26":"26 degrees Celsius"}, {"27":"27 degrees Celsius"}, {"28":"28 degrees Celsius"}, {"29":"29 degrees Celsius"},
        {"30":"30 degrees Celsius"}, {"31":"31 degrees Celsius"}, {"32":"32 degrees Celsius"}, {"33":"33 degrees Celsius"}
    ]
    content += render_auto_on("AUTO SWITCH ON", TEMP_LIST, selected_value=g_auto_on_temp)

    # RESET
    content += render_cmd_btn("", [RESET])

    return content

def main(req: func.HttpRequest) -> func.HttpResponse:
    logging.info('Python HTTP trigger function processed a request.')
    # ...
    if cmd == RESET:
        g_container = None
        g_on_after_mins = ""
        g_off_after_mins = ""
        g_auto_on_temp = ""
        init()
    else:
        g_on_after_mins = respone[ON_AFTER.lower()]
        g_off_after_mins = respone[OFF_AFTER.lower()]
        g_auto_on_temp = respone[AUTO_ON.lower()]

    content = body_html()

    # If there is a command is set, we will execute the command and update UI with the command is executed
    if cmd:
        text = f"<h3> Executed command: <strong>{cmd}</strong></h3>"
        content += f"<hr><p>{text}</p>"
        # Prepare data and send a C2D message
        props = {
            'device_key' : DEVICE_KEY,
            'after_mins' : after_mins,
            'auto_on_temp' : auto_on_temp
        }
        send_cmd(cmd, props)

    # Return the html page
    return func.HttpResponse(
        body=content,
        status_code=200,
        headers=None,
        mimetype='html'
    )
The requirements.txt file
- Add dependent libraries.
azure-functions
azure-iot-hub
azure-cosmos
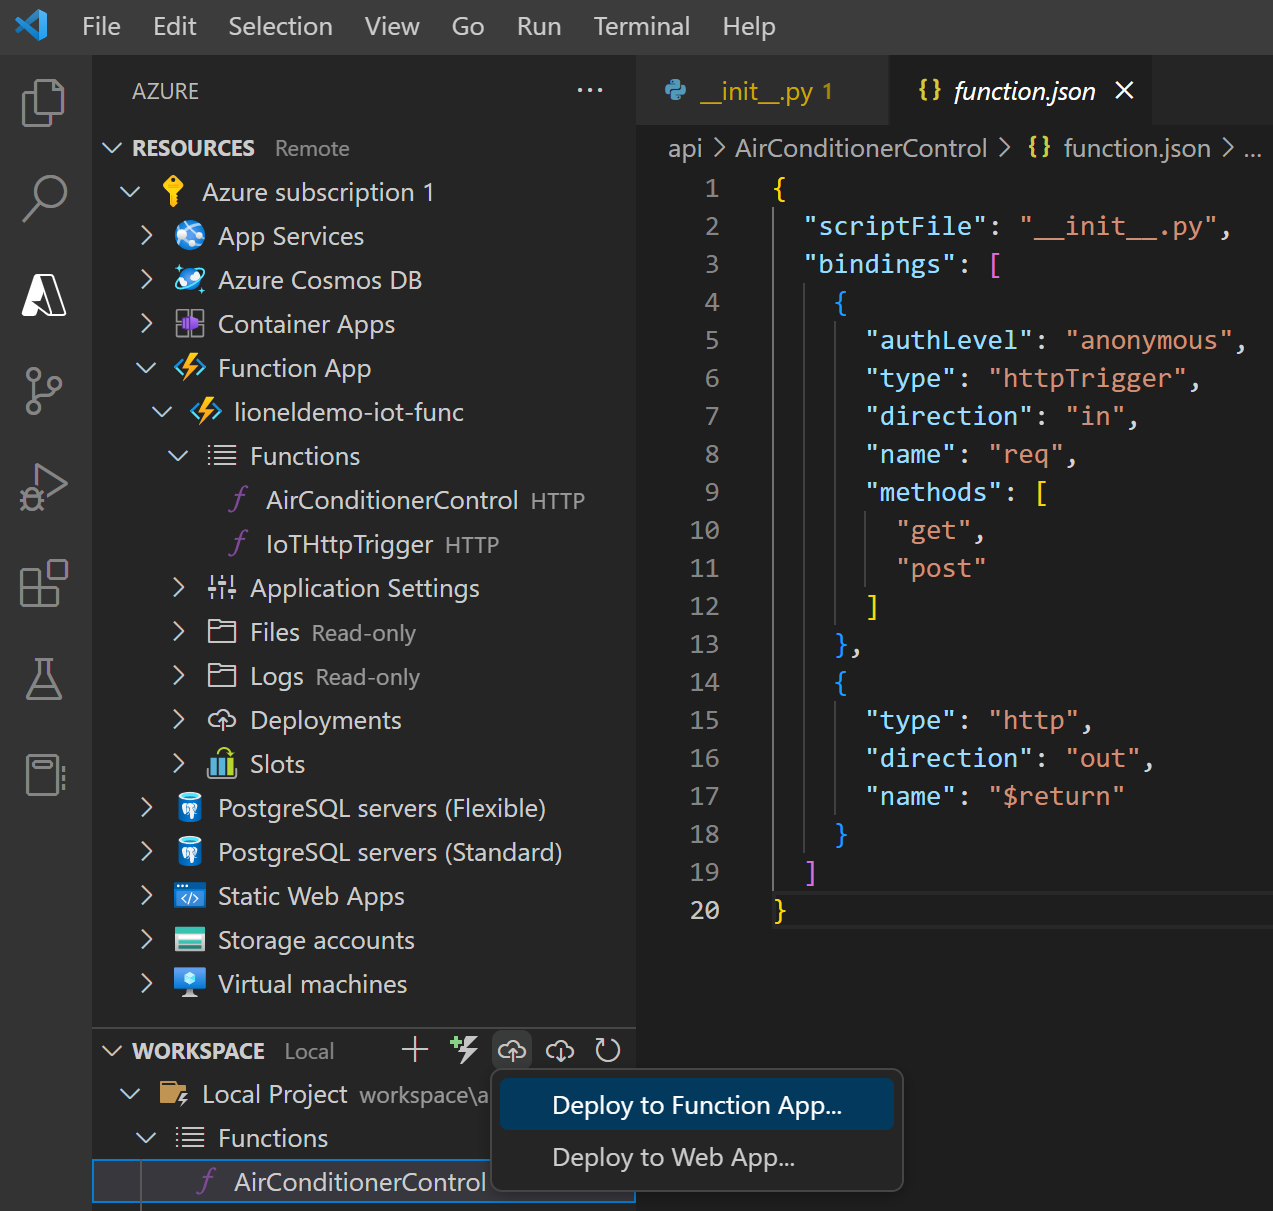
The function.json file
- Setting of the function app
{
  "scriptFile": "__init__.py",
  "bindings": [
    {
      "authLevel": "anonymous",
      "type": "httpTrigger",
      "direction": "in",
      "name": "req",
      "methods": [
        "get",
        "post"
      ]
    },
    {
      "type": "http",
      "direction": "out",
      "name": "$return"
    }
  ]
}
Now, we'll deploy the Azure function AirConditionerControl to Azure cloud, then we can control AC over the internet by using a browser on PC or Smartphone.
4.4.2. Raspberry Pi Side
We'll create some source code files in python to process receiving requests from Azure IoT Hub on Raspberry Pi and controlling AC.
Source code folder structure
~/iot/iotdemo
├── dht11.py
├── mydevice.py
├── myscheduler.py
└── receivec2d.py
The receivec2d.py file
- Receive requests from Azure IoT Hub (Cloud-To-Device - (C2D)).
In order to able to receive requested messages from Azure IoT Hub, firstly we need to install theazure-iot-devicelibrary on Raspberry Pi.
sudo pip3 install azure-iot-device
- Control AC via
mydevice.pyfile.
# receivec2d.py
# ...
def message_handler(message):
    device_key = message.custom_properties.get('device_key')
    after_mins = message.custom_properties.get('after_mins')
    auto_on_temp = message.custom_properties.get('auto_on_temp')
    cmd_str = message.data.decode('utf-8')
    if after_mins == "" or after_mins == None:
        after_mins = 0
    else:
        after_mins = int(after_mins)
    if auto_on_temp == "" or auto_on_temp == None:
        auto_on_temp = 0
    else:
        auto_on_temp = int(auto_on_temp)
    props = {
        'device_key' : device_key,
        'after_mins' : after_mins,
        'auto_on_temp' : auto_on_temp
    }
    print(f"Received command '{cmd_str}'")
    print(f"  Properties: {props}")
    mydevice.exe_cmd(cmd_str, props)

def main():
    print ("Starting the Python IoT Hub C2D Messaging device sample...")

    # Instantiate the client
    client = IoTHubDeviceClient.create_from_connection_string(CONNECTION_STRING)

    # print ("Waiting for C2D messages, press Ctrl-C to exit")
    try:
        # Attach the handler to the client
        client.on_message_received = message_handler
        while True:
            selection = input("Press Q to quit\n")
            if selection == "Q" or selection == "q":
                print("Quitting...")
                break
    except KeyboardInterrupt:
        print("IoT Hub C2D Messaging device sample stopped")
    finally:
        # Graceful exit
        print("Shutting down IoT Hub Client")
        mydevice.exe_cmd(RESET)
        client.shutdown()

if __name__ == '__main__':
main()- Execute the file by the following command:
python receivec2d.py
The mydevice.py file
- Control AC based on requested messages.
- Send IR signals to AC.
Beside that, the AC is also controlled bymyscheduler.pyanddht11.py.
# mydevice.py
# ...
def exe_cmd(cmd_str = "", props={}):
    device_key = props.get('device_key')
    after_mins = props.get('after_mins')
    auto_on_temp = props.get('auto_on_temp')

    if device_key == None or device_key == "":
        device_key = DEVICE_KEY1

    if cmd_str == None:
        return

    CMD_LIST = CMD_LIST1
    if (device_key == DEVICE_KEY2):
        CMD_LIST = CMD_LIST2

    cmd_str = cmd_str.upper()
    if cmd_str in CMD_LIST:
        irsend.send_once(device_key, [cmd_str])

    elif cmd_str == ON_AFTER:
        if after_mins <= 0 or after_mins == "" or after_mins == None:
            print(f"Cannot execute '{cmd_str}' because 'after_mins' = {after_mins} is an invalid value!")
            return
        myscheduler.exe_by_schedule("ON", device_key, after_mins)
    elif cmd_str == OFF_AFTER:
        if after_mins <= 0 or after_mins == "" or after_mins == None:
            print(f"Cannot execute '{cmd_str}' because 'after_mins' = {after_mins} is an invalid value!")
            return
        myscheduler.exe_by_schedule("OFF", device_key, after_mins)
    elif cmd_str == AUTO_ON:
        if auto_on_temp <= 0 or auto_on_temp == "" or auto_on_temp == None:
            print(f"Cannot execute '{cmd_str}' because 'auto_on_temp' = {auto_on_temp} is an invalid value!")
            return
        # Just Switch on AC about 0.5h then auto off.
        # FIXME: change another command if any!
        cmd = "OFF_0.5H"
        dht11.asycn_exe_cmd(cmd, device_key, auto_on_temp)
    elif cmd_str == RESET:
        myscheduler.exe_by_schedule(RESET, device_key, after_mins)
        dht11.asycn_exe_cmd(RESET, device_key, auto_on_temp)
    else:
        print(f"The command '{cmd_str}' not supported! ")
The myscheduler.py file
- Process scheduled tasks.
- Switch on or switch off AC according to the schedule established in the request sent from Azure IoT Hub.
# myscheduler.py
# ...
def exe_cmd(cmd_str = "", device_key = "", after_mins=0):
    print(f"The command '{cmd_str}' will be executed on device '{device_key}' after {after_mins} minutes")
    # time.sleep(after_mins * 60) # 1 minute = 60 seconds
    time.sleep(after_mins)  # FIXME: This line of code just for testing. In reality, the previous line of code should be used!
    print(f"The command '{cmd_str}' was executed")
    irsend.send_once(device_key, [cmd_str])

def exe_by_schedule(cmd_str="", device_key="", after_mins=0):
    global p, p2
    try: p
    except NameError: p = None
    try: p2
    except NameError: p2 = None

    if cmd_str == RESET:
        if p != None and p.is_alive() == True:
            print("The previous command was cancelled!")
            # Kill the current process
            p.terminate()
            time.sleep(0.1)
            p.exitcode == -signal.SIGTERM
            p = None

        if p2 != None and p2.is_alive() == True:
            print("The previous command was cancelled!")
            # Kill the current process
            p2.terminate()
            time.sleep(0.1)
            p2.exitcode == -signal.SIGTERM
            p2 = None

        print(f"The command {cmd_str} was executed")
        return None

    if cmd_str == ON:
        if p == None:
            print(f"The command {cmd_str} is put into the schedule")
            p = multiprocessing.Process(target=exe_cmd, args=(cmd_str,device_key,after_mins))
            p.start()
            return p
        elif p.is_alive() == True:
            print("The previous command was cancelled!")
            # Kill the current process
            p.terminate()
            time.sleep(0.1)
            p.exitcode == -signal.SIGTERM
            p = None
        else:
            p = None

        # Create new process
        print(f"The command '{cmd_str}' is put into the schedule")
        p = multiprocessing.Process(target=exe_cmd, args=(cmd_str,device_key,after_mins))
        p.start()
        return p

    elif cmd_str == OFF:
        if p2 == None:
            if cmd_str == RESET:
                print(f"The command {cmd_str} was executed")
                return None
            print(f"The command {cmd_str} is put into the schedule")
            p2 = multiprocessing.Process(target=exe_cmd, args=(cmd_str,device_key,after_mins))
            p2.start()
            return p2
        elif p2.is_alive() == True:
            print("The previous command was cancelled!")
            # Kill the current process
            p2.terminate()
            time.sleep(0.1)
            p2.exitcode == -signal.SIGTERM
            p2 = None
        else:
            p2 = None

        # Create new process
        print(f"The command '{cmd_str}' is put into the schedule")
        p2 = multiprocessing.Process(target=exe_cmd, args=(cmd_str,device_key,after_mins))
        p2.start()
        return p2

    return None
The dht11.py file
- Detect the current temperature in your room.
- Auto switch on AC when your room temperature is equal or higher than the temperature established in the request sent from Azure IoT Hub.
# dht11.py
# ...
# Auto detect temperature and switch on the AC if the current temperature is equal or higher than the setting temperature.
def exe_cmd(cmd_str = "OFF_0.5H", device_key = "", auto_on_temp = ""):
    try:
        while True and is_stop == False:
            result = read_dht11_dat()
            if result:
                humidity, temperature = result
                print("humidity: %s %%,  Temperature: %s C" % (humidity, temperature))
                if temperature <= 0:
                    return # Do nothing!
                if temperature >= auto_on_temp:
                    irsend.send_once(device_key, [cmd_str])
                    print(f"Turned on AC when temperature is over {auto_on_temp} C! Sleep 30 mins!")
                    time.sleep(60*30) # sleep 30 mins
            time.sleep(2)
    except KeyboardInterrupt:
        destroy()

def asycn_exe_cmd(cmd_str="OFF_0.5H", device_key="myaircon", auto_on_temp=0):
    global p, is_stop
    try: p
    except NameError: p = None

    try: is_stop
    except NameError: is_stop = None

    if p == None:
        if cmd_str == RESET:
            print(f"The command {cmd_str} was executed")
            return None
        print(f"The command '{cmd_str}' is executed in a new process")
        print(f"--- Params: {device_key}, {auto_on_temp}")
        is_stop = False
        p = multiprocessing.Process(target=exe_cmd, args=(cmd_str,device_key,auto_on_temp))
        p.start()
        return p
    elif p.is_alive() == True:
        is_stop = True
        time.sleep(0.1)
        print("The previous command was cancelled!")
        # Kill the current process
        p.terminate()
        time.sleep(0.1)
        p.exitcode == -signal.SIGTERM
        p = None
    else:
        is_stop = True
        p = None

    if cmd_str == RESET:
        print(f"The command {cmd_str} was executed")
        return None

    # Create new process
    print(f"The command '{cmd_str}' is executed in a new process")
    print(f"--- Params: {device_key}, {auto_on_temp}")
    is_stop = False
    p = multiprocessing.Process(target=exe_cmd, args=(cmd_str,device_key,auto_on_temp))
    p.start()
    return p
Demonstration Video
![[IoT] AIR CONDITIONER REMOTE CONTROL BOARD](https://blog.shiftasia.com/content/images/2023/01/04-04-10.PNG)
5. Summary
With the use of Azure IoT services, you can implement IoT applications more easily, quickly, and conveniently.
The demonstration above is just a very small application to help beginners understand the basic way to control an IoT device by using Azure IoT services. You can completely extend the application by combining many different utility services to improve your own IoT solution.